A Slinky looks like the simplest toy in the room: a coiled spring with no batteries, no screen, no tiny app asking for your location, and no instruction manual thick enough to qualify as a novella. Yet somehow, this humble spiral can walk down stairs, bounce between your hands, make waves, produce sci-fi sound effects, and briefly look like it has negotiated a private deal with gravity.
Learning how to do cool tricks with a Slinky is part toy play, part physics lesson, and part comedy routine when your first attempt collapses into a tangled metal pancake. The good news is that most Slinky tricks are easier once you understand what the toy wants to do. A Slinky stores energy when stretched, transfers motion through its coils, and uses gravity and momentum to create that famous “walking” movement. Once you stop fighting the spring and start guiding it, the tricks become smoother, cleaner, and much more fun.
This guide walks you through beginner, intermediate, and show-off-level Slinky tricks using practical steps, safety tips, and specific examples. Whether you have a classic metal Slinky, a colorful plastic Slinky, or a slightly mysterious spring you found in a drawer, you can turn it into a tiny performance tool with a little patience and a flat surface that is not your family’s antique dining table.
Why a Slinky Can Do Tricks in the First Place
Before the tricks begin, it helps to know why a Slinky behaves so strangely. A Slinky is a pre-compressed helical spring. That means its coils are already pressing together when the toy is at rest. When you stretch it, lift it, twist it, or let it drop, energy moves through the coils in visible waves. This is why a Slinky is often used in classrooms to demonstrate longitudinal waves, transverse waves, compression, tension, momentum, and gravity.
The classic stair trick works because the top of the Slinky falls forward and downward first. As the top section stretches, it pulls the rest of the coil along. Then the spring reforms on the next step and repeats the motion. It is not technically alive, although after a perfect staircase run, you may be tempted to name it Kevin and give it a tiny trophy.
Metal Slinkys are usually better for classic walking tricks because they have more weight and a sharper spring response. Plastic Slinkys are often brighter, safer around younger kids, and great for hand tricks, waves, and visual effects. Both can be fun, but they feel different. If your trick is failing, the problem may not be your talent; it may be the surface, the angle, or the type of Slinky you are using.
Choose the Right Slinky and Practice Area
Metal vs. Plastic Slinky
A metal Slinky is the traditional choice for walking down stairs, bouncing between hands, and making crisp spring sounds. It responds quickly and has enough weight to carry momentum from coil to coil. However, it can bend if handled roughly, and once a metal Slinky becomes badly kinked, it may start behaving like a philosophical question instead of a toy.
A plastic Slinky is better for younger players, colorful visual tricks, and low-stress practice. It is less likely to pinch fingers and often easier to see on camera. The trade-off is that it may not walk down stairs as smoothly as a metal one, especially if the stairs are too deep, too shallow, or covered with carpet.
Best Places to Practice
Use clean, flat, open areas. For stair tricks, smooth wooden or hard-surface steps usually work better than thick carpet. For hand tricks, stand over a bed, rug, or couch at first so the Slinky does not crash onto a hard floor every time it escapes. And yes, it will escape. A Slinky has the survival instincts of a squirrel near a bird feeder.
Trick 1: The Classic Stair Walk
The stair walk is the signature Slinky trick. It is the reason millions of people have stood at the top of a staircase whispering, “Please work this time,” like they are launching a space mission.
How to Do It
- Choose stairs with even spacing and a smooth surface.
- Hold the Slinky upright at the edge of the top step.
- Place the bottom coils flat on the step.
- Gently tip the top of the Slinky forward toward the next step.
- Let go only after the top coils begin to fall naturally.
- Watch the Slinky stretch, flip, reform, and continue downward.
Common Problems and Fixes
If the Slinky stops after one step, try moving it closer to the edge. If it launches too aggressively and collapses, use a softer push. If it falls sideways, make sure the first coil is square with the stair edge. Small adjustments matter. A Slinky is not stubborn, exactly, but it does have strong opinions about geometry.
The ideal stair height depends on the size and springiness of your Slinky. Some stairs are simply not Slinky-friendly. In that case, try using a stack of books, a slanted board, or a homemade ramp to create a gentler walking path.
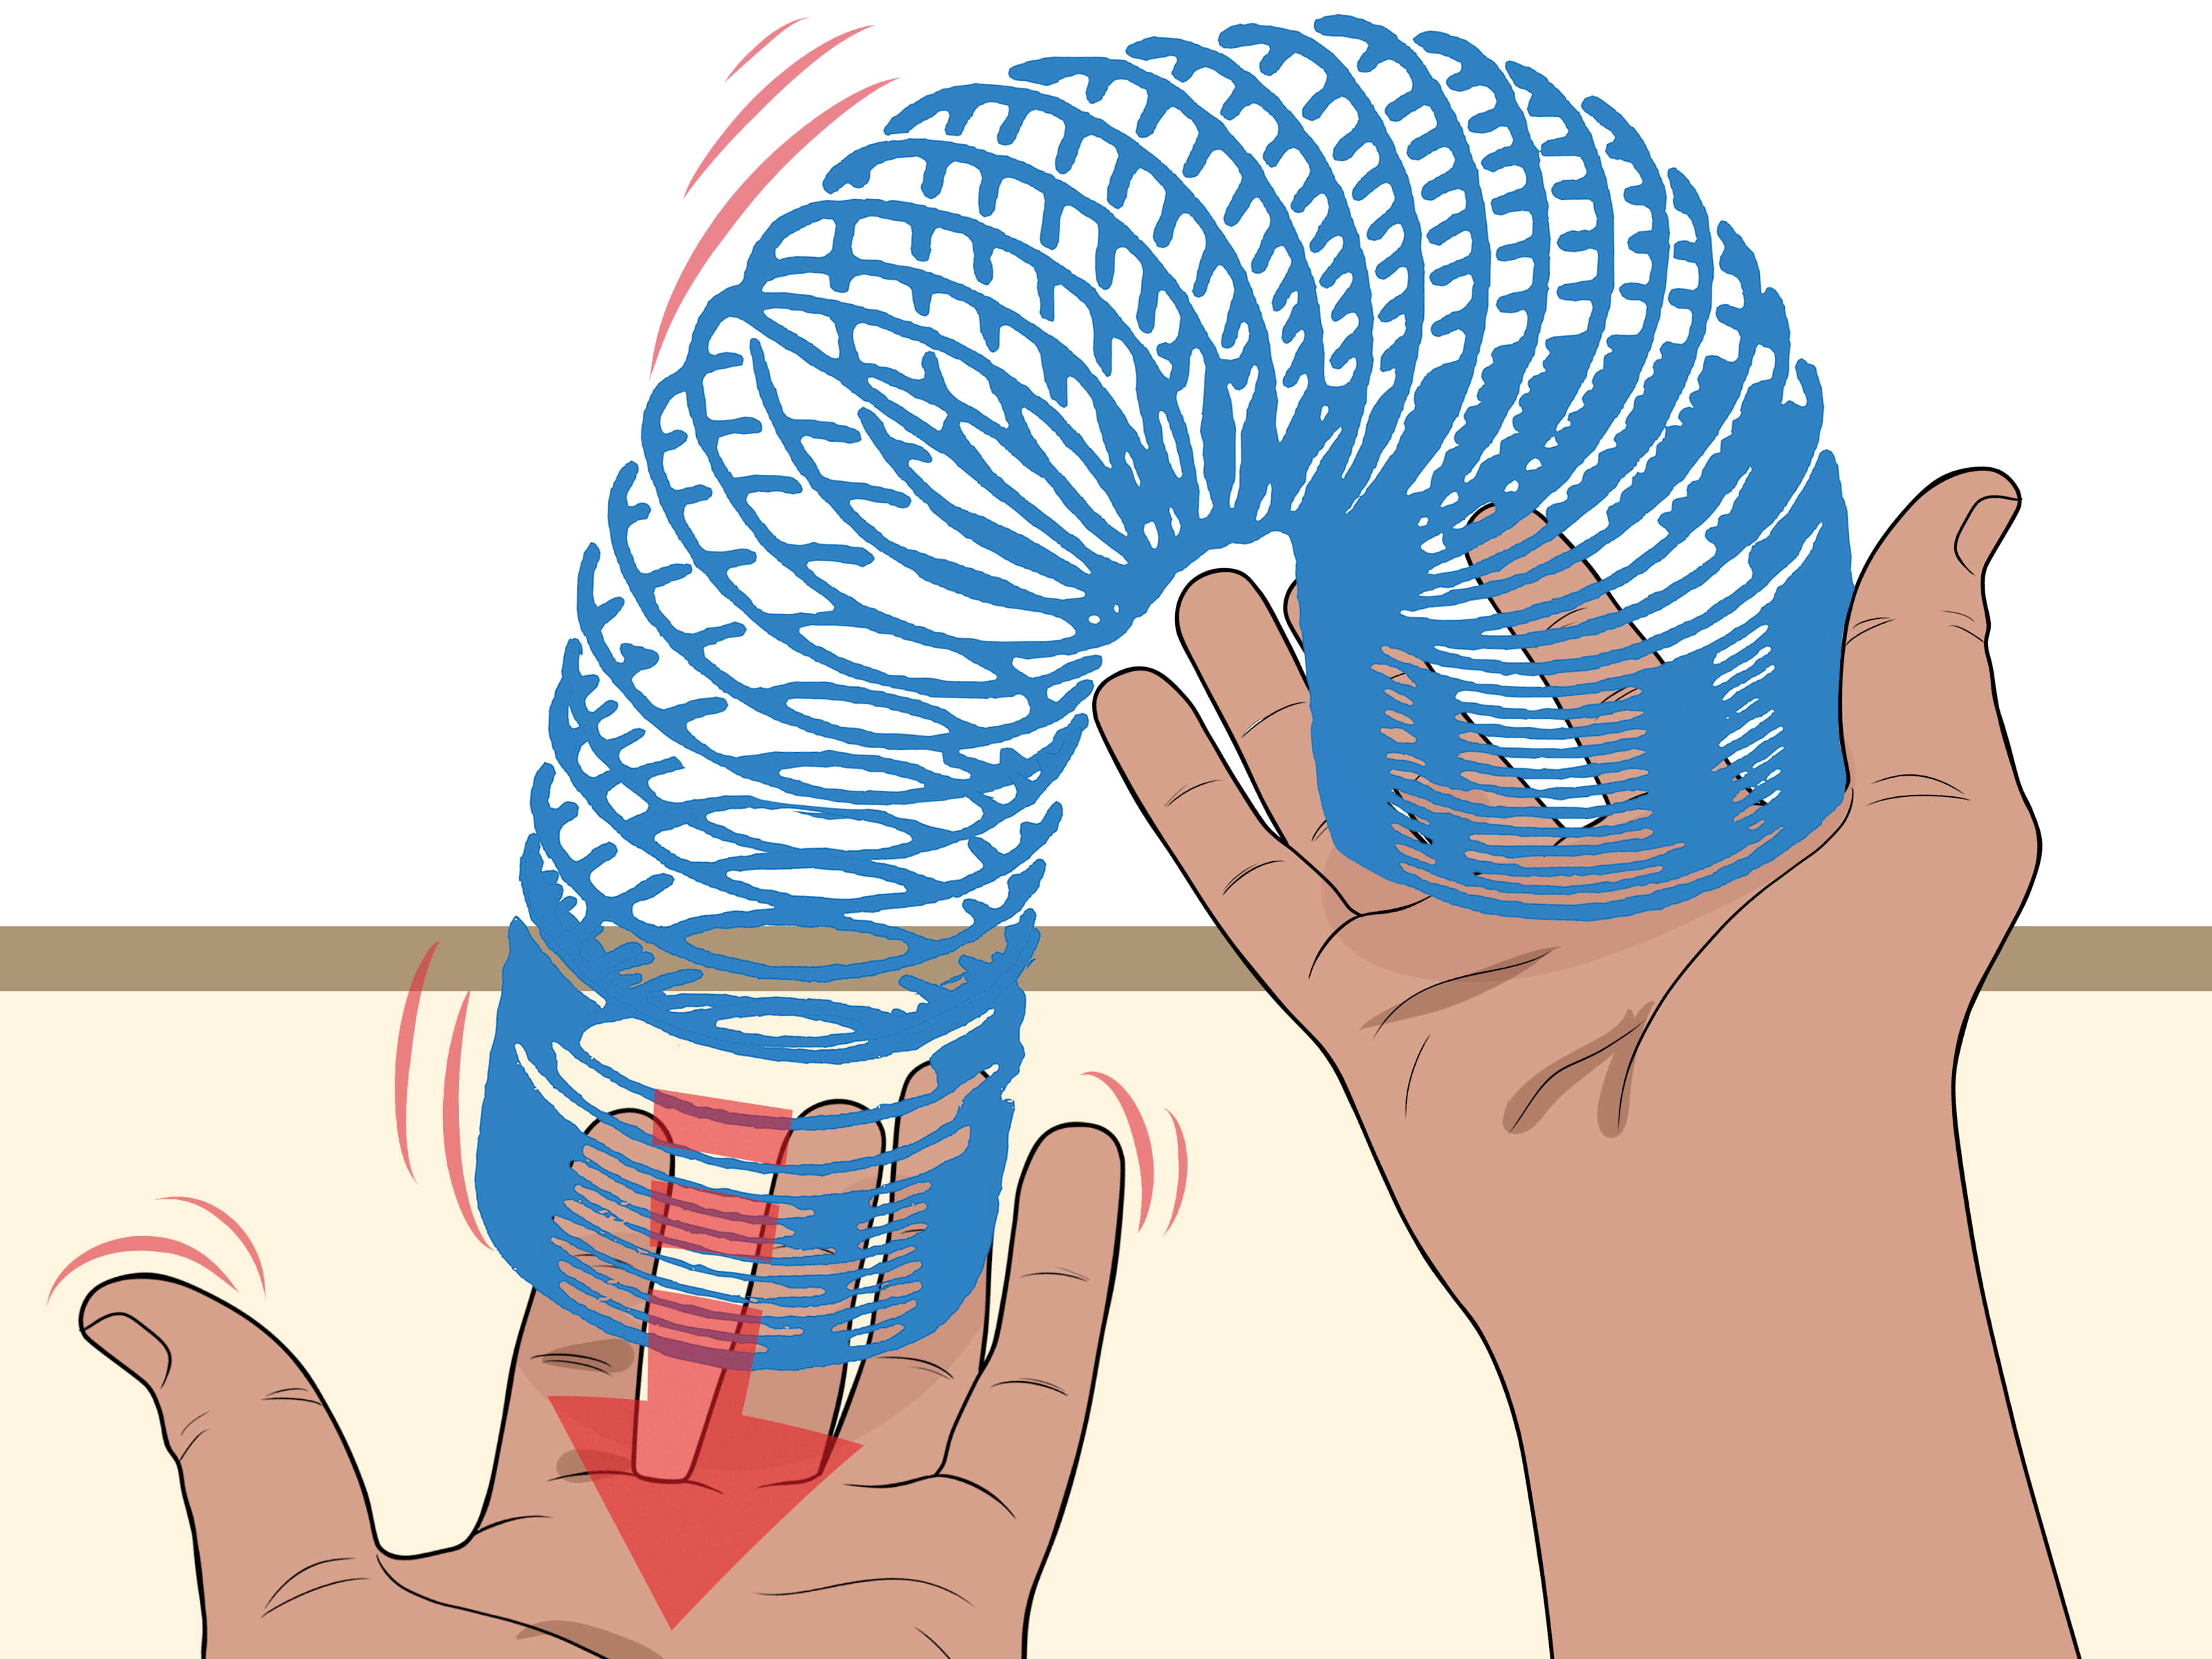
Trick 2: The Hand-to-Hand Slinky Flow
This trick looks smooth and satisfying when done well. The Slinky appears to pour from one hand to the other like a springy waterfall.
How to Do It
- Hold one end of the Slinky in your right hand and the other end in your left hand.
- Raise one hand slightly higher than the other.
- Let the upper hand release a few coils into the lower hand.
- As the coils arrive, lift the lower hand and lower the upper hand.
- Repeat the motion slowly until the Slinky transfers back and forth.
The secret is rhythm. Do not squeeze the coils too tightly. Your hands should guide the spring, not arrest it for loitering. Start slowly and focus on catching the weight of the coils as they drop. Once the motion feels natural, increase speed until the Slinky flows continuously.
Trick 3: The Slinky Waterfall
The waterfall is a more dramatic version of the hand-to-hand flow. Instead of short transfers, the Slinky drops in a long vertical stream from one hand to the other. It looks impressive, especially with a rainbow plastic Slinky.
How to Do It
- Hold the Slinky vertically with one hand at the top and the other hand below it.
- Let the bottom portion hang freely without touching the floor.
- Release the top coils gradually so they fall into your lower hand.
- As the lower hand fills, lift it and switch roles between hands.
- Keep the motion continuous, like pouring water from one cup to another.
For beginners, the most common mistake is dropping too much of the Slinky at once. Release a small section first. Once you can control the fall, you can make the waterfall taller and faster.
Trick 4: The Slinky Bounce
The Slinky bounce is simple, but it teaches timing. Hold the Slinky vertically, compress it slightly, and let it bounce between your hands without fully collapsing.
How to Do It
- Hold the Slinky with one hand at each end.
- Stretch it gently to about twice its resting length.
- Move your hands toward each other, then apart again.
- Let the spring compress and expand in a steady rhythm.
- Try to keep the center of the Slinky aligned instead of wobbling sideways.
This trick is useful because it builds hand control. When you can feel the spring’s natural timing, harder tricks become easier. Think of it as learning to dance with a partner who has no bones but plenty of enthusiasm.
Trick 5: The Floating Drop Illusion
This is one of the coolest Slinky science tricks. When you hold a stretched Slinky vertically and drop it, the bottom seems to hang in the air for a split second before falling. It looks like the lower end forgot gravity was a thing.
How to Do It Safely
- Use a metal or sturdy plastic Slinky.
- Hold it high enough so it can stretch vertically without touching the floor.
- Let the coils settle until the Slinky is still.
- Release the top end cleanly without pushing downward.
- Watch the bottom end carefully as the top collapses toward it.
The illusion happens because the bottom of the Slinky is being pulled upward by tension before release. When the top is dropped, the information that the support is gone travels downward through the spring. Until that compression wave reaches the bottom, the lower coils briefly remain almost in place. It is a tiny physics magic trick, except the magician is a spring and the rabbit is Newton.
Trick 6: Make Slinky Waves
A Slinky is one of the easiest tools for seeing waves in action. This trick works best with two people, but you can also anchor one end to a chair leg or heavy object.
Transverse Waves
Stretch the Slinky along the floor between two people. One person quickly moves their end left and right. The wave travels along the Slinky while the coils move side to side. This is called a transverse wave because the motion of the coils is perpendicular to the direction the wave travels.
Longitudinal Waves
Now push and pull one end of the Slinky forward and backward. You will see bunches of coils compress and spread out as the wave moves down the spring. This is a longitudinal wave because the coils move in the same direction as the wave travels.
To make it cooler, place small paper flags or tape markers on a few coils. You will see that the coils themselves do not travel all the way across the room; the energy does. Congratulations, you have just turned your living room into a physics lab, minus the mysterious goggles.
Trick 7: The Slinky Sound Effect
A metal Slinky can make a fantastic laser-blaster sound. This is a favorite trick for kids, science demonstrations, and anyone who believes every household object should have a secret spaceship mode.
How to Do It
- Hold one end of a metal Slinky near your ear, but not directly against it.
- Let the rest of the Slinky hang freely.
- Tap or flick the lower coils gently.
- Listen as the sound vibrates through the spring.
For a louder effect, place one end of the Slinky against a paper cup or plastic cup. The cup acts as a simple resonator, making the sound bigger and funnier. Try tapping different parts of the spring to hear changes in pitch and tone.
Trick 8: The Tabletop Crawl
If you do not have stairs, try the tabletop crawl. This trick uses a flat surface and a gentle tilt to make the Slinky move forward in small flips.
How to Do It
- Place a large book, cutting board, or smooth tray on a slight incline.
- Set the Slinky upright near the top.
- Tip the top coil forward and let gravity take over.
- Adjust the angle until the Slinky walks instead of sliding.
If the incline is too steep, the Slinky will tumble. If it is too shallow, it will refuse to move and stare at you in spring language. Adjust the slope a little at a time until the walking motion appears.
Trick 9: The Slinky Flip Catch
This trick adds flair to hand play. You flip the Slinky from one hand to the other, catching it as it opens and closes.
How to Do It
- Hold the Slinky compressed in one hand.
- Use your wrist to flip the top section toward your other hand.
- Catch the leading coils with your free hand.
- Allow the remaining coils to follow naturally.
- Repeat in the opposite direction.
Keep your movements smooth. A hard throw usually creates chaos. A gentle flip lets the spring unfold in the air and land neatly. Practice over a soft surface until your catch is reliable.
Trick 10: The Double Slinky Wave
If you have two Slinkys, connect or hold them side by side and create matching waves. This can be done with two people or solo if the ends are anchored.
How to Do It
- Stretch both Slinkys parallel to each other.
- Move both ends up and down at the same time.
- Try making one wave slow and one wave fast.
- Compare how the coils compress, stretch, and reflect back.
This trick is visually interesting and educational. You can experiment with wave size, speed, and reflection. It is also a sneaky way to teach science without anyone realizing they are learning. Very devious. Very noble.
How to Keep Your Slinky From Tangling
A tangled Slinky is one of life’s small tragedies. To avoid it, never overstretch the spring. Do not twist it sharply, pull it across rough surfaces, or stuff it into a backpack with keys, pencils, and the emotional weight of last week’s math homework.
Store your Slinky in a round container or keep it compressed neatly on a shelf. If it starts to twist, gently rotate the coils back into alignment instead of yanking. For metal Slinkys, avoid bending individual coils. For plastic Slinkys, avoid heat, because warped plastic will not move evenly.
Tips for Making Slinky Tricks Look Better on Camera
Slinky tricks are surprisingly good for short videos. Use a plain background so the coils stand out. Bright plastic Slinkys look great against dark surfaces, while metal Slinkys show up well against lighter backgrounds. Shoot stair tricks from the side so viewers can see the full walking motion.
For hand tricks, keep your hands inside the frame and move slowly at first. A Slinky moves fast once it gets going, and the camera may blur the coils. Good lighting helps. So does practicing once or twice before recording, unless your goal is to capture the authentic documentary experience of a spring attacking your wrist.
Safety Notes Before You Become a Slinky Legend
Do not place a metal Slinky near electrical outlets, plugs, or exposed wires. Do not wrap a Slinky around the neck, fingers, pets, or furniture legs that cannot defend themselves. Younger children should use Slinkys with adult supervision, especially metal ones. Also, avoid flinging a Slinky at people. It is a toy, not a medieval siege device.
If you are practicing stair tricks, keep the staircase clear. Nobody wants to discover a rolling spring halfway down the stairs while carrying laundry. That is not a trick; that is a household incident report.
Real Practice Experience: What Learning Slinky Tricks Actually Feels Like
The first thing you learn when practicing Slinky tricks is that the toy has a personality. Not a full personality, of course, but enough attitude to make you question your leadership skills. You set it at the top of the stairs with confidence, give it a gentle nudge, and it immediately falls over like a tired accordion. Then, on the fifth or sixth attempt, it suddenly walks down three steps perfectly, and you feel like you have unlocked an ancient secret.
In real practice, the stair walk is the best place to start because it teaches you how sensitive the Slinky is to placement. Moving it half an inch closer to the step edge can change everything. A push that feels tiny to you may be too strong for the spring. The trick is to stop “throwing” the Slinky down the stairs and start “inviting” it to move. That sounds dramatic, but it is true. The best stair runs begin with a calm tip, not a shove.
Hand tricks feel different. At first, the Slinky seems too loose, too fast, or too eager to collapse into your palms. The hand-to-hand flow becomes easier when you stop looking at every coil and focus on the overall rhythm. Your hands should move like an elevator: one rises as the other lowers. Once that timing clicks, the spring begins to pour smoothly from side to side. It is relaxing in the same way juggling can be relaxing after you stop dropping everything every four seconds.
The waterfall trick is especially satisfying because it looks harder than it is. The key experience is learning restraint. Beginners release too much Slinky too quickly, causing the whole thing to drop in a dramatic coil avalanche. Better results come from letting a small section fall first, catching it softly, and then continuing the motion. When done well, the Slinky looks like a shiny ribbon of gravity.
The sound trick is the surprise crowd-pleaser. Many people expect the Slinky to walk, but they do not expect it to sound like an old-school science fiction laser. Adding a cup makes the effect even better. It is a great reminder that the Slinky is not just a toy; it is a simple spring, wave machine, musical oddball, and physics demonstration all rolled into one.
After spending time with Slinky tricks, you also learn that failure is part of the fun. A failed trick is rarely boring. The Slinky flops, hops, twitches, twists, or makes a noise that sounds like a robot sneezing into a coffee can. Each mistake tells you something: the angle is wrong, the push is too strong, the surface is too soft, or your hands are moving against the spring instead of with it. Practice becomes a loop of test, laugh, adjust, and try again.
The best experience comes when you combine tricks. Start with a stair walk, catch the Slinky at the bottom, move into a hand-to-hand flow, then finish with a sound effect. It is simple, playful, and surprisingly impressive. You do not need expensive gear or special talent. You need a decent Slinky, a little space, and the patience to let a spring teach you timing.
Conclusion
Learning how to do cool tricks with a Slinky is a perfect mix of play, science, and old-fashioned “watch this!” energy. Start with the classic stair walk, then build your control with hand-to-hand flows, waterfalls, waves, sound effects, tabletop crawls, and flip catches. The more you practice, the more you will understand how gravity, momentum, tension, and timing work together inside those simple coils.
The biggest secret is not strength or speed. It is control. A Slinky performs best when you guide its natural motion instead of forcing it. Give it the right angle, the right rhythm, and enough room to move, and this classic spring toy can still steal the show. Not bad for something that looks like it escaped from a hardware drawer.
Note: This article is written as original, publish-ready web content based on established information from reputable toy history, science education, physics demonstration, and manufacturer-related sources.