Pear trees are generous, elegant, and occasionally dramatic. Leave one alone for too long and it may shoot straight upward like it is auditioning to become a telephone pole. Prune too hard, and it may respond with a fluffy explosion of leafy growth instead of the juicy pears you were hoping for. The secret is balance: enough pruning to guide the tree, open the canopy, and remove problem branches, but not so much that the tree panics and grows like it just drank three espressos.
Learning how to prune a pear tree is one of the most useful skills for any home orchard grower. Good pruning improves sunlight penetration, airflow, tree structure, fruit quality, and harvest access. It also helps reduce disease pressure, especially in areas where fire blight is a concern. Whether you have a young pear tree that needs training or an older tree that looks like a bird committee designed it, these 12 steps will help you prune with confidence.
The best approach is simple: prune in the right season, use sharp clean tools, respect the tree’s natural form, and make thoughtful cuts. Pear trees usually perform best when trained to a central leader, which means one main upright trunk with well-spaced side branches. Think of it as a Christmas tree shape, except the gifts are fruit and the ornaments are not plastic snowmen.
Why Pruning a Pear Tree Matters
Pear tree pruning is not just cosmetic. It affects how the tree grows, how much fruit it produces, and how healthy it stays over time. A crowded canopy traps moisture, blocks sunlight, and makes it easier for pests and diseases to move in like they signed a lease. A well-pruned pear tree, on the other hand, has open space between branches, strong scaffold limbs, and fruiting wood that gets enough light to do its job.
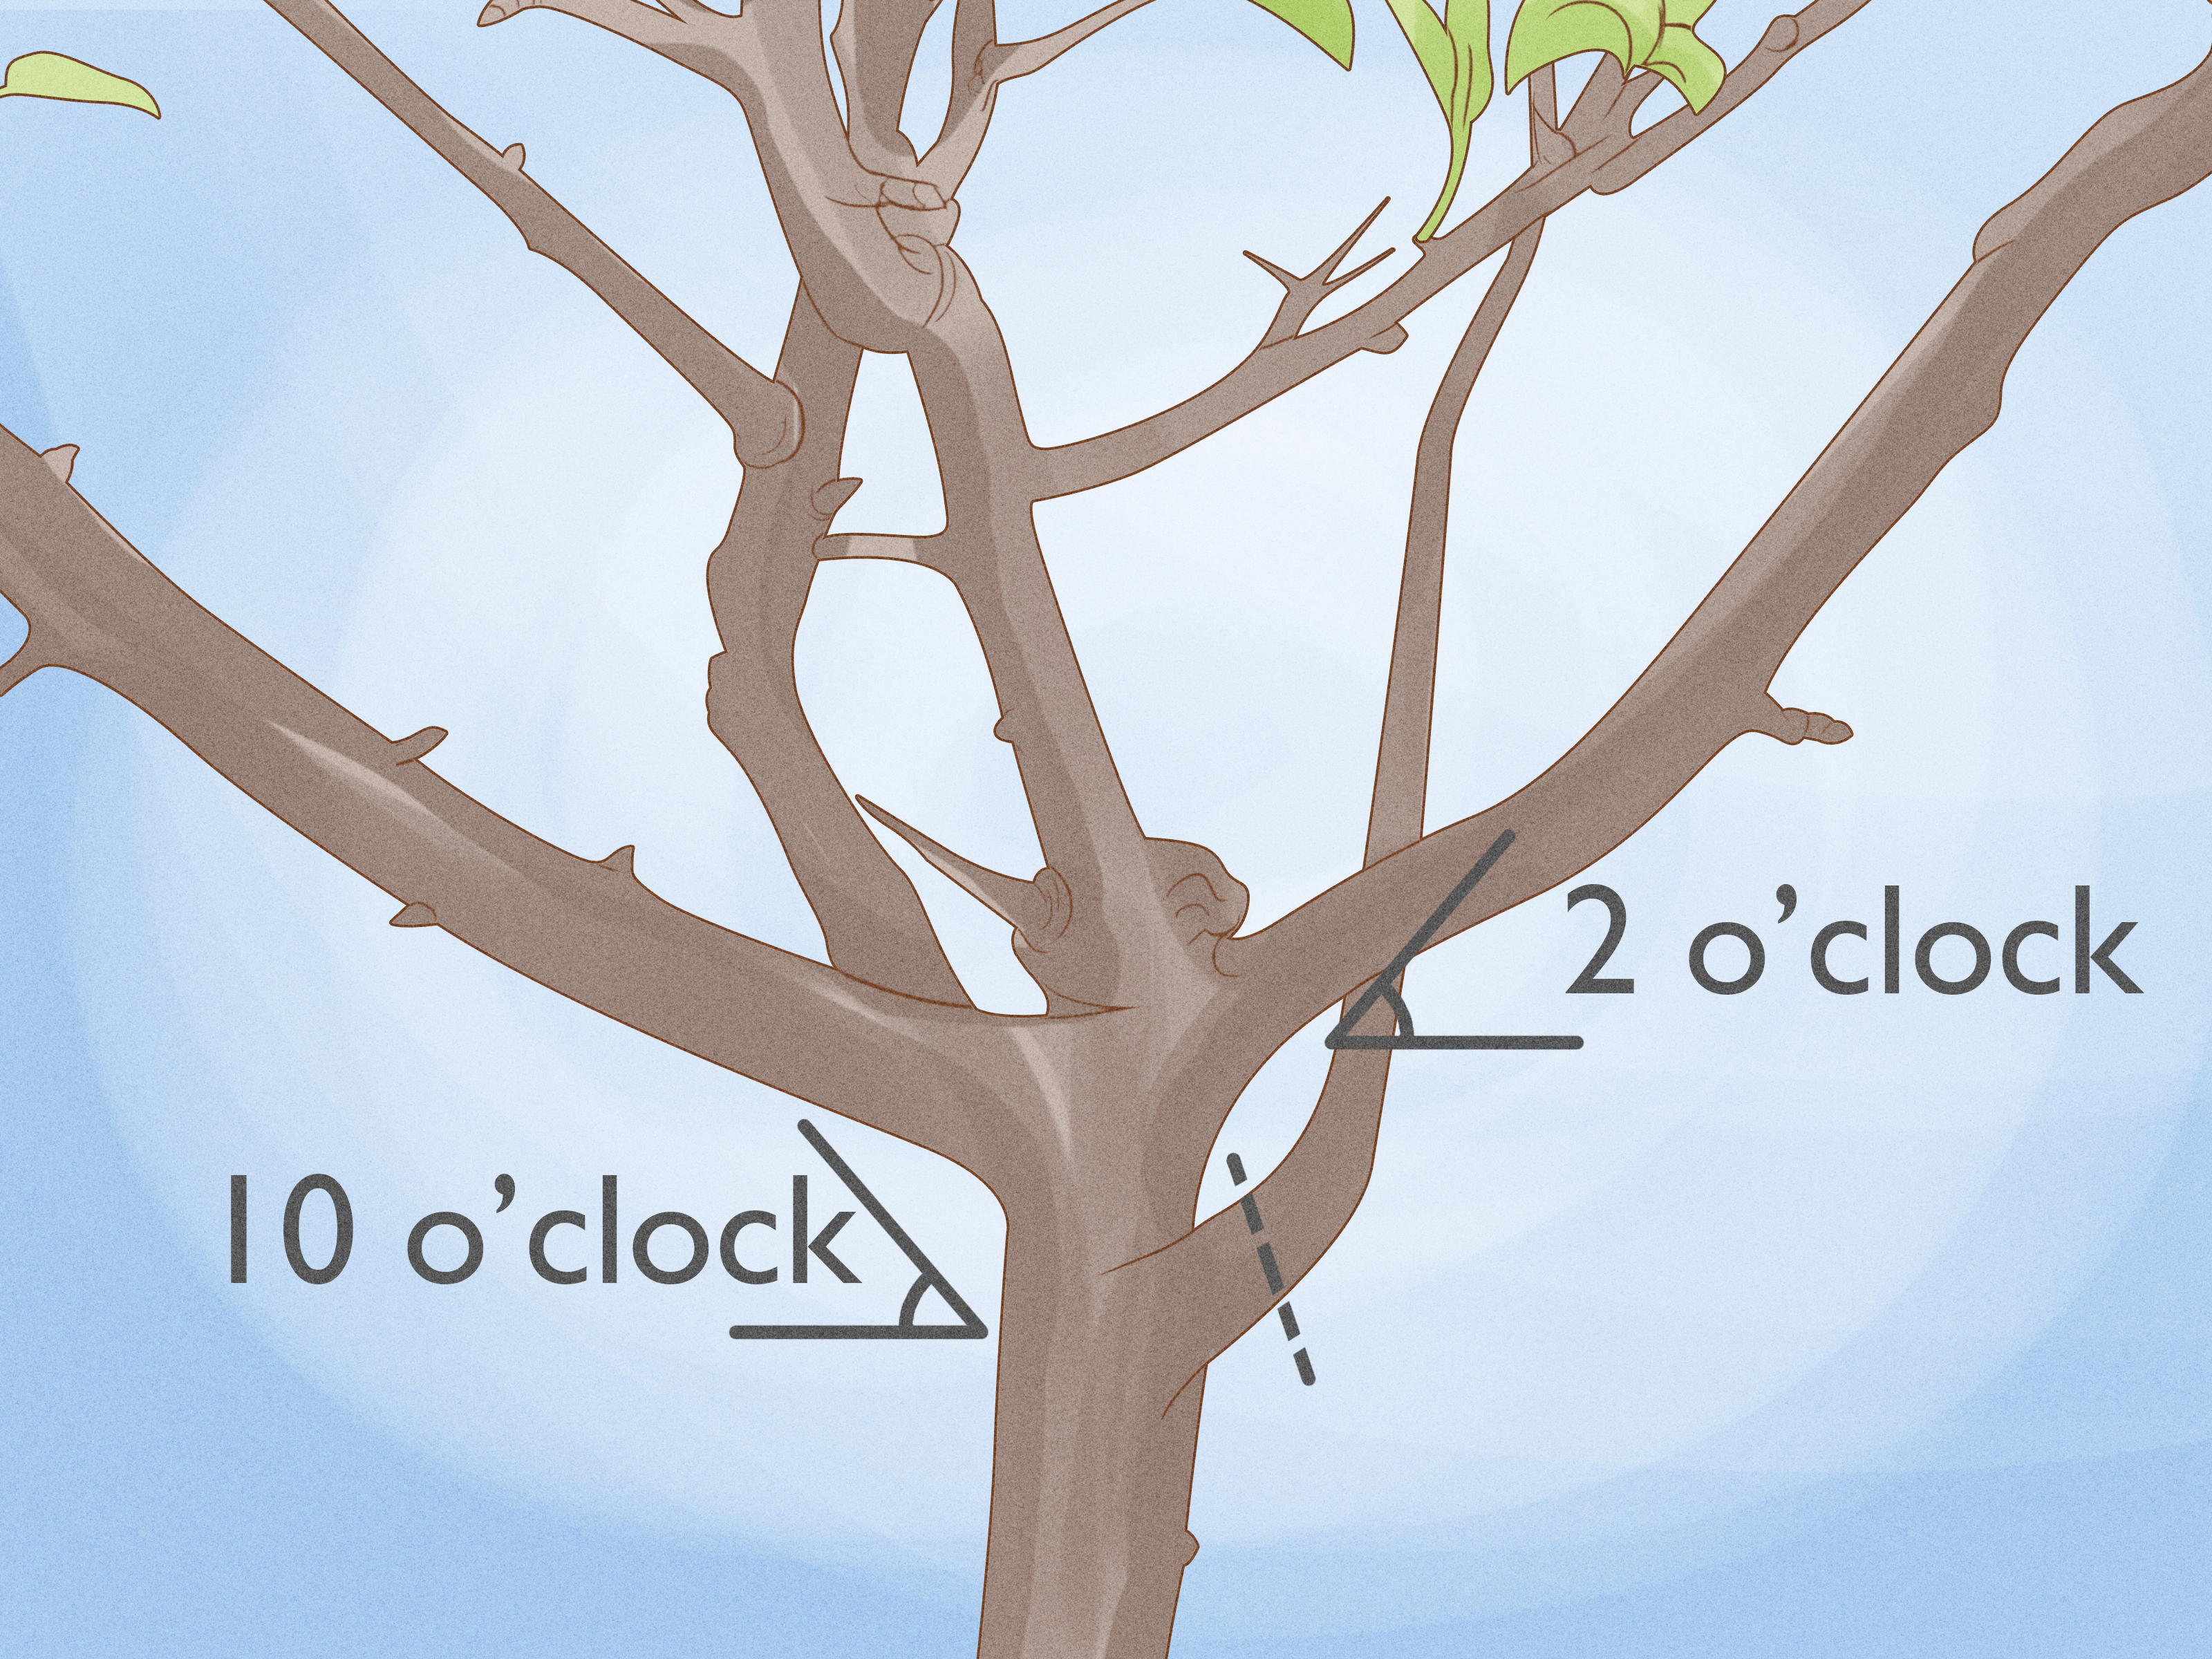
Pruning also prevents structural problems. Pear branches naturally tend to grow upright when young. Without guidance, they can develop narrow branch angles that are weaker under the weight of fruit. By selecting strong scaffold branches early and removing competing growth, you help the tree build a sturdy framework that can support crops for years.
How to Prune a Pear Tree: 12 Steps
1. Prune at the Right Time
The best time to prune most pear trees is late winter to early spring, after the coldest weather has passed but before new growth begins. At this stage, the tree is still dormant, the leaves are gone, and you can clearly see the branch structure. It is much easier to spot crossed limbs, upright water sprouts, and dead wood when the tree is not wearing its full leafy disguise.
Avoid heavy pruning in fall because it may encourage tender growth or leave wounds exposed going into winter. Summer pruning can be useful, but keep it light. It is best reserved for removing small water sprouts, suckers, or overly vigorous shoots that are shading fruit. Major shaping belongs in the dormant season.
2. Gather the Right Tools
You do not need a professional orchard trailer full of equipment to prune a pear tree. For most home trees, a few good tools are enough: bypass hand pruners for small twigs, loppers for medium branches, and a pruning saw for larger limbs. A sturdy ladder may be needed for taller trees, though pruning should ideally keep the tree low enough for safer maintenance and harvesting.
Make sure your tools are sharp. Dull blades crush wood instead of cutting cleanly, and crushed wood heals poorly. Clean tools also matter, especially if the tree shows signs of disease. When removing diseased branches, disinfect blades between cuts with an appropriate sanitizer to reduce the chance of spreading pathogens from one branch to another.
3. Step Back and Study the Tree First
Before making the first cut, walk around the tree and look at it from every side. This step may feel suspiciously like doing nothing, but it is actually one of the most important parts of pruning. Identify the central leader, main scaffold branches, crowded areas, dead limbs, and shoots growing in strange directions.
Imagine the final shape before you begin. For most pear trees, the goal is a narrow pyramidal form: one central leader, lower scaffold branches that are longer, and upper branches that are shorter. This allows sunlight to reach the lower canopy instead of turning the top of the tree into a leafy umbrella that shades everything below.
4. Remove Dead, Diseased, and Broken Wood First
Start with the obvious troublemakers. Cut out dead, diseased, damaged, or broken branches before doing any shaping. These branches do not help the tree produce fruit, and they may become entry points for insects or disease. Removing them first also makes the rest of the pruning decisions easier.
Dead wood often looks brittle, gray, shriveled, or barkless. Diseased wood may show sunken areas, darkened bark, oozing, or twig tips that look scorched. If you suspect fire blight, prune well below the visibly infected area and dispose of the cut material away from the orchard. Do not leave diseased branches lying under the tree like a buffet for future problems.
5. Cut Away Suckers from the Base
Suckers are shoots that grow from the base of the tree or from the rootstock below the graft union. They are energetic, annoying, and usually not useful. Since many pear trees are grafted, suckers may come from the rootstock rather than the fruiting variety you actually want.
Remove suckers as close to their origin as possible. Young suckers can sometimes be rubbed or snapped off by hand during the growing season. Older ones should be cut cleanly with pruners. Do not leave stubs, because stubs tend to sprout again with the enthusiasm of a bad sequel.
6. Remove Water Sprouts
Water sprouts are fast-growing vertical shoots that often appear on scaffold branches or along the central leader. They shoot straight upward, crowd the canopy, and usually produce little or no fruit. If your pear tree looks like it is growing a collection of green antennas, those are probably water sprouts.
Cut most water sprouts back to their point of origin. However, do not automatically remove every upright shoot without thinking. In an older tree, a well-positioned young shoot may sometimes be trained as replacement fruiting wood. The rule is simple: remove the crowded, shaded, weak, or badly placed shoots; keep only those that serve a clear purpose.
7. Choose and Protect the Central Leader
Pear trees are commonly trained to a central leader system. This means one strong vertical trunk remains dominant, while side branches form the scaffold structure. If your tree has two or more leaders competing at the top, choose the strongest, straightest one and remove or shorten the competitors.
A strong central leader helps the tree maintain its pyramidal shape. Without it, the tree may split into multiple upright trunks with narrow angles, making it more vulnerable to breakage. The central leader should remain taller than surrounding branches, but not so tall that the tree becomes impossible to manage. A pear tree should produce fruit, not require mountaineering gear.
8. Select Strong Scaffold Branches
Scaffold branches are the main side limbs that form the permanent framework of the tree. Ideally, they should be spaced vertically around the trunk rather than stacked directly above one another. Good scaffold branches have wide angles, grow outward, and are distributed around the tree so sunlight can reach all sides.
For a young pear tree, select several well-positioned scaffold branches and remove branches that are too low, too crowded, too upright, or too narrow at the crotch. Pear branches often grow upright at first, so branch spreaders, tying, or gentle training may help create wider angles while the branches are still young and flexible.
9. Thin Crowded and Crossing Branches
After removing dead wood, suckers, water sprouts, and competing leaders, look for branches that cross, rub, grow inward, or crowd the center of the tree. These branches reduce airflow and create shaded pockets where fruit quality declines. When two branches rub together, the bark can wear away, creating a wound where disease may enter.
Use thinning cuts rather than random chopping. A thinning cut removes an entire branch back to its point of origin or to a suitable lateral branch. This opens the canopy without causing the same burst of regrowth that heavy heading cuts can create. In plain English: remove the branch cleanly; do not give it a weird haircut.
10. Make Clean Cuts in the Right Place
Good pruning cuts heal better. When removing a branch, cut just outside the branch collar, which is the slightly swollen area where the branch joins the trunk or larger limb. Do not cut flush against the trunk, and do not leave a long stub. Flush cuts damage the tree’s natural healing zone, while stubs die back and can invite decay.
For large branches, use the three-cut method. First, make an undercut a short distance away from the trunk. Second, cut from above farther out on the branch to remove the branch’s weight. Third, make the final clean cut just outside the branch collar. This prevents bark from tearing down the trunk, which is exactly as unpleasant for the tree as it sounds.
11. Avoid Over-Pruning
One of the biggest mistakes in pear tree pruning is removing too much at once. Heavy pruning can stimulate excessive leafy growth, reduce fruiting, and increase the number of water sprouts. As a general rule, avoid removing more than about one-third of the tree in a single year. For healthy annual maintenance, less is often better.
This is especially important with mature pear trees and neglected trees. If a tree has not been pruned for years, do not try to fix everything in one afternoon. Restore it gradually over two or three seasons. The tree did not become a tangled jungle overnight, and it does not need to become a model orchard specimen before dinner.
12. Clean Up and Monitor the Tree
After pruning, collect and remove cut branches, especially if any were diseased. Do not compost fire blight-infected material unless you are certain your composting process reaches disease-killing temperatures. When in doubt, dispose of diseased wood away from the orchard.
In spring and summer, watch how the tree responds. New shoots will tell you whether you pruned lightly or aggressively. A moderate amount of new growth is normal. A wild explosion of vertical shoots usually means the tree was pruned too hard or fertilized too heavily. Adjust your approach next year. Pruning is not a one-time event; it is an ongoing conversation with the tree, and pear trees are not shy about giving feedback.
Special Tips for Young Pear Trees
Young pear trees should be trained early. If the tree is unbranched at planting, many growers head it back at about waist height to encourage side branches. If it already has branches, select a central leader and several well-spaced scaffold branches. Keep pruning light during the first few years because excessive pruning can delay fruit production.
The first years are about structure, not instant fruit. Remove flowers or fruit if the tree is too young or weak to support a crop. It may feel painful to remove baby pears, but it helps the tree put energy into roots and branches. A strong young tree becomes a better fruit producer later. Think of it as sending the tree to strength training before asking it to carry groceries.
Special Tips for Mature Pear Trees
Mature pear trees need annual maintenance rather than major surgery. Focus on removing dead wood, thinning crowded areas, managing height, and keeping sunlight in the canopy. Avoid severe heading cuts and topping. Topping a pear tree often causes vigorous regrowth near the cut, leaving the tree thicker, weaker, and uglier than before. It is the horticultural version of fixing a bad haircut with a lawn mower.
If the tree is too tall, reduce height gradually by cutting back to strong lateral branches. Keep the lower branches productive by making sure they are not shaded by the upper canopy. A mature pear tree should have enough openness that sunlight reaches interior leaves and fruiting spurs.
Common Pear Tree Pruning Mistakes
Pruning Too Much in One Year
Hard pruning often creates a wave of water sprouts. It may also delay fruiting. When in doubt, make fewer cuts and return next year.
Leaving Long Stubs
Stubs do not heal well. Cut just outside the branch collar so the tree can seal the wound properly.
Ignoring Fire Blight
Pears are vulnerable to fire blight in many regions. Remove infected wood carefully, prune during dry conditions, and disinfect tools when disease is present.
Keeping Narrow Branch Angles
Branches with narrow crotches are more likely to split. Train young branches outward when possible and remove poorly placed limbs before they become large.
Topping the Tree
Topping does not solve height problems. It usually creates more problems by encouraging weak, upright regrowth.
How Much Should You Prune?
For a healthy pear tree that is pruned every year, the answer is: not much. Annual pruning should feel more like editing than demolition. Remove what is dead, diseased, crowded, crossing, or poorly placed. Then stop before confidence turns into chaos.
For neglected trees, create a multi-year plan. In the first year, remove dead and dangerous wood, lower the height modestly, and open the canopy slightly. In the second year, continue thinning and encourage better fruiting wood. By the third year, the tree should be easier to manage and more productive. Patience is not flashy, but fruit trees reward it.
Field Experience: What Pruning a Pear Tree Teaches You
The first time many homeowners prune a pear tree, they are either too timid or too bold. The timid gardener snips three twigs, steps back, and wonders why the tree still looks like a green thundercloud. The bold gardener removes half the canopy and then spends summer staring at a forest of water sprouts. The sweet spot is somewhere in the middle: deliberate, calm, and slightly suspicious of your own enthusiasm.
One practical experience that helps is starting with a “problem branch tour.” Instead of thinking, “I must prune the whole tree,” walk around and identify only the branches that clearly need attention. Dead limb? Cut it. Broken branch? Cut it. Sucker from the base? Gone. Branch rubbing another branch? Choose the better one and remove the other. This approach prevents over-pruning because every cut has a reason.
Another useful lesson is that pear trees often look more upright than expected. A young pear may send branches skyward like it is trying to escape the yard. Beginners sometimes shorten every upright branch, but that can create even more branching near the tips. A better strategy is to select good scaffold branches, spread them when young, and remove the worst competitors. If a branch can be trained outward, it may become useful. If it is crowded, narrow, weak, or growing into the center, it has probably earned a polite goodbye.
In older pear trees, the biggest surprise is how much difference a few thoughtful thinning cuts can make. You do not need to carve the tree into a sculpture. Removing a cluster of water sprouts, a crossing branch, and a few shaded interior limbs can suddenly let light enter the canopy. The tree looks healthier, fruit becomes easier to see, and harvest no longer feels like wrestling a leafy octopus.
Fire blight awareness is another real-world lesson. If you have ever seen pear shoots that look scorched, you understand why sanitation matters. Pruning diseased wood is not the same as ordinary shaping. It requires cleaner tools, wider margins below the infected area, dry weather if possible, and careful disposal. When disease is present, the goal is not beauty first. The goal is containment.
Home growers also learn that pruning affects next season’s workload. Heavy winter pruning may feel productive, but it can create vigorous regrowth that must be managed later. Light annual pruning is easier than heroic rescue pruning every five years. A pear tree responds best to consistency. Give it a little structure every year, and it rarely becomes a monster.
Finally, experience teaches humility. No two pear trees grow exactly alike. Variety, rootstock, age, climate, soil, disease pressure, and past pruning all influence what the tree needs. The best pruners are observant. They look before cutting, cut with purpose, and learn from the tree’s response. If your first attempt is not perfect, welcome to gardening. The tree will grow again, and next year you will arrive with sharper tools, better judgment, and possibly fewer dramatic facial expressions.
Conclusion
Pruning a pear tree is part science, part patience, and part standing in the yard pretending you know exactly which branch is annoying you. The basic formula is reliable: prune in late winter or early spring, maintain a central leader, select strong scaffold branches, remove dead and diseased wood, thin crowded growth, and avoid taking off too much at once.
When done well, pruning helps your pear tree stay strong, open, productive, and easier to harvest. It also reduces disease pressure and improves fruit quality by allowing sunlight and air to move through the canopy. Start with the obvious cuts, think before removing large limbs, and remember that annual light pruning beats occasional tree surgery. Your reward is a healthier pear tree, better fruit, and the quiet satisfaction of looking at your orchard and thinking, “Yes, I did thatand no ladder acrobatics were required.”
SEO Tags
Note: This article is written for general home gardening education. For severe disease, storm damage, very large trees, or unsafe pruning situations, consult a local extension office or certified arborist.