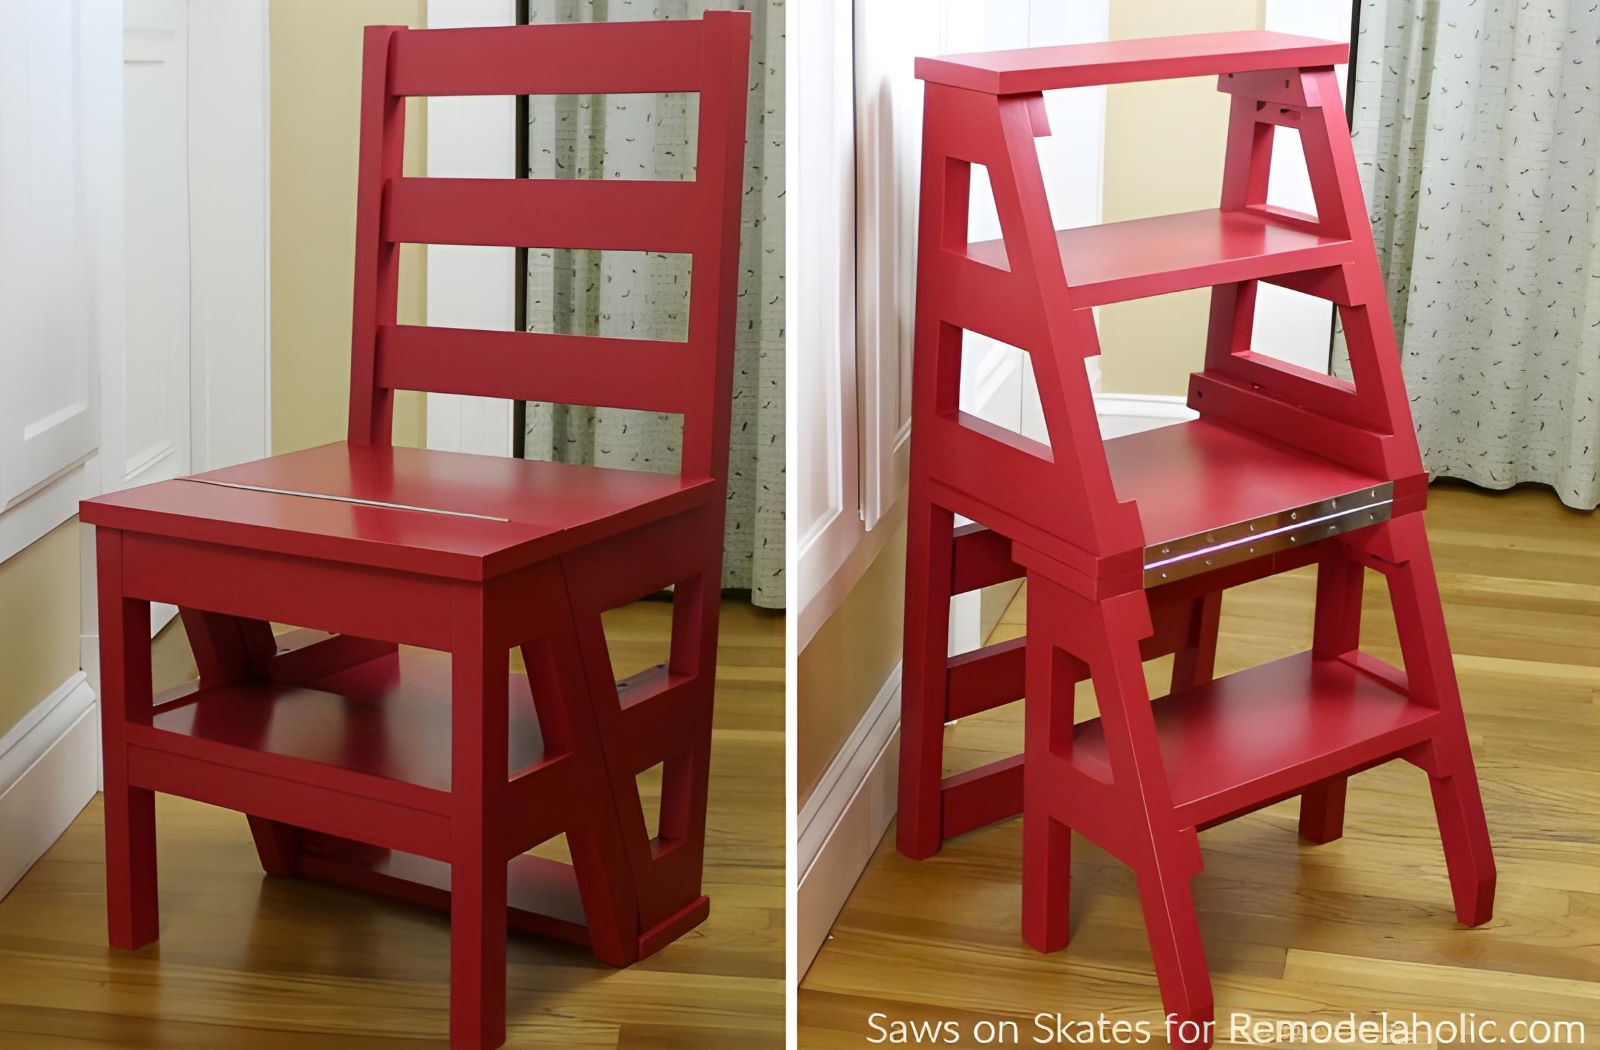
Short version: This project turns a handsome chair into a sturdy step stool with a quick flipperfect for reaching the top shelf without dragging a ladder through the house. It’s a space-saving, why-didn’t-we-build-this-sooner classic inspired by the old “library ladder chair,” updated with accessible joinery and modern finishes. You’ll cut clean parts, use reliable joints, and build for real-world loadsthen finish it to look like it came from a boutique furniture shop, not your sawdusty garage.
What’s a “ladder chair,” and why should you build one?
A ladder chair (sometimes called a convertible library chair or Jefferson chair) looks like a regular side chair in daily life. Flip the backrest/seat assembly forward andprestoit becomes a small, secure step ladder for cabinets, bookcases, and those mystery boxes parked on the highest shelf. It’s the ultimate small-space multitasker: one piece of furniture that seats guests on game night and helps you swap smoke detector batteries the next morning.
Design decisions that make your build safer (and nicer)
1) Comfortable stepping geometry
For steps you’ll actually use, aim for a “feel” like a short staircase: risers no taller than about 7-3/4 inches and treads around 10 inches deep. That mirrors common residential stair guidance so climbing feels natural, not like mountaineering in socks. Your stool isn’t a fixed stair run, but sticking near these proportions improves comfort and reduces missteps.
2) Safe rung spacing
OSHA’s ladder rules call for rungs/steps generally spaced 10–14 inches apart (centerline to centerline). For a compact ladder chair, keeping your step spacing in that zone feels right and respects familiar ladder ergonomics.
3) Plan for real loads (duty ratings)
Commercial ladders use duty ratings to indicate load capacityType III (200 lb) up to Type IAA (375 lb). Your wooden chair won’t be “certified,” but designing with a Type I/IA mindset (250–300 lb) encourages beefier joinery and thicker stock. That means wider step supports, better bracing, and zero wobble drama.
Materials that punch above their weight
Smart wood choices
White oak, hard maple, or ash are excellent for the step frame and side rails. They machine cleanly and boast respectable hardness (e.g., white oak ~1,350 lbf on the Janka scale), making dents less likely on step edges. Want a lighter look? Walnut (about 1,010 lbf) is still plenty tough for indoor use.
Glue and hardware
A waterproof cross-linking PVA like Titebond III gives you a generous open time (8–10 minutes) and cures hard. Pair the glue with mechanical fasteners (screws or dowels/tenons) at critical joints so the chair can handle racking forces when you’re on the top step. Follow the manufacturer’s clamping guidance (roughly 125–250 psi depending on species) for gap-free joints.
Finish that survives real life
For furniture that gets handled (and stepped on), polyurethane remains the go-to. Water-based formulas stay clear and low-odor; oil-based versions build a tougher, amber-warm film with longer cure times. If you want maximum scuff resistance, oil-based poly wins; if you want fastest re-coat and minimal smell, water-based is convenient.
Tools & supplies
- Table saw or track saw, miter saw, drill/driver.
- Pocket-hole jig or mortise-and-tenon/dowel jigs (choose your joinery style).
- Flush-trim bit + router for crisp, matching edges.
- Clamps (bar and F-style), square, mallet, sanding blocks (120–220 grit).
- Titebond III (or equivalent), quality wood screws (if using screws), 1-1/4″ to 1-1/2″ pocket screws if pocket joinery is chosen.
- Piano hinge or paired butt hinges for the flip section; two small barrel bolts or magnetic catches for the “chair mode” lock.
- Finish: polyurethane (water- or oil-based), foam and bristle brushes.
Suggested cut list (typical chair, ~18" seat height)
Adjust to your design. Dimensions below are “net” sizes; mill parts flat/square first.
- (2) Front legs: 1" × 1-3/4" × 17-1/2"
- (2) Rear legs (become side rails in ladder mode): 1" × 1-3/4" × 32"
- (2) Seat rails (front/back): 3/4" × 2-1/2" × 16"
- (2) Side stretchers: 3/4" × 2" × 15"
- (3) Steps/treads: 3/4" × 9-3/4" × 16"
- (1) Seat panel (split/hinged): 3/4" × 16" × 16" (rip later to create the hinge line)
- (2) Step supports (cheeks): 3/4" × 7-1/2" × 16" (with a simple rise/run profile)
- (2–3) Braces/cleats as needed: 3/4" × 1-1/4" × length to fit
Joinery options (pick your path)
Pocket holes make this project approachable and fast, especially for the seat frame and stretchers. Traditionalists can use mortise-and-tenon joints for maximum durability on the front legs/rails. Independent testing shows classic M&T joints outperform pocket-hole joints for ultimate strengththough pocket holes are still more than adequate when used smartly with glue, good grain selection, and proper screw length.
Step-by-step build
1) Mill, mark, and dry-fit
Face-joint, edge-joint, and plane to final thickness so your parts are straight and square. Lightly chamfer the edges of parts you’ll handle frequently (top of steps and seat front) to reduce splinter risk and make the piece feel finished in the hand. Dry-fit the seat frame, legs, and step supports in both “chair” and “ladder” orientations to confirm clearances.
2) Build the chair frame
Assemble the seat rails between the front legs. Add side stretchers and rear legs. Keep the base squaremeasure diagonals and adjust clamps before the glue sets. If you’re using pocket holes, orient pockets to the inside faces and clamp diligently to avoid joint creep while driving screws. If you’re using mortise-and-tenon, go for a snug, not sledgehammer, fit.
3) Make the step module
Cut the two step supports (“cheeks”) with a simple stair-like profile that yields your planned rise and run. Attach the treads so their front edges align and spacing lands in the 10–14 inch rung window (center to center), then add a low back cleat to keep the assembly rigid. A quick template and flush-trim pass keeps the pair perfectly symmetrical.
4) Hinge the seat
Rip the seat panel into front and rear halves. The rear half attaches to the step module; the front half remains with the chair frame. A continuous piano hinge makes alignment easy and spreads load; two heavy butt hinges work too. When hinged, the assembly should flip forward without binding and park on the floor with all four “ladder” feet contacting evenly.
5) Add stops and a simple lock
In “chair mode,” use a discrete barrel bolt or magnetic catch to keep the flip section closed. In “ladder mode,” add a positive stop block under the rear legs so the assembly opens to the same, stable angle every time. Keep the angle stair-like (roughly mid-30s degrees) rather than steep like a climbing ladder, for comfort and confidence.
6) Sand and finish
Break sharp corners on steps and handholds. Vacuum dust, wipe with a barely damp cloth, and apply your finish. Water-based poly builds clarity fast with low odor; oil-based poly builds a tougher film and can be a better choice for heavily used steps. Two to three coats, sanding lightly between coats, yields a silky surface that still has grip underfoot.
Safety notes you’ll actually use
- Respect load. Build for a 250–300 lb target and avoid narrow, spindly parts. Commercial Type IA step stools are rated 300 lbuse that as your mental benchmark.
- Non-slip insurance. A strip of clear tread tape along step noses adds grip without shouting “shop ladder.”
- Lock it. Add a simple latch in chair mode so curious hands don’t flip it unexpectedly.
- Inspect. Give your hinge screws and structural joints a seasonal checkespecially if the chair lives in a dry winter / humid summer environment.
- Kid gear ≠ pro stool. If children will use any step stool, consider current CPSC notices/recalls for comparable productshelpful reminders of failure patterns to avoid (bars that detach, tip-prone proportions). Build your chair to be more robust than the cheapest fold-flat stools online.
Finish options (and how they look in your kitchen)
- Walnut + oil poly: Deep chocolate tone, hard-wearing film, slight amber warmth; longer cure time.
- Maple + water-based poly: Clean, modern look that resists yellowing; more coats, fast re-coat.
- Painted poplar + water-based poly topcoat: Saturated color with scuff protection; touch-ups are easy.
For any finish, let it cure fully before stepping on it with shoesyour future self (and your finish) will thank you.
Troubleshooting
- Wobble in ladder mode: Plane/sand the “ladder feet” coplanar, then add low-profile pads. Confirm your stop angle is consistent left/right.
- Flip binds: Loosen hinges, clamp the assembly in the open position, then re-drive screws from center outward so the hardware “finds” its neutral position.
- Step deflection: Upgrade tread thickness to 1" or laminate a hidden underside cleat.
- Screwheads telegraphing through: Countersink consistently and fill with matching plugs, or shift to dowels/tenons on the highly visible joints.
Why this update on a classic works
The original “library chair” used period joinery and proportions; modern updates make the build friendlier without giving up strength. Using pocket holes where they make sense (interior rails) and stronger traditional joints where loads concentrate (leg/rail junctions) gives you a fast build that’s still furniture-grade. If you prefer going full traditionalist with mortise-and-tenon throughout, your chair will be a tankjust budget more time at the bench.
Cut-once checklist (print this section)
- Measure your intended stowed footprint and the “ladder mode” height you actually need.
- Sketch a side profile with rise/run near stair comfort (≤7-3/4" rise, ~10" run).
- Choose a wood species tough enough for steps (white oak, maple, ash).
- Decide joinery per skill/tools: pocket holes with glue, or mortise-and-tenon/dowels.
- Pre-finish hidden surfaces, then assemble in this order: frame → step module → hinges → stops/latch → final finish.
Frequently asked (and actually useful) questions
How high can I safely make the top step? Keep the top step roughly where you can still maintain three points of contact without overreaching. For most users, a top step around chair-seat height (17–19") feels secure; going much higher begins to feel like a ladderfine outdoors, less ideal in a kitchen.
Can I use only pocket screws? You canmany hobby builds dobut reinforce where loads concentrate. If you have the tools, use dowels or a tenon on the leg/rail joints and pocket holes on intermediate parts.
What finish won’t yellow? Water-based polyurethane stays clearer over time than oil-based; oil-based is tougher and more amber. Pick your trade-off.
Do I need metal corner brackets? Not if your joinery and glue-ups are tight. A cross-grain brace or a hidden cleat under the steps is neater and stronger.
Neat conclusion (and next steps)
You now have a compact chair that moonlights as a confidence-inspiring step stoolan updated take on a Remodelaholic favorite that fits modern tools and materials. Build one for the kitchen, then another for the home library, and enjoy not teetering on tiptoes again.
SEO wrap-up
-
Quiet hardware sounds silly until you live with the piece. On my first build, I used two small butt hinges. They worked, but the flip made a little “tick-tick” as the leafs seated. My next build used a short piano hinge and a strip of felt under the stop blockthe whole motion became whisper-soft. Add a magnetic catch in chair mode so kids don’t surprise-flip the seat. Also, set your stop angle once and lock it in with a hardwood block; if the angle creeps steeper, confidence drops fast. Mid-30s degrees feels stair-like and sure-footed.
On joinery, I’m pragmatic. When a joint is visible and highly stressed (front leg to seat rail), I prefer a proper tenon for peace of mind. Everywhere else, pocket holes save time. The “hybrid” approach helps beginners succeed while keeping the structure trustworthy. If you go pocket-hole heavy, clamp like you mean itpocket screws love to shift parts out of plane just as you drive the last screw. And don’t skimp on glue coverage; treat the screws as clamps, not as the only thing holding your future self off the floor. Tests consistently show traditional M&T joints topping pocket holes, so put your strongest joinery where loads concentrate.
For wood selection, my best-looking “forever” build was white oak with an oil-based polyurethane. That combo took shoe scuffs well and developed a mellow glow. A maple/water-based poly build stayed crisp and bright but needed an extra touch-up on the step noses after a year. If you’re painting, poplar keeps costs down, and a water-based poly topcoat makes cleanup painless. Whichever route you choose, let the finish cureresist the temptation to climb on day one. Oil poly in particular benefits from patience; your shoes are surprisingly abrasive.
One more lesson from the “ask me how I know” file: plane the ladder-mode feet dead coplanar. I now set the chair in ladder mode on a flat surface, slip a sheet of 120-grit under the proud foot, and sand until all four feet kiss the floor together. Add clear tread tape on the step noses if your floors are slick. It’s invisible insurance. Finally, treat recalls and incident reports like a free design labany time you see a collapsing step stool in the news, note what failed (loose safety bars, spindly supports) and overbuild that detail in wood. You’ll end up with a piece that feels as solid in year five as it did on day one.