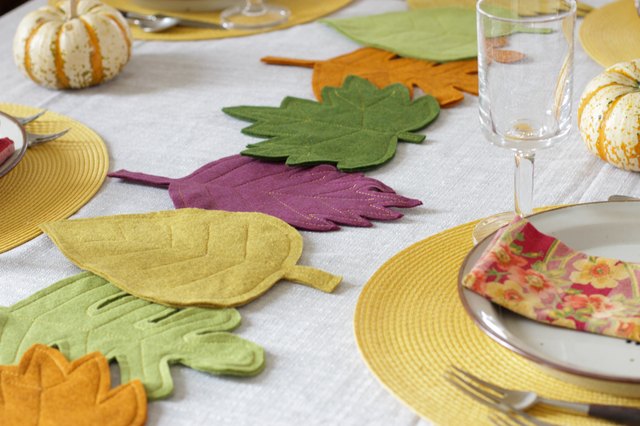
Autumn decorating has a wonderfully forgiving personality. Colors do not need to match perfectly, leaves are allowed to be crooked, and almost anything looks intentional when placed beside a pumpkin. That makes a fall-themed table runner with felt leaves an ideal weekend craft.
This project combines the rich colors of changing foliage with the soft texture and easy handling of felt. Because felt does not unravel like woven fabric, you can cut detailed maple, oak, and simple oval leaves without hemming every edge. The finished runner works beautifully for everyday fall décor, a Thanksgiving table, or a seasonal buffet display.
The instructions below create an openwork runner made primarily from overlapping felt leaves. You can sew the leaves for a durable, handcrafted finish or use fabric adhesive for a faster no-sew version. Either way, your dining table is about to acquire its own tiny forestminus the squirrels and the suspiciously damp ground.
Choose the Size and Style of Your Fall Table Runner
Measure the table before buying or cutting materials. Most decorative table runners are approximately 12 to 16 inches wide. The length depends on whether you want the runner to remain entirely on the tabletop or hang over both ends.
For a traditional drape, add approximately 12 to 20 inches to the table length, creating a 6- to 10-inch drop at each end. For example, a 72-inch table could use a runner measuring 84 to 92 inches long. If children, pets, or enthusiastic dinner guests may pull the ends, make the runner 12 to 24 inches shorter than the tabletop instead.
Recommended Dimensions
- Small coffee table: approximately 10 by 36 inches
- Four-person dining table: approximately 12 by 60 inches
- Six-person dining table: approximately 14 by 72 to 90 inches
- Long buffet or farmhouse table: approximately 14 to 16 by 90 to 108 inches
An openwork arrangement looks organic and decorative, while a solid fabric backing makes the runner flatter, stronger, and easier to move. Beginners may prefer a backing strip because it keeps every leaf in position while the design is assembled.
Materials and Tools
- Felt sheets or felt by the yard in five to eight fall colors
- Kraft paper, freezer paper, cardstock, or printable leaf templates
- Sharp fabric scissors or a rotary cutting machine suitable for felt
- Fabric marker, tailor’s chalk, or washable marking pen
- Straight pins, sewing clips, or low-tack tape
- Embroidery floss and a hand-sewing needle
- Fabric adhesive for a no-sew runner or temporary positioning
- Measuring tape and ruler
- Optional linen, burlap, cotton canvas, or solid felt backing
- Optional iron and pressing cloth
Which Felt Works Best?
Acrylic craft felt is inexpensive, widely available, and excellent for a casual seasonal project. It is also easy to cut, although thin sheets may stretch or look less substantial when used without backing.
Wool or wool-blend felt costs more but generally offers richer color, cleaner edges, and a denser hand. It is a strong choice for a reusable Thanksgiving table runner that you expect to bring out year after year. Stiffened felt holds crisp leaf shapes particularly well, but it can make a long runner harder to roll for storage.
Whatever material you select, test a scrap before applying heat or adhesive. Felt composition varies, and synthetic fibers may react poorly to a hot iron. A pressing cloth and a low-temperature setting are safer than attacking the material with maximum heat as though it owes you money.
Plan an Autumn Color Palette
The classic combination of burnt orange, mustard yellow, burgundy, olive green, and brown is difficult to beat. However, a modern fall table runner does not have to resemble a traffic jam of every autumn color ever invented.
For a calmer farmhouse look, combine cream, camel, rust, sage, and dark brown. For a dramatic Thanksgiving table, use plum, copper, deep red, forest green, and touches of gold. A contemporary palette might include terracotta, blush, oatmeal, and charcoal.
Choose one dominant color, two or three supporting colors, and one dark accent. Repeating the dominant color throughout the runner makes the design cohesive. Distributing the darkest leaves at intervals helps anchor the arrangement instead of leaving one end looking visually heavier.
How to Make a Fall-Themed Table Runner With Felt Leaves
Step 1: Create a Full-Size Layout Guide
Tape together sheets of kraft paper until the paper matches the intended runner dimensions. Draw a centerline from one end to the other, then mark the approximate outer edges. This guide prevents the arrangement from slowly expanding until it becomes a felt tablecloth.
If using a fabric backing, cut it to size now. Felt does not require a finished hem, but linen, cotton, and burlap may need folded and stitched edges. A narrow runner about 13 or 14 inches wide leaves room for plates and serving pieces on most dining tables.
Step 2: Make Three or Four Leaf Templates
Collect a few real leaves for inspiration or sketch simplified maple, oak, birch, and oval leaf shapes on cardstock. Avoid extremely narrow points because they are slower to cut and more likely to bend.
A useful group includes small 2- to 3-inch leaves, medium 4-inch leaves, and several large 5- to 6-inch leaves. Include both detailed and simple silhouettes. The variation makes the finished felt leaf table runner look natural without requiring botanical accuracy. Your guests are unlikely to conduct a leaf-identification exam before dessert.
Step 3: Trace and Cut the Felt Leaves
Trace the templates onto the back of the felt with a fabric marker or chalk. Place shapes close together to reduce waste, but leave enough room for clean scissor movement. Cut approximately 45 to 70 leaves for a medium runner, depending on leaf size and how much open space you want.
Use long, controlled cuts for smooth curves. Turn the felt rather than twisting the scissors around every corner. For intricate maple leaves, cut the deep inner angles first and then shape the outer points.
If you have an electronic cutting machine, secure the felt to the recommended mat and use the blade and material setting specified for your machine. Soft felt often cuts cleanly with a rotary blade, while some machines handle stiffened or stabilized felt more reliably.
Step 4: Add Veins and Decorative Details
This step is optional, but it transforms plain shapes into convincing autumn leaves. Draw a central vein with tailor’s chalk, then sew along it using backstitch, running stitch, or stem stitch. Add two or three angled side veins on larger leaves.
Use contrasting embroidery floss for a folk-art appearance or matching thread for subtle texture. A full six-strand embroidery thread creates bold lines; separating it into three strands produces finer details.
For a no-sew alternative, apply veins with dimensional fabric paint or a permanent fabric marker. Test the product first to ensure it does not bleed or make the felt unpleasantly stiff.
Step 5: Arrange the Largest Leaves
Place the biggest leaves along the paper guide or backing. Angle them in different directions, allowing some to extend slightly beyond the planned edges. Begin near the center and work toward both ends so the arrangement stays balanced.
Overlap neighboring leaves by approximately one-half to one inch. Each leaf should touch at least one or two others if you are making an openwork runner. These contact points will become the structural connections.
Do not distribute every color with mathematical precision. Nature rarely organizes itself like a box of crayons. Instead, repeat colors loosely while avoiding large, accidental blocks of a single shade.
Step 6: Fill Gaps With Medium and Small Leaves
Add medium leaves between the large shapes, then use small leaves to conceal awkward openings or overly straight edges. Preserve a few intentional negative spaces in an openwork design. They allow the wood, tablecloth, or other surface underneath to show through and keep the runner from looking bulky.
Step back every few minutes and view the arrangement from both ends. Dining table décor is seen from multiple directions, so no single end should appear to be the official “top.” Photographing the layout is also helpful because the camera makes unbalanced color clusters surprisingly obvious.
Step 7: Pin, Clip, or Temporarily Glue the Layout
Once satisfied, secure the overlapping sections with pins or small sewing clips. If the design will be sewn, tiny dots of fabric adhesive can hold pieces in place, but keep glue away from the exact stitch lines. Dried adhesive can make hand sewing unnecessarily difficult.
For a completely no-sew table runner, select an adhesive formulated specifically for felt or fabric. Apply a thin, even amount rather than saturating the fibers. Press each connection firmly and follow the manufacturer’s drying and curing directions.
Step 8: Connect the Leaves
For an openwork runner, sew several small stitches through every overlapping area. Match the thread to the top leaf for nearly invisible connections. For a decorative finish, use contrasting embroidery floss and visible cross-stitches.
If attaching leaves to a backing, work in sections. Begin with the lowest layer, secure it, and then add the overlapping leaves. A blanket stitch around selected leaf edges creates a charming handmade border, while a simple running stitch down each center vein is faster and less formal.
A sewing machine can speed up a backed design. Use a longer straight stitch, sew slowly around curves, and test the combination on scraps first. A stabilizer may help if the backing puckers beneath dense appliqué.
Step 9: Shape the Ends and Inspect the Runner
Tapering the last 8 to 12 inches toward each end gives the runner an elegant silhouette. Point several leaves outward to soften the transition rather than ending the design with a straight chopped edge.
Turn the runner over and inspect every connection. Reinforce any leaf attached by only a tiny corner. Trim loose threads and remove visible glue strings. Lay the finished runner flat overnight so stitched or glued sections can settle.
No-Sew and Sewn Variations
Fast No-Sew Version
Use stiffened felt, simplified leaves, and a solid felt backing. Arrange the pieces, photograph the layout, and glue them down one layer at a time. This method is beginner-friendly and can often be assembled in an afternoon, although the adhesive may need considerably longer to cure.
Heirloom Hand-Stitched Version
Choose wool-blend felt and embroidery floss. Add hand-stitched veins to every leaf and use blanket stitches around selected edges. This version takes longer, but the visible needlework gives the runner depth and personality.
Reversible Fall Runner
Attach muted leaves to one side of a solid backing and brighter foliage to the other. Use one face for everyday autumn decorating and flip it for Thanksgiving. Keep decorative stitches tidy on both sides or cover the reverse with a second backing layer.
How to Style the Finished Runner
Let the runner provide most of the color and keep the surrounding pieces restrained. Cream dinnerware, clear glasses, and natural linen napkins prevent the tablescape from becoming visually crowded.
Place a low arrangement of mini pumpkins, pears, pinecones, dried grasses, or flowers along the center. Maintain clear sightlines across the table and leave room for serving dishes. Small felt leaves can also become matching place cards, napkin rings, coasters, or garland decorations.
Battery-operated candles are the safest choice around felt. If using real candles, place them in stable, enclosed holders well away from the runner. Felt is decorative, not fireproof, and the runner should never be used as a potholder or trivet for hot cookware.
Cleaning and Storage
Remove crumbs with a soft brush, lint roller, or low-suction handheld vacuum. Blot small spills promptly with a clean, barely damp cloth. Do not scrub aggressively because friction can roughen the felt surface or encourage pilling.
Whether the runner can be washed depends on the felt, backing, thread, and adhesive. Follow the care instructions for the least washable component. When uncertain, spot cleaning is safer than machine washing.
Store the runner flat or roll it loosely around a mailing tube covered with clean tissue paper. Avoid folding it tightly through detailed leaf points. Keep it dry and away from direct sunlight, which can fade colors during long-term storage.
Common Mistakes to Avoid
- Cutting every leaf at one size: Multiple sizes create movement and prevent the layout from looking like a classroom bulletin board.
- Using too much glue: Excess adhesive can soak through, form hard patches, and remain visible after drying.
- Ignoring the runner’s reverse side: Loose threads and weak connections become obvious when the runner is moved.
- Making the center too bulky: Heavy overlap can cause glasses or serving dishes to wobble.
- Skipping the full layout: Attaching leaves as you cut them often leads to uneven width, clustered colors, and emergency leaf surgery.
- Treating felt as heat protection: Decorative felt should not sit beneath hot pans unless the material is specifically rated for that purpose.
Practical Experience Notes: What You Learn While Making a Felt Leaf Runner
The biggest lesson from making this style of runner is that cutting takes longer than expected, while arranging takes even longerand arranging is also the most enjoyable part. A pile of felt leaves can look slightly underwhelming on the craft table. Once those same pieces overlap in a long, winding composition, however, the project suddenly begins to resemble a designer decoration rather than colorful yard debris.
A common first attempt starts with beautifully detailed maple templates. After cutting the fourth leaf, the maker often develops a new appreciation for plain oval leaves. Mixing one intricate shape with two simpler silhouettes keeps the project visually interesting without turning it into a test of hand endurance. Cutting several felt layers together sounds efficient, but thick or slippery stacks may shift. Two layers are usually manageable with excellent scissors; larger stacks frequently create uneven edges.
Color also behaves differently once the leaves cover a large surface. Bright orange and yellow felt may seem cheerful in the package but can dominate the entire table when used in equal amounts. Muted brown, olive, cream, and burgundy leaves give the eye somewhere to rest. One reliable approach is to make roughly half the leaves in quiet supporting colors, one-third in medium autumn shades, and the remainder in vivid accents.
During layout, the center tends to grow wider because that is where people naturally keep adding their favorite leaves. Marking the intended edges on a paper guide solves this problem. Even then, checking the width with a ruler every foot or so prevents the runner from developing what might politely be called “a generous middle.” Tapered ends are easier to achieve when several small leaves are reserved specifically for the final stage.
Temporary placement matters more than it appears. Moving an unsecured runner from the floor or worktable can destroy half an hour of careful arranging in seconds. Taking a clear overhead photograph before attaching anything provides an invaluable reference. Numbering complicated layers with removable paper tags can also help when rebuilding the design one section at a time.
For sewn runners, a few hidden stitches at every overlap usually provide more flexibility than a solid line of glue. Decorative vein stitching adds considerable character, but it is not necessary on every leaf. Stitching the most visible large leaves and leaving smaller filler pieces plain creates enough detail without adding hours of work.
The finished runner may initially curl at a few points, especially if thin craft felt has been stretched during sewing. Laying it beneath a clean towel and several heavy books overnight can flatten minor waves. Gentle steam may help some materials, but it should never be used without first testing a scrap and checking the felt manufacturer’s instructions.
Most importantly, handmade autumn décor benefits from small irregularities. A slightly uneven stitch, an asymmetrical leaf, or an unexpected color combination makes the runner feel personal. Perfection is not the goal; the goal is a welcoming table that looks as though fall wandered indoors, behaved itself, and agreed to stay for dinner.
Conclusion
Making a fall-themed table runner with felt leaves is an approachable way to create reusable seasonal décor without advanced sewing skills. Careful measuring, a controlled color palette, varied leaf shapes, and a full-size layout are the keys to a polished result.
Choose a quick glued version for an afternoon project or add embroidery and hand stitching for a keepsake-quality runner. Once completed, it can anchor an autumn centerpiece, brighten a Thanksgiving meal, or make an ordinary Tuesday dinner feel pleasantly festive.