A shoebox pinhole camera is the ultimate “look what I made!” project: it’s part physics demo, part art experiment,
and part gentle reminder that cameras worked just fine before they had autofocus, Wi-Fi, and opinions.
With nothing more than a light-tight box and a tiny hole, you can project the outside world onto a screen
or even make real photographsno lens required.
In this guide, you’ll learn three build styles (projector, photographic, and adjustable-focus),
why each one works, and how to fix the classic problems (light leaks, mushy images, “why is everything upside down?!”).
Grab a shoebox and your sense of curiosity. The rest is just tape and tiny triumphs.
What You’re Building (in Plain English)
A pinhole camera is a camera obscura: a dark box with one small opening.
Light rays from the scene travel in straight lines through that opening and form an image on the opposite wall.
Because rays cross at the hole, the image appears upside down and reversed. That’s not a bugit’s the whole show.
The “lens” is basically the hole. A smaller hole tends to make a sharper image (but dimmer).
A larger hole makes a brighter image (but blurrier). We’ll lean into this tradeoff in Method #3.
Materials You’ll Use (Choose What Fits Your Method)
- Shoebox with lid (sturdier is better)
- Black tape (gaffer tape, electrical tape, or duct tape)
- Matte black paint or black construction paper (to reduce internal reflections)
- Aluminum foil or a thin piece of metal (soda can aluminum works; be careful with edges)
- Pin/needle (for the hole), plus a pushpin or awl (to start a pilot hole if needed)
- Scissors or a craft knife (use safely)
- White paper or tracing paper (for a screen/projector build)
- Black-and-white photographic paper (for the photo-taking build)
- Optional: ruler, binder clips, a scrap of cardstock, a small magnet or Velcro (for shutters)
Method 1: The 10-Minute Shoebox Projector (Best for Kids, Classrooms, and Eclipse Days)
This version is a viewer/projector. It won’t make a permanent photo by itself, but it will
project a live image inside the boxperfect for learning and for safe solar projection (with the right cautions).
Step-by-step
-
Darken the inside.
Line the inside of the shoebox with black paper or paint it matte black. This reduces stray reflections and boosts contrast. -
Make a “pinhole window.”
On one short end of the shoebox, cut a neat square hole about 1–2 inches across.
Cover that opening with aluminum foil and tape all around the edges so it’s flat and tight. -
Poke the pinhole.
Use a needle or pin to make one clean hole in the center of the foil.
Don’t “drill” it; a gentle twist is enough. Aim for small. You can always enlarge later. -
Add a screen.
On the opposite short end (inside the box), tape a piece of white paper or tracing paper.
Tracing paper gives a softer, brighter screen; plain white paper gives higher contrast. -
Seal the box.
Put the lid on and tape every seam. If light can sneak in, it will. Tape is your bouncer. -
View the image.
In a dim room or shade, point the pinhole end toward a bright scene.
Peek inside by lifting a small flap in the lid (make a “viewing door” and tape it shut when done).
You should see a faint, upside-down image on the screen.
Solar safety note (seriously)
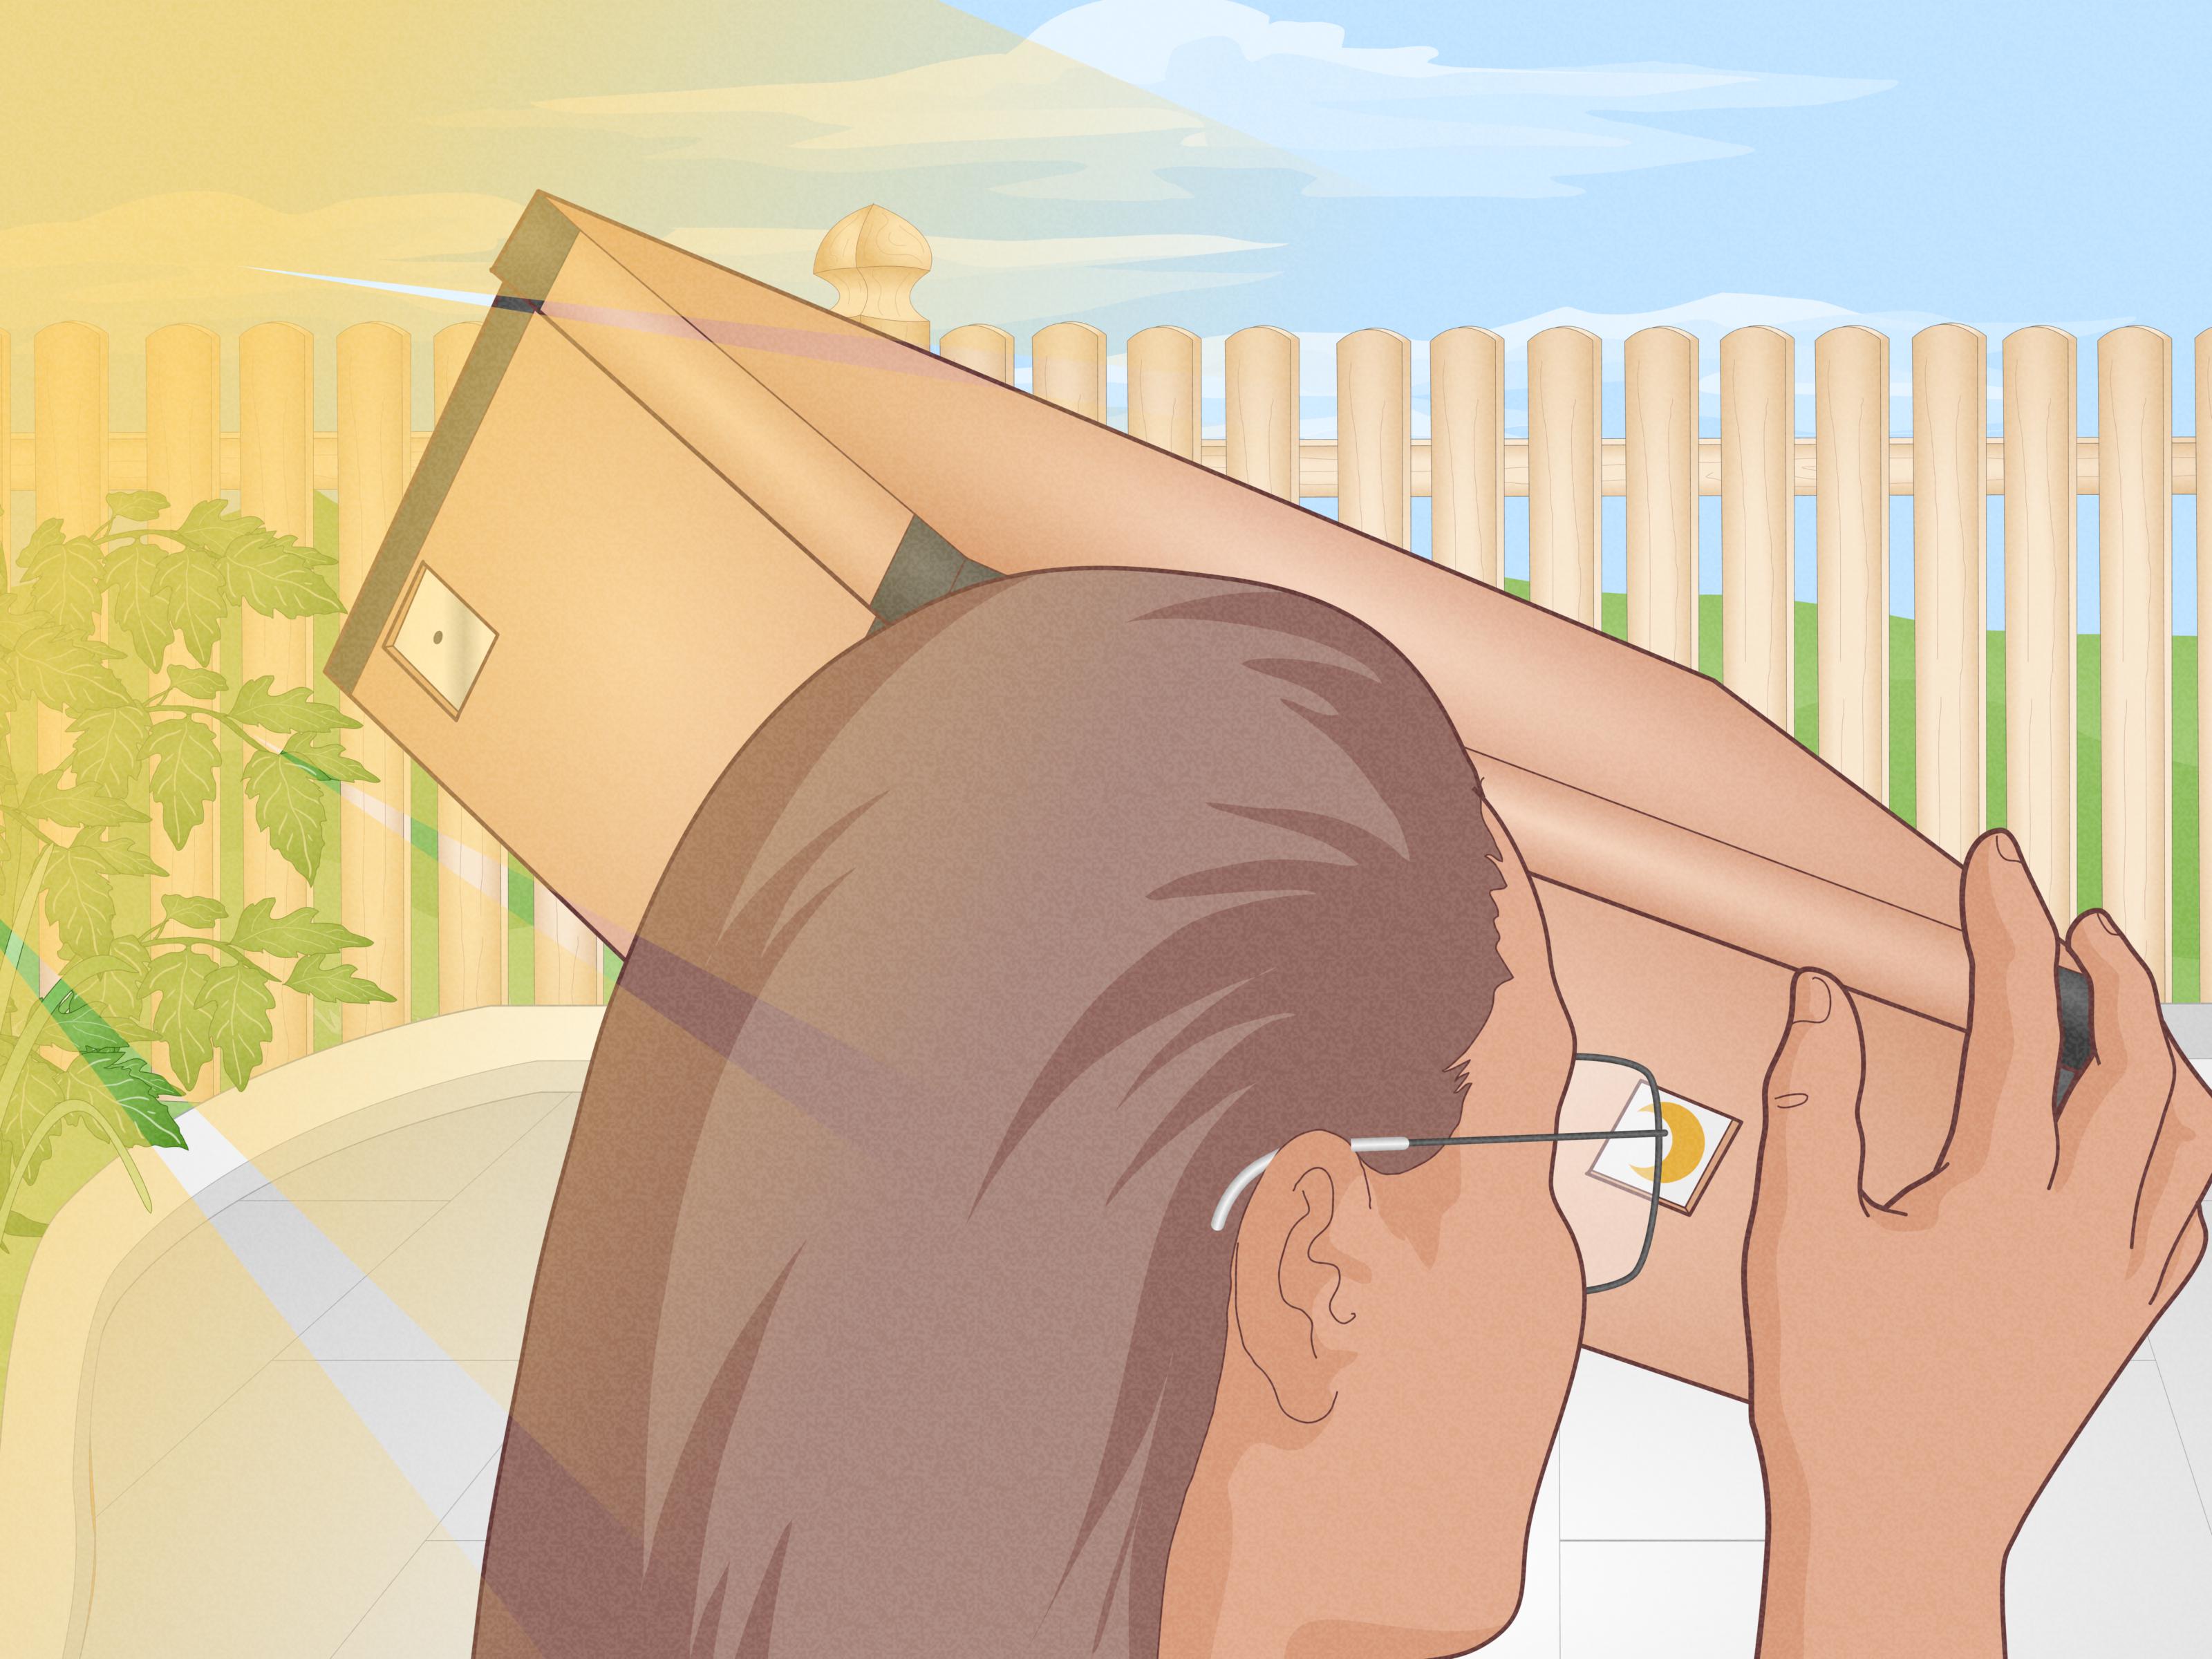
You can use this as a projection device for sun viewing, but the key word is projection.
Never look directly at the Sun through a hole or any optical device.
Keep your eyes on the screen inside the box, not the pinhole.
Quick tweaks for a better projection
- Sharper image: make the pinhole slightly smaller or ensure the foil is perfectly flat.
- Brighter image: use tracing paper for the screen or enlarge the hole a tiny bit.
- More contrast: darken the room or shade the box with your body.
Method 2: The Photographic Shoebox Camera (Make Real Pinhole Photos)
This build turns your shoebox into a true camera that exposes photographic paper inside.
The payoff: ghostly, dreamy pinhole photos with that vintage “time moved differently back then” vibe.
Build the camera body
-
Light-proof everything.
Tape all box seams and any gaps where the lid meets the base.
A camera can’t do its job if it’s basically a lantern. -
Black out the interior.
Paint it matte black or line it with black paper. Reflections inside the box lower contrast and fog your image. -
Create the pinhole plate.
Cut a 1–2 inch square hole on one end of the shoebox. Tape a foil square over it (or use thin metal).
Poke a tiny pinhole in the center. -
Add a shutter.
Tape a small flap of black cardstock over the pinhole like a door.
Use one edge as a hinge, then press it closed with tape, Velcro, or a small magnet.
This is your “shutter” for exposures. -
Make a paper holder (optional but helpful).
If you want flatter paper, tape two thin strips of cardboard inside as rails,
or use small tabs of tape to hold the paper at the back wall.
Load the photographic paper
Photographic paper must be handled in very low light.
Many black-and-white papers are safe under a red/orange safelight, but always follow your paper’s guidance.
When in doubt, load in a windowless room with minimal light.
- Open the shoebox in safelight conditions.
-
Place one sheet of photographic paper on the inside back wall (opposite the pinhole), emulsion side facing the pinhole.
Close the lid carefully. - Seal the lid again with tape if needed.
Take the photo
-
Put the camera on a stable surface (tripod, stool, sidewalkanything steady).
Pinhole exposures are often seconds to minutes, so stability matters. - Frame the shot by aiming the pinhole toward your subject. (Pinhole cameras are wide-ish by nature.)
- Open the shutter flap to start the exposure. Count time. Close the flap to end.
Starting exposure guide (you’ll refine with practice)
- Bright midday sun (outdoors): ~5–30 seconds
- Overcast outdoors / shade: ~30 seconds–3 minutes
- Indoors near a bright window: ~3–15 minutes
These ranges vary a lot depending on pinhole size, box depth, and paper sensitivity.
Treat them as “get an image” baselines, not cosmic law.
Develop the print
Once exposed, develop the paper using standard black-and-white paper chemistry (developer, stop bath, fixer),
following the chemical manufacturer’s directions. After fixing and washing, you’ll have a paper negative.
You can scan and invert it digitally to get a positive image, or contact print it onto another sheet of paper.
Why this method rules
- You get a real, physical photograph made by light and time.
- The long exposure “averages” motionmoving people vanish, clouds smear, trees become soft brushstrokes.
- It’s surprisingly forgiving: no focus ring, no batteries, no updates.
Method 3: The Adjustable-Focus Shoebox (Sharper Results, More Control)
Here’s the secret: in a pinhole camera, “focus” is mostly about distance.
The farther the paper (or screen) is from the pinhole, the larger the projected imageoften with a different balance of brightness and sharpness.
This method builds a simple sliding tray so you can change the “focal length” and tune your results.
How it works
The “focal length” of a pinhole camera is essentially the distance from the pinhole to the image plane (your paper/screen).
Changing that distance changes the image size and effective aperture (f-number).
Translation: you get more creative control, and you can test what looks best for your setup.
Build the sliding tray
-
Make an inner tray.
Find a slightly smaller box (or create a sleeve from folded cardboard) that can slide inside the shoebox smoothly.
This inner tray will hold the photographic paper. -
Put the pinhole on the outer box.
Build the pinhole plate and shutter on one end of the shoebox (outer shell), just like Method 2. -
Attach paper to the inner tray.
Tape a flat backing panel inside the tray where the photographic paper will sit.
Mark a few distance positions (for example: 3″, 4″, 5″, 6″ from the pinhole end). -
Light-seal the sliding gap.
This is the trickiest part: any sliding joint is a light-leak opportunity.
Wrap the overlap area with black fabric, tape skirts, or layered gaffer tape that still allows motion.
Think “camera accordion,” but made of whatever is in your junk drawer.
Dial in the pinhole size (simple version)
If your hole is too big, things look soft. If it’s too small, diffraction softens detail and exposures get long.
Many builders start around sub-millimeter holes for shoebox-scale cameras and then test.
Use your phone as a “digital back” (optional, very fun)
If you built Method 1 (projector) or you’re using the tray method with a translucent screen,
you can sometimes capture the projected image by placing a smartphone camera at the viewing window and snapping a photo of the screen.
It’s not a perfect substitute for photographic paper, but it’s a great way to iterate quickly:
adjust distance → check image → adjust again.
Testing workflow (fast and nerdy in the best way)
- Pick a bright outdoor scene with clear lines (a fence, street sign, or building edges).
- Start with a mid-distance tray position and a modest exposure time (say, 30 seconds in bright conditions on photo paper).
- Adjust one thing at a time: tray distance or pinhole size or exposure duration.
- Keep notes. Pinhole photography loves the organized chaos of a little notebook.
Pinhole “Math” Without the Headache
Two ideas help you build smarter:
(1) focal length = distance from pinhole to paper/screen,
and (2) f-number ≈ focal length ÷ pinhole diameter.
Bigger f-number means less light and longer exposures.
Want a rule of thumb? If your shoebox depth is around 4–6 inches, your effective aperture can be extremely “stopped down”
compared to normal camerasthink the photographic equivalent of squinting through a keyhole (because you are).
That’s why long exposures are normal, and that’s also why pinhole images have that smooth, time-stretched look.
Sharpness vs. brightness: the trade you can’t dodge
- Too large a pinhole: brighter, blurrier (light rays overlap more).
- Too small a pinhole: dimmer, sometimes softer (diffraction spreads light).
- Just right: best balance for your box depth and paper.
Troubleshooting (Because Tape Happens)
Problem: The whole image is gray or foggy
- Likely cause: light leak. Tape every seam, especially the lid. Check corners.
- Also check: reflective interior. Make sure it’s matte black inside.
Problem: No image at all
- Exposure too short (common). Increase time.
- Pinhole blocked or shutter not opening fully.
- Paper facing the wrong way. (Yes, everyone does this once.)
Problem: The image is very blurry
- Pinhole is too big or ragged. Re-make it on fresh foil or thin metal.
- Camera moved during exposure. Stabilize it or weigh it down.
- Box interior isn’t dark enough. Add more black lining.
Problem: It’s way too dark
- Exposure too long. Reduce time.
- Pinhole slightly too large (yes, this can brighten but also changes the look). Consider adjusting methodically.
Ideas to Level Up Your Shoebox Pinhole Camera
- Multiple pinholes: add two holes (with separate shutters) for double exposures or quirky ghosting.
- Curved “film plane”: gently curve the photo paper inside to reduce edge softness and create a panoramic feel.
- Color experiments: tape colored cellophane over the pinhole for tinted projections (best with Method 1).
- Time studies: photograph the same street corner for 10 seconds, 1 minute, and 5 minutes and compare motion effects.
Conclusion
If you want the quickest win, build Method 1 and watch a live, upside-down world appear on your screen.
If you want a real keepsake image, go with Method 2 and expose photographic paper for dreamy pinhole photos.
And if you’re ready to tinker like a backyard optical engineer, Method 3 gives you adjustable distance and better control.
However you build it, the lesson is the same: light is predictable, boxes are underrated,
and a tiny hole can still make something beautiful.
Field Notes: Real-World Experiences That Make This Project Click (Extra )
People usually expect a shoebox pinhole camera to feel like a craft. Then it turns into a small adventure in patience,
problem-solving, and learning how light behaves when it isn’t being “helped” by fancy glass.
In classrooms, photo clubs, and weekend tinkering sessions, the same pattern shows up again and again:
the first build is rarely perfect, but it’s almost always educational in a way that sticks.
The most common “aha” moment happens when someone finally sees the projected image in Method 1.
There’s a beat of silence, followed by a very sincere, “Wait… that’s outside.” It’s faint at first, and someone inevitably
tries to fix it by making the hole biggerbecause brighter feels better. That’s when the second lesson lands:
brightness and sharpness don’t always travel together. A pinhole camera is basically the universe saying,
“Pick two: bright, sharp, tiny hole.” (Okay, that’s not the exact quote, but it’s close.)
Light leaks are the other rite of passage. You can build something that looks sealed, feels sealed, and still behaves like it’s
hosting a laser show in the corners. The practical experience here is surprisingly transferable: you learn to test assumptions.
Builders start holding the box up to a bright lamp and looking for tiny glows along the seams. They learn that lids are the
number-one suspect, followed closely by corners and “that little bend in the cardboard I thought didn’t matter.”
Once those leaks are taped, images suddenly pop with contrast and everyone feels like a wizard.
When people try Method 2 with photographic paper, the emotional arc is classic: excitement, confusion,
then delight. Confusion arrives because exposure times don’t behave like phone cameras.
A ten-second exposure might look great in harsh sun and nearly invisible in shade. People start making notes:
“Cloudy = longer. Shade = much longer. Indoors = go make a sandwich.” This is where pinhole photography quietly teaches
the value of controlled experiments. Change one variable at a time, and your results stop feeling random.
Another recurring experience is the joy of motion “disappearing.” Someone sets the camera facing a sidewalk,
holds the shutter open for a couple minutes, and then develops a scene where the buildings look crisp but the pedestrians
are faint ghostsor missing entirely. That outcome feels like magic the first time you see it, and it sparks creative ideas:
long exposures of clouds, trees, traffic, or even a friend who stands still for half the exposure and moves for the rest.
Finally, the adjustable-focus Method 3 tends to turn casual makers into curious tinkerers.
Sliding the tray forward and back makes the camera feel more “real,” like you’re dialing in a deliberate look rather than
hoping for one. People begin to treat the shoebox like a legit tool: they label distances, cut cleaner shutters, re-make
pinholes with more care, and build a little process. The best part is that none of this requires expensive gearjust attention.
In the end, most makers keep the shoebox camera longer than they planned, because it’s not just a project.
It’s proof that simple physics can still make artand that tape, in sufficient quantities, can solve almost anything.