A serpentine belt is one of those humble car parts that rarely gets applause. It spins quietly, powers important accessories, and asks for very little attentionuntil one morning your engine bay starts squealing like a startled violin. That sound may be funny for about three seconds. After that, it becomes a warning sign worth taking seriously.
Learning how to test serpentine belt tension can help you catch small problems before they become expensive, inconvenient, or wildly dramatic in a grocery store parking lot. The serpentine belt may drive the alternator, air conditioning compressor, power steering pump, water pump on some vehicles, and other accessories. If belt tension is too loose, the belt can slip. If it is too tight, it can stress bearings and accessories. Either way, the engine is not exactly sending thank-you notes.
The good news is that checking serpentine belt tension is not mysterious. You do not need to be a master technician with a tool chest the size of a small apartment. You do, however, need patience, safety awareness, and a willingness to compare what you see with the vehicle manufacturer’s specifications. Below are three practical ways to test serpentine belt tension, plus real-world experience tips to help you avoid the most common mistakes.
Why Serpentine Belt Tension Matters
A serpentine belt works by wrapping around several pulleys in one continuous loop. As the crankshaft pulley turns, the belt transfers motion to engine accessories. For that transfer to happen smoothly, the belt needs the right amount of grip. That grip depends on belt condition, pulley alignment, pulley surface, and proper tension.
When tension is too low, the belt may slip under load. You might hear squealing during startup, when turning on the air conditioner, when accelerating, or when turning the steering wheel in vehicles with belt-driven power steering. You may also notice flickering electrical performance, weak charging, overheating on certain engine designs, or poor accessory operation.
When tension is too high, the problem is different but still annoying. Excessive belt tension can place extra load on alternator bearings, water pump bearings, idler pulleys, and tensioner components. In plain English: too loose is bad, too tight is also bad, and “just crank it tighter” is not a repair strategy. It is automotive guessing wearing work gloves.
Safety First: Read This Before Touching the Belt
Before testing serpentine belt tension, park the vehicle on a flat surface, set the parking brake, turn the engine off, remove the key or keep the key fob away from the vehicle, and let the engine cool. Never put your fingers, tools, hair, hoodie strings, jewelry, or anything else near a moving belt. A running belt system moves fast and does not care how confident you feel.
If you are not comfortable working around the engine bay, ask a qualified mechanic for help. Also, always check your owner’s manual or service information for your exact vehicle. Serpentine belt layouts, tensioner designs, and belt specifications vary by make, model, engine size, and accessory package.
Way 1: Use the Deflection Test for a Quick Manual Check
The deflection test is the classic “press the belt and see how much it moves” method. It is simple, fast, and useful for an initial check, especially on older vehicles or systems with manual belt adjustment. However, it should not replace the factory specification or a proper belt tension gauge when precision matters.
How the Deflection Test Works
Find the longest straight run of the serpentine belt between two pulleys. This section gives you the most useful feel for belt movement. With the engine off and cool, press down on the belt using moderate thumb pressure. You are checking how far the belt moves from its resting position.
As a general rule, many older belt systems should not move excessively when pressed at the midpoint of the longest span. Some informal rules mention about one-half inch of movement on a longer span, but that is only a rough guide. Modern vehicles often use automatic tensioners, and a thumb test can be misleading because the tensioner is designed to compensate dynamically.
What Good Tension Feels Like
A belt with reasonable tension should feel firm but not guitar-string tight. If it flops around easily, tension may be too low. If it barely moves at all and feels overly rigid, it may be overtightened or the tensioner may be stuck. Think “firm handshake,” not “arm-wrestling champion.”
When the Deflection Test Is Useful
The deflection test is helpful when you want a quick roadside-style impression. It can tell you if something is obviously wrong, such as a belt so loose it can be lifted far away from the pulley. It can also help after replacing a manually adjusted belt, as long as you still verify the result with proper specifications.
Limitations of the Deflection Test
The problem with the deflection test is that “moderate pressure” means different things to different people. One person’s gentle push is another person’s thumb workout. Belt length, pulley spacing, belt material, and temperature can also affect how the test feels.
On vehicles with automatic belt tensioners, deflection alone may not tell the full story. The belt may feel fairly tight while the tensioner is near the end of its travel, weak internally, misaligned, or sticking. That is why the next method is often more revealing.
Way 2: Inspect the Automatic Belt Tensioner
Most modern vehicles use a spring-loaded automatic belt tensioner. Its job is to maintain proper serpentine belt tension as the belt wears, stretches slightly, heats up, cools down, and deals with changing accessory loads. In other words, the tensioner is the belt system’s tiny gym coach, constantly shouting, “Stay tight, but not too tight!”
If your vehicle has an automatic tensioner, testing serpentine belt tension means inspecting the tensioner as much as the belt itself. A new belt on a weak tensioner may still slip. A strong-looking belt on a crooked pulley may still chirp. The whole system matters.
Check the Tensioner Indicator
Many automatic tensioners have an indicator mark or operating range mark. This mark shows whether the tensioner arm is sitting within its normal working range. If the mark is outside the acceptable range, the belt may be the wrong length, the belt may be worn, or the tensioner may be weak or sticking.
Use a flashlight and look carefully at the tensioner body. If you see marks labeled “min,” “max,” “new,” “used,” or similar indicators, compare the arm position with the range. If the indicator is clearly out of range, do not ignore it. The belt system is politely raising its hand before it starts yelling.
Watch for Tensioner Movement
With the engine running, a healthy tensioner may move slightly as engine speed and accessory loads change. However, it should not bounce wildly, hammer back and forth, or look like it is auditioning for a drum solo. Excessive tensioner movement can indicate belt wear, pulley misalignment, accessory drag, or tensioner weakness.
Observe from a safe distance only. Do not reach into the engine bay while the engine is running. If the belt is wobbling, walking off a pulley, or vibrating heavily, shut the engine off and investigate further.
Feel for Smooth Tensioner Travel
With the engine off and the belt removed, the tensioner arm can usually be moved with the correct tool, such as a serpentine belt tool, breaker bar, or socket, depending on the design. The arm should move smoothly through its travel and return with steady spring force. If it feels gritty, notchy, frozen, loose, or uneven, the tensioner may be failing.
Do not force a tensioner beyond its designed stops. If you are unsure where to apply the tool, check the service manual. Some tensioners have a square drive opening; others are moved by placing a socket on the pulley bolt. Using the wrong point can damage parts or turn a simple inspection into a small mechanical comedy show.
Look for Physical Warning Signs
Inspect the tensioner for rust bleed, cracks, shiny metal-to-metal contact, pulley wobble, bearing noise, and misalignment. Also look at the belt’s position on each pulley. A serpentine belt should run centered and straight. If it rides too far forward or backward, tension may not be the only issue; pulley alignment may be the real troublemaker.
A worn pulley bearing can create squealing or grinding noises that sound like a belt problem. That is why many technicians inspect the tensioner, idler pulleys, and accessory pulleys together. Replacing only the belt when the tensioner is failing is like changing your shoes while ignoring the rock inside them.
Way 3: Measure Belt Tension With a Belt Tension Gauge
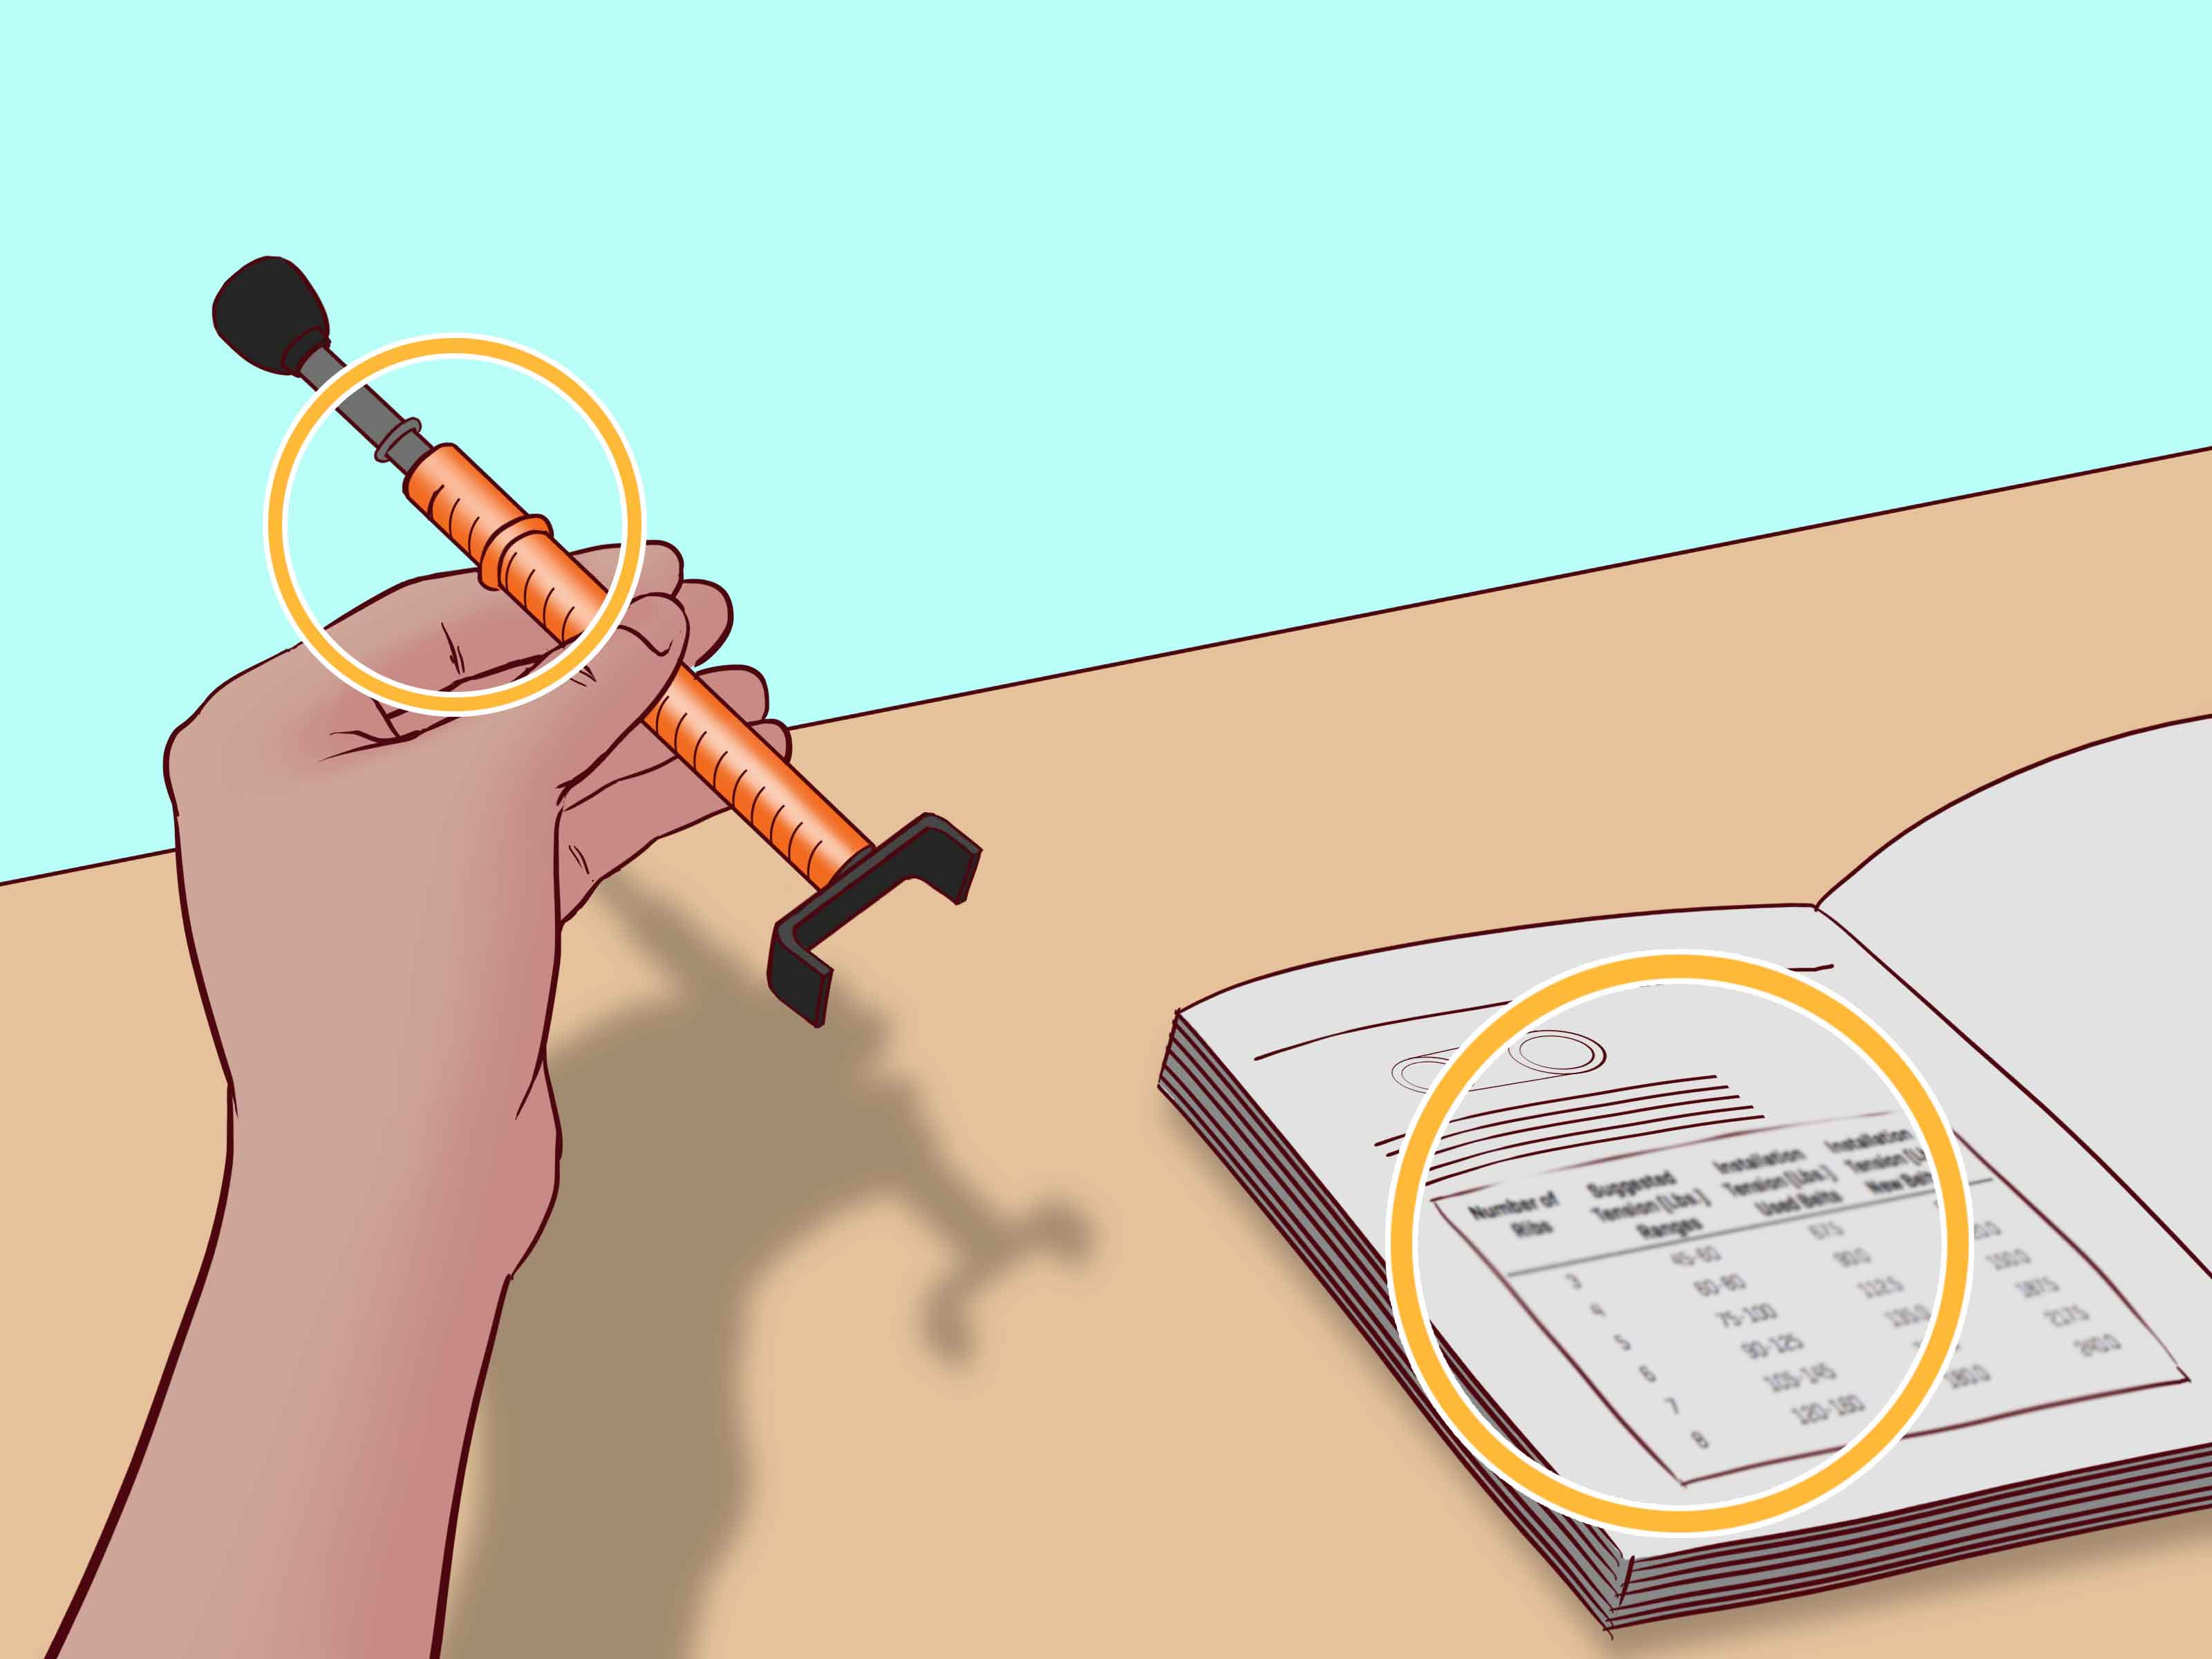
If you want the most accurate way to test serpentine belt tension, use a belt tension gauge. A gauge removes much of the guesswork from the process and gives you a measurable result. This is especially useful for manually tensioned belt systems, performance applications, fleet maintenance, and situations where repeat accuracy matters.
Types of Belt Tension Gauges
There are several types of belt tension gauges. A simple mechanical gauge may press against the belt and show tension on a scale. Some gauges are designed for V-belts, while others are made for multi-rib serpentine belts. More advanced tools may use sonic or frequency-based measurement, but those are more common in professional or specialized settings.
A popular style for automotive belts is a compact mechanical gauge that fits against the belt and gives a tension reading in pounds or kilograms. Some tools are specifically designed for multi-rib belts up to a certain number of ribs. Always confirm that the gauge is appropriate for serpentine belts and not intended for another belt type.
How to Use a Belt Tension Gauge
First, locate the longest accessible belt span. Place the gauge at the center of that span, following the tool manufacturer’s directions. Apply pressure as instructed until the tool clicks, deflects, or displays a reading. Then compare the result with the specification for your vehicle or belt application.
Specifications matter. Belt tension requirements can vary depending on belt width, pulley layout, whether the belt is new or used, and whether the system uses manual adjustment or an automatic tensioner. Do not use a random number from the internet and declare victory. The internet is useful, but it has never had to pay for your alternator bearing.
New Belt vs. Used Belt Tension
Some service information gives different tension values for new belts and used belts. A new belt may require a different initial setting because it can seat into the pulley grooves during early use. A used belt has already gone through that initial settling period. This is another reason the correct service specification matters.
Why a Gauge Beats Guesswork
A belt tension gauge gives you a number. That number helps prevent two common mistakes: leaving the belt too loose because it “felt okay,” or overtightening it because tighter seemed safer. Proper tension is not about maximum tightness. It is about correct grip, smooth accessory operation, and reasonable bearing load.
Common Signs of Incorrect Serpentine Belt Tension
Testing belt tension becomes easier when you know the symptoms. A loose or slipping serpentine belt may cause squealing, chirping, burning rubber smell, visible glazing, accessory performance problems, or belt dust near pulleys. The noise may be worse during cold starts, rainy weather, acceleration, or when switching on high-load accessories like the air conditioner.
An overtightened belt may not always make noise at first. Instead, it can quietly punish bearings until a pulley begins to whine, grind, or wobble. If a belt was recently replaced and a new bearing noise appears soon after, tension should be checked along with pulley condition.
Do Not Confuse Belt Tension With Belt Condition
A belt can have correct tension and still be bad. Modern serpentine belts do not always crack dramatically like older rubber belts. Some wear down in the grooves, changing from a sharper V-shaped rib profile to a more rounded shape. A worn belt may slip even if the tensioner is doing its job.
Inspect the belt for missing ribs, frayed edges, glazing, oil contamination, coolant contamination, cracks, chunking, uneven wear, and shiny spots. If the belt is contaminated with oil or coolant, replacing the belt without fixing the leak is usually a temporary solution. The new belt may soon become another casualty in the engine bay soap opera.
Specific Example: Diagnosing a Startup Squeal
Imagine a car that squeals for five seconds every morning, then quiets down. The owner assumes the belt is “just old” and replaces it. Two weeks later, the squeal returns. What happened?
A smarter diagnostic path would be to test serpentine belt tension and inspect the system. The belt may have been slipping because the automatic tensioner spring was weak. Or the tensioner arm may have been sticking when cold. Or an idler pulley bearing may have been dragging. The belt was only the messenger. Replacing the messenger rarely fixes the kingdom.
Specific Example: Diagnosing Belt Chirp After Replacement
Now imagine a serpentine belt that chirps after a fresh replacement. The new belt is the correct brand and length, but the noise appears immediately. In this case, tension may not be the main problem. The issue could be pulley misalignment, debris in the pulley grooves, a worn tensioner pulley, or a belt routed incorrectly by one groove.
This is why testing belt tension should be part of a broader inspection. Check the routing diagram, verify the belt sits correctly on every pulley, inspect pulley grooves, and confirm the tensioner indicator is within range. A serpentine belt system is a team sport. One lazy pulley can make everyone look bad.
When to Replace the Belt, Tensioner, or Both
Replace the serpentine belt if it shows visible damage, severe wear, missing ribs, fraying, contamination, or persistent slipping. Replace the tensioner if it is weak, noisy, cracked, misaligned, seized, notchy, leaking rust-colored residue, or outside its operating range with the correct belt installed.
Many technicians recommend inspecting the tensioner and idler pulleys whenever the belt is replaced. That does not mean every part must automatically be replaced, but it does mean every part deserves a look. A belt failure can leave you stranded, and the repair bill becomes much less charming when a preventable pulley issue caused it.
Experience Notes: Real-World Lessons About Testing Serpentine Belt Tension
One of the biggest lessons from working around serpentine belts is that noise does not always point directly to the belt. Many drivers hear squealing and immediately blame the belt itself. Sometimes they are right. Other times, the belt is simply reacting to a weak tensioner, a rough pulley bearing, a misaligned accessory, or contamination from a slow oil leak. The sound may come from the belt, but the cause may live somewhere else.
Another common experience is the “new belt, same noise” problem. This usually happens when someone replaces the belt without testing tension or checking the tensioner. A fresh belt can grip better for a short time, which hides the issue. Then the noise returns, and everyone gets annoyed except the failing tensioner, which continues its villain arc. Before installing a new belt, it is worth moving the tensioner through its range, checking for smooth spring action, and spinning the pulleys by hand with the belt removed.
The thumb deflection test is useful, but it can fool you. A belt may feel firm simply because the span is short. Another belt may feel flexible because the span is long, even though actual tension is acceptable. Temperature also changes feel. A cold belt may behave differently from a hot belt. That is why experienced mechanics treat the thumb test as a clue, not a courtroom verdict.
A belt tension gauge is especially helpful when dealing with manual adjustment. Without a gauge, it is easy to overtighten the belt to stop a squeal. That may quiet the system temporarily, but it can overload bearings. A customer may return later with a noisy alternator or water pump, and suddenly the “quick fix” looks less quick. Correct tension protects both the belt and the accessories it drives.
It is also smart to inspect pulley grooves. Dirt, rubber deposits, and fluid residue can reduce grip. If an old belt has been slipping, it may leave material behind on the pulleys. Installing a new belt on dirty pulleys is like putting clean socks into muddy shoes. Technically possible, emotionally disappointing.
Finally, belt routing matters more than people think. On engines with many pulleys, it is possible to route a belt incorrectly and still make it look almost right. Before removing the belt, take a photo of the routing diagram or the belt path. If the factory sticker is missing, find reliable service information. A correctly tensioned belt routed the wrong way is still wrong, just with confidence.
Conclusion
Testing serpentine belt tension is not just about pushing on a belt and hoping your thumb has professional credentials. The best approach is to combine three methods: use the deflection test for a quick impression, inspect the automatic tensioner for range and smooth movement, and measure tension with a belt tension gauge when accuracy matters.
Proper belt tension helps prevent squealing, slipping, accessory problems, premature bearing wear, and roadside frustration. More importantly, it helps you understand the entire belt drive system instead of blaming one part too quickly. The serpentine belt may be simple, but it works with several components. Give the whole system a careful look, and your engine bay will be much less likely to perform its morning squeal concert.