An old armoire can be a lot like a forgotten supporting actor: sturdy, useful, and quietly waiting for someone to give it better lighting. Ours began as a bulky, dark-brown cabinet with scratched doors, tired hardware, and the unmistakable energy of furniture that had survived several decorating trends without enjoying any of them.
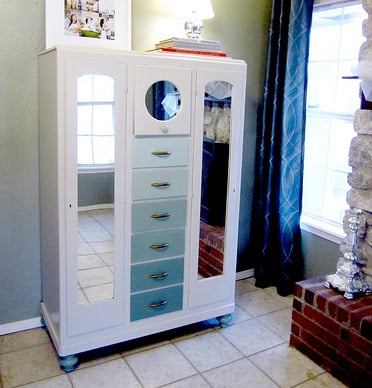
Instead of sending it to the curb, we gave it an ombre furniture makeover. The finished armoire moves gradually from a pale, misty blue at the top to a deep ocean shade near the base. New hardware, a brighter interior, and a smoother finish turned the once-heavy cabinet into a modern statement piece.
Note: The techniques below can be adapted to solid wood, veneer, laminate, particleboard, or MDF furniture, but preparation must match the material. Before sanding an older painted piece, especially one that may predate 1978, test for lead and follow appropriate lead-safe practices. The EPA warns that disturbing old lead-based paint can create hazardous dust.
The Before: A Useful Armoire With a Serious Case of the Browns
The original armoire had good bones. Its doors closed properly, the shelves were stable, and the frame did not wobble. Unfortunately, the glossy brown finish made the cabinet look larger and heavier than it really was. Scratches covered the lower doors, while faded spots around the handles revealed years of enthusiastic opening and closing.
The ornate brass-colored pulls were not genuine brass, and they had aged with all the elegance of a forgotten belt buckle. Inside, the shelves were serviceable but gloomy. The cabinet offered plenty of storage, yet its appearance made the entire room feel dated.
That combination made it an ideal makeover candidate. Painting valuable antique furniture can reduce its historical or financial value, but a mass-produced, damaged, or stylistically outdated piece is often a good choice for creative refinishing. Better Homes & Gardens similarly recommends looking beyond worn finishes and considering how color, patterns, or new hardware could give ordinary furniture a new purpose.
Why an Ombre Finish Works So Well on an Armoire
Ombre refers to colors or tones that gradually shade into one another. In furniture design, that transition can be soft and blended, or it can be created through several clearly defined shades from the same color family.
An armoire is particularly suited to the technique because its height provides room for the color to develop. A single bold shade across a tall cabinet may feel visually dense, while a pale-to-dark gradient creates movement and helps break up the large surface.
There are two main ways to create an ombre armoire:
- Layered ombre: Separate areas, drawers, doors, or panels are painted in progressively darker shades.
- Blended ombre: Neighboring colors are brushed together while wet, producing soft transitions with no obvious dividing lines.
For this makeover, we used a blended gradient on the large doors and more controlled transitions along the side panels. The lightest color remained near the crown, while the deepest blue anchored the feet. HGTV and Better Homes & Gardens both suggest using neighboring colors from the same paint strip when creating an approachable ombre effect, because the undertones are already designed to coordinate.
Choosing the Color Palette
A successful ombre palette needs contrast, but not chaos. Five unrelated colors can make a tall cabinet resemble a stack of misplaced toy boxes. Three related shades usually provide enough variation without overwhelming the furniture.
Our palette included:
- A pale blue-gray for the top section
- A medium, slightly muted coastal blue for the center
- A deep navy-blue for the base
The blue-gray kept the upper half visually light, while the navy gave the cabinet definition. A small amount of the neighboring colors was mixed at each transition point, creating two custom bridge shades. This prevented the gradient from jumping abruptly from “peaceful morning sky” to “submarine expedition.”
Test Before Committing
Paint colors frequently appear different on furniture than they do on a small paper chip. The room’s lighting, nearby wall colors, sheen, and the size of the painted surface can all affect the result. We tested the three shades on the back of a removable shelf and viewed them during the morning, afternoon, and evening.
Testing also reveals whether a color changes as it dries or whether a clear protective finish alters its appearance. General Finishes recommends testing colors on an inconspicuous part of the project before covering the entire piece.
Supplies Used for the Makeover
- Screwdriver and labeled bags for hardware
- Mild dish soap and clean water
- Wood filler and a flexible putty knife
- 120-, 180-, and 220-grit sandpaper
- Vacuum, lint-free cloths, and tack cloth
- Bonding or stain-blocking primer
- Three coordinated furniture or cabinet paint colors
- Two small paint trays for mixing transition shades
- High-quality angled brush
- Small foam or microfiber rollers
- Clean blending brushes
- Painter’s tape and drop cloths
- Optional compatible water-based clear topcoat
- Replacement knobs or pulls
A respirator or suitable dust mask, eye protection, gloves, and good ventilation are also important. Even when the paint is water-based, sanding creates fine particles, and finishes should be applied according to the manufacturer’s safety instructions.
Step 1: Remove the Doors, Shelves, and Hardware
Trying to paint around hinges and handles may seem faster, but it usually creates uneven edges and tiny paint ridges. We removed the doors, hinges, pulls, magnetic catches, and adjustable shelves. Every set of screws went into a labeled bag.
Labeling is not overly cautious. Once several similar hinges are rolling around on a workbench, they develop a mysterious ability to forget where they came from. Real Simple recommends numbering doors and organizing their hardware so reassembly does not become an unwanted puzzle.
Step 2: Clean Before Sanding
The entire armoire was washed with diluted dish soap and clean water. Special attention went to the areas around the pulls, where hand oils and furniture polish had accumulated. The surfaces were then allowed to dry completely.
Cleaning before sanding keeps grease from being ground deeper into the old finish. Paint needs a stable, clean surface, not a thin layer of household history. Sherwin-Williams, Lowe’s, The Home Depot, and Family Handyman all place cleaning and surface preparation ahead of primer and paint.
Step 3: Repair Damage and Identify the Material
Small dents and abandoned hardware holes were filled with wood filler. After drying, the repairs were sanded flush. Loose trim was glued and clamped before the cosmetic work began.
Material identification mattered. The armoire’s frame and doors were solid wood, but its side panels were veneered. Veneer should be scuff-sanded gently rather than aggressively stripped, because sanding through the thin decorative layer can reveal the substrate beneath.
MDF requires its own approach. Its porous edges may need filler or a sealing primer before painting, while laminate generally benefits from light scuffing and a high-adhesion bonding primer. This Old House, Sherwin-Williams, Lowe’s, and Bob Vila all emphasize adjusting surface preparation to the furniture material rather than treating every cabinet like bare lumber.
Step 4: Sand for Adhesion, Not Revenge
The goal was not to remove every trace of the old finish. We needed to dull the gloss, smooth damaged areas, and provide enough texture for the primer to grip.
We began with 120-grit paper on repaired and badly scratched areas, followed with 180 grit, and finished the broad surfaces with 220 grit. Curves and molding were sanded by hand using flexible sanding pads. The dust was vacuumed away before the piece was wiped with a clean cloth.
Fine sanding after coarser sanding helps remove visible scratches, while sanding in the direction of the grain reduces cross-grain marks. Lowe’s and This Old House recommend progressing toward finer grits and removing all dust before applying the next finish.
Step 5: Prime the Armoire
A bonding primer was applied to the glossy exterior, while a stain-blocking primer was used over a few suspicious reddish marks in the old wood. Without proper blocking, tannins or old stains can sometimes migrate through pale paint and appear just when you are preparing to admire your work.
The detailed molding was primed with an angled brush, followed by a small roller on the flat sections. After the primer dried, it was lightly sanded with 220-grit paper and cleaned again.
Primer improves adhesion and creates a more even base, especially when changing from a dark finish to a pale color. Lightly sanding dried primer can also remove texture, brush marks, and small debris.
Step 6: Map the Ombre Gradient
Before opening the paint, we divided the armoire visually into three broad zones. The pale blue-gray would cover roughly the upper third, the medium blue would dominate the middle, and the navy would begin above the lower third and continue to the feet.
The transition lines were marked lightly with removable tape placed beside, rather than across, the painting area. These marks acted as guides but did not create hard stripes.
Mix the Bridge Colors
In one tray, equal portions of the pale and medium blues were combined. In another, the medium and navy shades were mixed. These bridge colors made blending easier and reduced the amount of frantic brushing required while the paint was wet.
For highly predictable results, another option is to select four or five consecutive shades from one manufacturer’s color strip. For a softer custom gradient, start with one main color and add measured amounts of white. Whichever method you choose, record the ratios. “A little more blue” is not a formula; it is how touch-ups become philosophical debates.
Step 7: Paint and Blend the Doors
The doors were positioned horizontally, making drips less likely and giving us more control over the wet paint. Working from top to bottom, the pale color was rolled across the upper section, followed by the first bridge shade, the medium blue, the second bridge shade, and the navy.
Each transition was blended with a separate clean brush. The brush moved lightly in horizontal strokes across the boundary, alternating between the two neighboring colors. Heavy pressure would have removed paint rather than blending it.
The trick was to work quickly in manageable sections while both colors remained wet. We occasionally stepped back several feet to judge the transition. Up close, every brush mark can feel like a national emergency. From normal viewing distance, many of them disappear into a smooth visual gradient.
After the first coat dried, the surface was lightly sanded and a second thin coat was applied. Multiple thin coats generally level better and resist drips more successfully than one thick application.
Step 8: Paint the Cabinet Frame and Interior
The same gradient continued across the cabinet frame and side panels. To keep the transition aligned, measurements from the doors were transferred to the cabinet body.
Inside, we skipped the ombre effect and used the pale blue-gray throughout. A light interior makes stored items easier to see and prevents the cabinet from feeling like a decorative cave. The shelf edges received the medium blue as a subtle accent.
A small roller created a smoother finish across broad areas, while an angled brush reached corners and molding. Paint was applied in the direction of the wood grain where it remained visible. The Home Depot and This Old House both recommend brushes for detailed areas and rollers or sprayers when a smoother finish is desired on larger furniture surfaces.
Step 9: Protect the Finish and Allow It to Cure
The cabinet paint used for this project was formulated for furniture and trim, so a clear coat was optional. We added a compatible water-based topcoat only to the shelves, top surface, and high-touch door edges.
Not every painted armoire needs polyurethane. Some modern furniture and cabinet paints are designed to cure into a durable, washable film without an additional sealer. When a topcoat is used, it should be tested first because certain products can alter sheen, deepen colors, or cause pale shades to yellow.
Drying and curing are not the same thing. Paint may feel dry while remaining vulnerable beneath the surface. The doors were left off for several days, and the finish was handled carefully during the early curing period. Reinstalling hardware too soon can create dents, chips, and permanently attached door bumpers. Real Simple recommends giving painted cabinetry ample time before reassembly and treating it gently while the coating develops its full hardness.
Step 10: Add New Hardware
Simple brushed-brass pulls replaced the old ornate handles. Their warm finish complemented the cool blue paint without competing with the gradient. The original hinge locations were reused, avoiding unnecessary drilling.
Hardware is a small component with an outsized visual effect. Black pulls would have made the result feel sharper and more contemporary, while wood knobs would have softened the cabinet for a casual or coastal room. The important thing was choosing a style simple enough to let the ombre finish remain the main event.
The After: Lighter, Taller, and Far More Interesting
The completed armoire looks less bulky even though its dimensions have not changed. The pale upper section seems to recede toward the wall, while the darker base visually grounds the cabinet. The vertical gradient draws the eye upward, making the piece appear taller and more graceful.
Scratches and faded areas have disappeared beneath a smooth, coordinated finish. The brighter interior improves function, the updated hardware adds polish, and the deep lower color is practical in a zone more likely to encounter shoes, vacuum cleaners, and other low-altitude hazards.
Most importantly, the makeover preserved a useful piece of furniture. Instead of replacing a solid cabinet with a lower-quality alternative, the project adapted what was already available. That is the sweet spot of furniture upcycling: less waste, more character, and permission to create something that cannot be ordered from a catalog.
Common Ombre Furniture Makeover Mistakes
Skipping Surface Preparation
Specialty paint can simplify a project, but it cannot turn grease, peeling varnish, or loose paint into a stable foundation. Cleaning, repairing, and deglossing remain the safest route to a lasting finish.
Using Colors With Conflicting Undertones
A warm turquoise, cool gray-blue, and purple-leaning navy may look related in separate containers but fight when placed together. Test the complete sequence before painting the armoire.
Overworking the Blend
Repeatedly brushing partially dried paint creates ridges and muddy color. Blend while the surface is wet, then leave it alone. A slightly imperfect transition can be improved with the next thin coat.
Applying Too Much Paint
Thick paint collects in corners and around molding. It also dries unevenly and is more likely to sag. Benjamin Moore recommends sanding dried drips smooth with progressively finer paper before repainting rather than attempting to camouflage them beneath another heavy coat.
Reassembling the Armoire Too Soon
Fresh paint can stick where doors meet the frame. Allow sufficient curing time, add soft bumpers only when the finish is ready, and avoid loading shelves immediately.
Experiences and Lessons From an Ombre Armoire Makeover
The most revealing part of this project was how little of the transformation came from the final color itself. The dramatic “after” photograph may celebrate the gradient, but the quality of the makeover was decided much earlierduring cleaning, repair, sanding, and priming. Those stages are not glamorous, yet they determine whether the finished surface looks professionally intentional or begins peeling during its first disagreement with a laundry basket.
Another lesson was that ombre painting rewards planning more than artistic confidence. At first, blending three colors across tall doors seemed like a technique requiring the instincts of a studio painter. In practice, measuring the zones, preparing bridge colors, and assigning a clean brush to each transition removed most of the uncertainty. The process became less like spontaneous art and more like following a friendly recipe.
Working horizontally on the removable doors also made a remarkable difference. Painting them while attached would have saved a few minutes at the beginning and created hours of frustration later. With the doors flat, paint stayed where it belonged, the gradient was easier to compare, and the edges could be inspected under better light. Removing components may feel slow, but it often shortens the project by preventing corrections.
The first blended coat did not look perfect. A few sections appeared streaky, and the lower transition was more obvious than expected. That moment is familiar in furniture refinishing: the piece looks worse halfway through, and the nearest trash pickup suddenly seems unusually convenient. Allowing the coat to dry before judging it was essential. Once dry, a light sanding and second coat softened the differences.
The makeover also demonstrated the value of stepping away. During blending, it was tempting to inspect the doors from six inches away and chase every tiny variation. Viewed from across the room, however, the overall transition looked balanced. Furniture is experienced at normal living distance, not under laboratory magnification. Knowing when to stop prevented the wet paint from being overworked.
Color placement influenced the final effect as much as color selection. Putting the darkest shade at the bottom gave the armoire a stable base and concealed the area most likely to show scuffs. Reversing the gradient could work in a dramatic room, but a dark top might make a large cabinet feel visually top-heavy. The chosen arrangement made the cabinet feel lighter without sacrificing contrast.
The interior color was another unexpectedly important choice. Painting the exterior while leaving the interior brown would have made the makeover feel unfinished each time the doors opened. The pale interior required additional work, but it connected the design and made the storage space brighter. Small accents on the shelf edges added enough personality without turning every surface into a competing feature.
Patience during curing proved harder than patience during painting. Once the cabinet looked finished, the natural impulse was to install the hardware, fill the shelves, and begin staging photographs. Waiting protected the new coating from pressure marks and chips. A furniture makeover is not complete when the paint stops feeling wet; it is complete when the finish has developed enough strength for normal use.
Finally, the project showed why old furniture deserves a second look. The original armoire was not rare, fashionable, or especially charming. It was simply well-built and useful. Paint did not erase its history, but it allowed the cabinet to participate in a different room and a different style. That is what made the before-and-after satisfying: the result was not merely a new color. It was a practical object becoming welcome again.
Conclusion
An ombre armoire makeover combines careful furniture preparation with a forgiving decorative technique. By using coordinated colors, thin coats, controlled blending, and sufficient curing time, a dark or dated cabinet can become a lighter, more modern focal point. The transformation is dramatic, but it does not require exotic equipment or flawless artistic talentjust planning, patience, and the willingness to spend more time sanding than anyone will ever applaud.