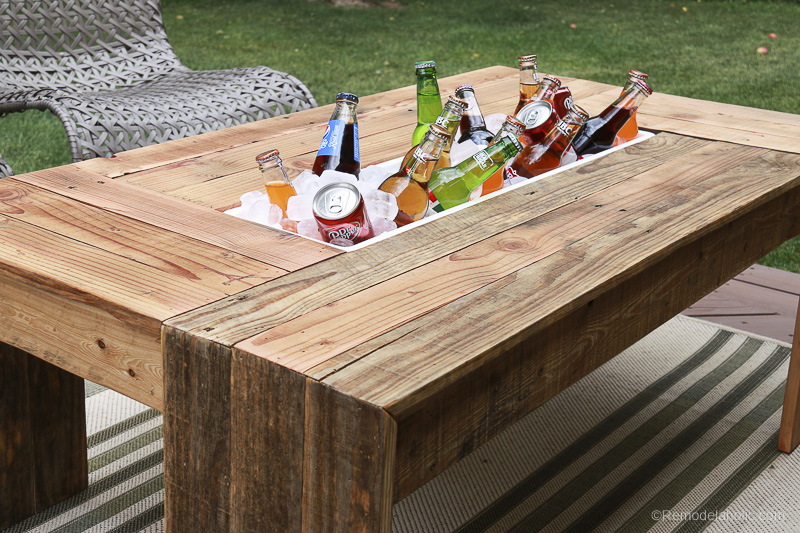
A good patio table holds snacks. A great patio table holds snacks, conversation, sunscreen, card games, and a sneaky little drink cooler hiding in the middle like it has been training for backyard greatness all winter. That is exactly why a DIY outdoor pallet coffee table with drink cooler is such a satisfying weekend project: it turns reclaimed wood into a practical outdoor centerpiece, saves money, and gives your patio the kind of “wait, you made that?” energy every DIYer secretly loves.
This project combines the rustic charm of pallet furniture with the usefulness of a built-in cooler trough. Instead of dragging a plastic cooler across the deck, you build a low coffee table with a removable insert in the center. Fill the insert with ice, tuck in canned drinks, juice boxes, sparkling water, or chilled fruit, and suddenly your patio has upgraded itself from “nice place to sit” to “mini outdoor lounge.” The best part? You do not need museum-grade woodworking skills. You need patience, safe pallet selection, a sensible plan, and the emotional strength to sand more than you originally expected.
Why Build an Outdoor Pallet Coffee Table With a Cooler?
Pallet projects are popular because they hit the magical DIY triangle: affordable, customizable, and slightly smug in the best way. A discarded pallet can become a coffee table, bench, shelf, planter, or garden bar. For this build, the pallet gives you character: nail holes, varied grain, weathered color, and a rustic outdoor look that feels relaxed rather than showroom-perfect.
The built-in drink cooler adds real function. At backyard gatherings, everyone eventually asks the same question: “Where are the drinks?” With a center cooler, the answer is not “in the kitchen,” “in the garage,” or “somewhere behind Uncle Dave.” It is right there in the table. The cooler insert can also double as a planter box, snack tray, herb display, or storage bin when you are not using ice.
This kind of table works especially well for patios, balconies, porches, fire pit seating areas, poolside lounges, and small backyards. Since it is lower than a dining table, it pairs naturally with outdoor sofas, Adirondack chairs, lounge chairs, and sectional seating. It is casual furniture with a useful trick built in.
Start With the Right Pallet
The most important step is choosing a safe pallet. Not every pallet deserves a second life as furniture. Some pallets may have been exposed to spills, chemicals, moisture, insects, or unknown cargo. For a project that will sit near drinks and snacks, be picky.
What to look for
Choose a clean, dry pallet with no strong odor, oily stains, mold, mystery residue, or broken stringers. Look for a pallet stamp. Pallets marked HT are heat-treated, which is generally preferred for DIY furniture. Avoid pallets marked MB, which indicates methyl bromide fumigation, and skip any pallet that looks like it has lived a hard life behind a suspicious warehouse.
Also avoid painted pallets unless you know exactly what they were used for. Brightly colored pallets often belong to specific shipping pools and may be treated, coated, or not meant to be taken. The best pallet is plain, clean, sturdy, and boring. Boring wood is underrated. Boring wood does not surprise you later.
Design Overview: How the Cooler Table Works
The simplest design uses pallet slats for the tabletop and a basic wood frame underneath. In the center, you leave an opening sized for a removable plastic planter box, metal tray, or food-safe storage bin. The container sits on support rails below the tabletop. When filled with ice, it becomes the drink cooler. When empty, you can lift it out to drain, clean, or swap it with a decorative insert.
A smart size for most patios is about 42 to 48 inches long, 22 to 28 inches wide, and 16 to 18 inches high. That height feels comfortable beside outdoor seating. The cooler opening can be long and narrow, around 24 to 36 inches long and 6 to 10 inches wide, depending on the insert you buy. Always buy or choose the insert first, then build the opening around it. Measuring the hole before owning the insert is how DIY projects learn sarcasm.
Materials and Tools
Materials
- 1 to 2 clean heat-treated pallets, depending on table size and usable boards
- 2×2 or 2×4 lumber for the frame and legs
- Exterior wood screws
- Exterior-grade wood glue
- Plastic planter box, metal trough, or removable storage bin for the cooler insert
- Outdoor wood stain, exterior paint, or spar urethane
- Sandpaper in coarse, medium, and fine grits
- Optional: casters, handles, bottle opener, drainage plug, decorative trim, or removable lid boards
Tools
- Work gloves and safety glasses
- Pry bar or pallet buster
- Hammer or nail puller
- Drill and driver bits
- Measuring tape and square
- Miter saw, circular saw, or handsaw
- Clamps
- Orbital sander or sanding block
- Paintbrush, foam brush, or lint-free cloth for finish
If you are new to power tools, get help from an experienced adult and follow the tool manufacturer’s instructions. DIY confidence is good. DIY overconfidence is how boards get cut twice and still end up too short.
Step-by-Step Build Guide
Step 1: Break down and clean the pallet
Start by removing the pallet slats carefully. A pallet buster makes this much easier, but a pry bar and patience can work. Pull nails as you go. If a board cracks, do not mourn it too long. Pallet wood has a dramatic personality, and some pieces simply want to become kindling-shaped scrap.
After dismantling, scrub the boards with mild soap and water, rinse them, and let them dry completely. Drying can take a day or two depending on weather. Do not seal damp wood. Moisture trapped under finish can cause peeling, cloudiness, or early rot.
Step 2: Sort the best boards
Lay the slats on the ground and group them by thickness, width, and condition. Choose the straightest boards for the tabletop, because uneven tabletop boards can make glasses wobble like they are auditioning for a disaster movie. Save shorter or more rustic pieces for trim, lower shelves, or decorative side panels.
Step 3: Build the base frame
Build a rectangular frame from 2×2 or 2×4 lumber. A typical coffee table frame might be 44 inches by 24 inches, but adjust it to your space. Use exterior wood glue at the joints and secure everything with exterior screws. Check for square by measuring diagonally from corner to corner. If both diagonal measurements match, the frame is square. If not, gently shift the frame before the glue sets.
Add cross supports where the cooler insert will sit. These supports should hold the weight of ice and drinks without sagging. Remember that ice is heavier than it looks. It arrives at the party pretending to be fluffy frozen confetti, then suddenly weighs like a small appliance.
Step 4: Frame the cooler opening
Place your planter box or cooler tray in the center of the frame and mark the opening. Leave enough clearance so the insert can lift in and out easily. Add support rails under the rim of the insert. The goal is for the container lip to rest neatly at tabletop level or slightly below it.
For a cleaner look, build a simple rectangular border around the cooler opening. This creates a finished edge and helps protect the pallet slats from moisture. If your insert has no drain, choose one that is easy to remove. If it has a drain plug, position it so water can empty into a bucket rather than onto your deck or patio.
Step 5: Attach the tabletop slats
Cut the pallet boards to length and dry-fit them before attaching. You can run the boards lengthwise for a simple farmhouse look, crosswise for a chunkier rustic style, or in a herringbone pattern if you enjoy both beauty and extra measuring. Leave a tiny gap between boards so rainwater can escape.
Attach the boards with exterior screws or brad nails and exterior glue. Pre-drilling helps prevent splitting, especially near the ends of pallet slats. Keep the cooler opening clear and trim the boards neatly around it. A jigsaw is helpful for small adjustments.
Step 6: Add legs and lower bracing
Cut four legs to the same height, usually between 15 and 18 inches. Attach them inside the frame corners with screws and glue. Add lower side braces if the table feels wobbly. Outdoor furniture gets bumped, dragged, leaned on, and occasionally used as a footrest by someone who says, “Don’t worry, I’m careful.” Build it stronger than necessary.
If you want mobility, add locking outdoor casters. Casters are useful on decks and smooth patios, but choose larger wheels if the table will roll over pavers or uneven concrete.
Step 7: Sand until it feels friendly
Pallet wood can be rough, splintery, and full of attitude. Sand every visible surface, edge, and corner. Start with coarse grit to remove roughness, then move to medium and fine grits for a smoother finish. Round over sharp edges slightly. The final table should feel rustic, not like it wants to high-five your skin with a splinter.
Step 8: Finish for outdoor use
Outdoor wood needs protection from moisture, sunlight, temperature swings, and everyday use. You can use exterior stain, outdoor paint, deck sealer, or spar urethane. For a natural look, use a semi-transparent exterior stain. For a modern patio, black or charcoal paint can make pallet wood look surprisingly upscale. For a coastal feel, try whitewash or a pale gray finish.
Apply finish to all sides when possible, including the underside. The underside is where moisture loves to hide and start trouble. Follow the product label for drying time and number of coats. If the table will live outside full-time, consider adding several protective coats and refreshing the finish every year or two.
Smart Customizations
Add a removable tabletop cover
Cut two or three boards that fit over the cooler opening when the insert is not in use. This lets the table become a full coffee table again. Add small cleats underneath the cover boards so they stay aligned.
Install a drain
If your cooler insert is plastic and thick enough, you can add a small drain fitting and tube. This makes cleanup easier after the ice melts. Route the water into a bucket or garden area, not onto a wood deck where standing moisture can cause stains.
Add a lower shelf
A bottom shelf is perfect for outdoor pillows, board games, citronella candles, napkins, or a basket of sunscreen. Use extra pallet slats and leave gaps for airflow.
Use the cooler as a planter
When you are not entertaining, swap the ice for herbs, succulents, or seasonal flowers. A planter insert filled with basil, mint, or rosemary makes the table smell amazing and gives your patio a fresh, lived-in look.
Common Mistakes to Avoid
The first mistake is using questionable pallet wood. If it smells odd, looks stained, or has no clear history, skip it. The second mistake is building the opening before selecting the cooler insert. That almost always leads to creative language and emergency trim pieces. The third mistake is under-supporting the cooler. A tray full of ice and drinks needs strong rails, not hopeful little scraps.
Another common mistake is rushing the finish. Outdoor furniture should be sealed properly, especially end grain, edges, and screw holes. Finally, do not forget drainage. A cooler table is fun until you have a cold puddle sitting in the middle for two days. Make the insert removable, washable, and easy to empty.
Budget and Time Estimate
If you already have a pallet and basic tools, this project can be very affordable. Your main costs may be screws, finish, glue, sandpaper, and the cooler insert. A simple version can often be built for much less than buying a ready-made outdoor cooler table. A more polished version with casters, premium stain, trim, and a drain will cost more, but still gives you custom furniture at a friendly price.
Plan for one weekend. Day one is for breaking down pallets, cutting, framing, and assembly. Day two is for sanding and finishing. If the weather is humid, give the finish extra drying time. Outdoor DIY has a way of negotiating with the weather, and the weather usually has a better lawyer.
Care and Maintenance
Keep the table covered when not in use, especially during heavy rain or snow. Empty the cooler insert after each use, wipe it clean, and let it dry before storing. Reapply sealer or exterior finish as needed. If you notice rough spots, give them a quick sanding before they become splinter zones.
At the start of each outdoor season, check screws, legs, braces, and the cooler support rails. Tighten anything loose. Clean the tabletop with mild soap and water. Avoid harsh chemicals unless your finish specifically allows them. A little maintenance keeps the table looking intentional instead of abandoned.
Real-World Experience: What This Project Teaches You
Building a DIY outdoor pallet coffee table with drink cooler teaches you something that every DIYer eventually learns: the project is never just the project. On paper, you are building a table. In reality, you are learning how to judge reclaimed wood, solve measurement problems, choose finishes, and accept that no pallet board has ever been perfectly straight in the history of patio furniture.
The first experience most people have is surprise. Pallet wood looks simple until you start dismantling it. Some nails slide out politely. Others cling to the board like they signed a lifetime contract. A few boards split no matter how carefully you pry. That is normal. The trick is to collect more wood than you think you need and treat the imperfect pieces as design opportunities. A knot, crack, or nail mark can add character when placed thoughtfully.
The second lesson is that sanding matters more than expected. A rustic table can still be smooth. In fact, the best pallet furniture keeps the visual texture while removing the physical roughness. You want guests to notice the reclaimed wood grain, not quietly inspect their hand for splinters. Spending extra time rounding edges and softening corners makes the finished table feel much more professional.
The third lesson is that the cooler insert controls the whole design. Many beginners start with a table size and then go hunting for a container that fits. That approach can work, but it often creates frustration. It is much easier to choose the insert first. A long plastic planter box is usually affordable and easy to find. A metal trough looks stylish but may need extra protection around sharp edges. A food-safe storage bin can be practical because it lifts out easily and cleans fast.
The fourth experience is the joy of customization. Once the basic table is built, ideas start multiplying. Maybe you add a lower shelf. Maybe you put locking wheels on the legs. Maybe you paint the base black and stain the top walnut. Maybe you create a removable wood cover for the cooler opening so the table can hold a tray of snacks. This is where the project becomes yours. Store-bought furniture rarely gives you that feeling.
The fifth lesson is about outdoor reality. Sun fades wood. Rain finds weak spots. Ice melts. People spill lemonade. Patio furniture lives a harder life than indoor furniture, so the finish is not decoration; it is armor. A good exterior finish helps the table survive weather and use. Covering the table when not in use may not sound glamorous, but neither is rebuilding a swollen tabletop because you wanted to “see how it does in the rain.” Spoiler: rain usually wins.
The best part of this project is how useful it becomes after the build. During a cookout, people naturally gather around it. Kids grab cold juice. Adults reach for sparkling water. Someone puts chips on one corner, sunglasses on another, and a phone dangerously close to the ice because humans are adventurous creatures. The table becomes more than furniture; it becomes the center of the patio.
And when nobody is visiting, it still earns its place. Fill the insert with herbs, flowers, or smooth river stones. Use it for storage. Cover the opening and turn it back into a normal coffee table. A flexible piece of furniture is always more valuable outdoors, where space is limited and every item needs to work a little harder.
Most importantly, this project gives you the satisfaction of making something practical from material that might otherwise be ignored. It is sustainable, budget-conscious, and genuinely useful. Plus, every time someone compliments it, you get to say, “Thanks, I made it,” which is one of the finest sentences in the DIY language.
Conclusion
A DIY outdoor pallet coffee table with drink cooler is the perfect blend of rustic style and backyard convenience. It is budget-friendly, customizable, and practical enough to use all season long. Choose safe pallet wood, build a strong frame, support the cooler insert properly, sand thoroughly, and protect the table with an exterior finish. Do that, and you will have an outdoor coffee table that keeps drinks cold, sparks conversation, and makes your patio feel more welcoming.
This is not just a pallet project. It is a patio upgrade, a weekend challenge, and a small reminder that great outdoor furniture does not have to come from a showroom. Sometimes it starts with a pallet, a planter box, and the brave decision to sand until your arms question your hobbies.