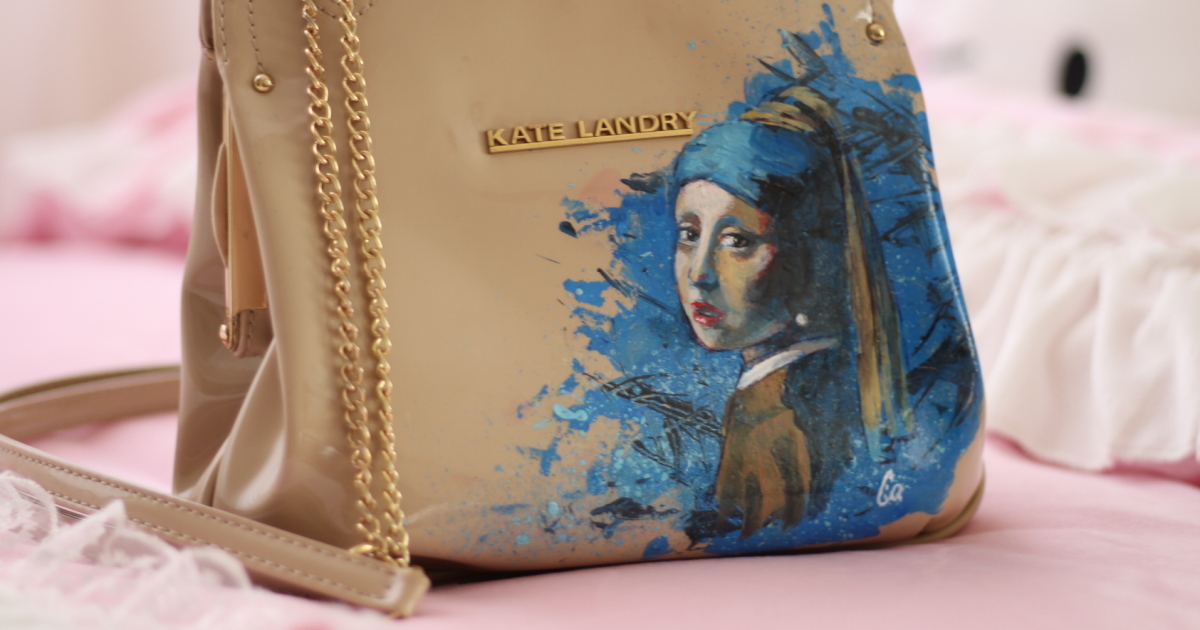
There are two kinds of purse stains: the tiny ones you pretend not to see, and the dramatic ones that introduce themselves before you do. Mine belonged to the second category. It sat right on the front of the bag, bold as a billboard, looking less like an accident and more like a design decision made by a raccoon with espresso.
At first, I did what any reasonable person would do: I panicked, dabbed it with a cloth, stared at it under three different lights, and briefly considered carrying the purse only with the stained side pressed against my body forever. But then a better idea arrived. What if the stain was not the end of the purse? What if it was the beginning of a tiny art project?
That is how I ended up painting on my purse. Not because I woke up one morning feeling like a luxury handbag customizer, but because life handed me a stain and I refused to let it win. The result was surprisingly charming, deeply personal, and a reminder that sometimes the best DIY projects begin with one small disaster and a bottle of paint.
Why Painting Over a Purse Stain Actually Makes Sense
A stained purse can feel like a style emergency, especially when the bag is otherwise in good shape. But throwing it away is not always necessary. Many handbags can be refreshed, disguised, or completely transformed with the right cleaning, preparation, paint, and finish.
This idea fits neatly into the world of upcycling, which means taking something old, damaged, or unwanted and turning it into something useful or more beautiful. Instead of treating a stain as a reason to retire a purse, painting gives the bag a second act. Think of it as fashion’s version of a plot twist.
It also adds personality. A painted purse can look intentional, artistic, and one-of-a-kind. A floral design, abstract pattern, tiny landscape, monogram, moon-and-stars motif, fruit illustration, or even a playful doodle can cover a stain while making the bag feel custom. Suddenly, the purse is no longer “the one with the mark.” It is “the one everyone asks about.”
First, Figure Out What Your Purse Is Made Of
Before grabbing paint like a caffeinated craft goblin, pause and identify the material. Different purse surfaces need different treatment.
Leather
Leather is beautiful, durable, and slightly dramatic. It can be painted, but it needs careful preparation. Smooth finished leather often has oils, waxes, or protective coatings that can prevent paint from sticking. A leather-safe cleaner and, in some cases, a leather preparer or deglazer may be needed before painting. Always test products in a hidden area first.
Faux Leather
Faux leather can be painted, but it may be slicker and less flexible than real leather. Paint may sit on top rather than bond deeply with the surface. Thin layers are important because thick paint can crack, peel, or look like frosting on a cupcake that lost its confidence.
Canvas or Fabric
Canvas purses and fabric totes are often the easiest to decorate. Fabric paint, acrylic paint mixed with fabric medium, or textile paint can work well. Depending on the product, the finished design may need heat-setting with an iron from the reverse side or protection with a fabric-safe sealer.
Suede or Nubuck
Suede and nubuck are trickier because their soft, napped texture can be damaged by moisture and paint. If the stain is on suede, consider professional cleaning, a suede brush, or a decorative patch instead of painting directly over it.
Clean the Purse Before Painting
The stain may be the reason for the project, but dirt, oil, lotion, sunscreen, makeup, and everyday grime can interfere with the paint. Cleaning is not glamorous, but neither is watching your artwork peel off because the surface was secretly wearing a layer of hand cream.
For leather or faux leather, use a soft cloth and a gentle leather-safe cleaner. Avoid soaking the purse. Leather does not enjoy swimming. Harsh household cleaners, bleach, ammonia, abrasive scrubbers, and random internet “miracle” hacks can damage the finish, dry the material, or cause discoloration.
For fabric or canvas, spot-clean gently and let the bag dry completely. If the stain is oily, absorb as much as possible before painting. Paint can hide discoloration, but it cannot always bond well over grease. When in doubt, clean, dry, test, and then proceed.
Choose the Right Paint for the Job
The best paint depends on the purse material. For leather, acrylic leather paint is usually the smartest choice because it is designed to remain more flexible than regular craft paint. For fabric bags, fabric paint or acrylic paint mixed with fabric medium can create a softer finish. For faux leather, flexible acrylic leather paint may work, but testing is especially important.
Regular acrylic craft paint can be tempting because it is affordable and comes in approximately one million colors, including “Pumpkin Spice Regret” and “Mermaid Tax Refund.” However, plain acrylic can dry stiff on flexible surfaces. If the purse bends often, stiff paint may crack over time. Use thin coats and choose flexible formulas whenever possible.
Plan a Design That Works With the Stain
The stain is not the enemy anymore. It is your weird little creative assistant. Let its size, shape, and location guide the design.
If the stain is small
Try a tiny flower, star, bee, cherry, heart, shell, moon, or simple monogram. Small designs are less intimidating and can look elegant rather than “I had an accident with a craft drawer.”
If the stain is wide or irregular
Use a larger motif such as a cluster of wildflowers, vines, leaves, clouds, butterflies, abstract brushstrokes, or a scenic patch. Organic shapes are forgiving because they do not need perfect symmetry.
If the stain is near an edge
Create a border design. A painted vine along the bottom of a purse, little stars near a zipper, or a color-blocked corner can look intentional and modern.
If the stain is right in the center
Go bold. Center stains are divas. Give them a starring role with a painted medallion, sunburst, floral bouquet, or graphic shape.
Supplies You May Need
You do not need an entire art studio, although the project may give you an excuse to visit the craft store and wander the paint aisle like a person with important business.
- Soft cloths or microfiber towels
- Leather-safe cleaner or mild cleaner appropriate for the bag material
- Leather preparer/deglazer for certain leather projects
- Acrylic leather paint, fabric paint, or flexible acrylic paint
- Small detail brushes and one flat brush
- Painter’s tape
- Pencil, chalk, or removable fabric marker
- Palette or paper plate
- Clear leather finisher, acrylic finisher, or fabric-safe sealer
- Cardboard or tissue paper to help the purse hold its shape
How I Painted Over the Stain
I started by emptying the purse, which revealed three receipts, a lip balm without a cap, and a mysterious mint that had clearly seen things. Then I stuffed the bag with tissue paper so the front panel stayed firm while I worked.
Next, I cleaned the surface gently and let it dry. This step matters more than it seems. Paint needs a clean surface, and patience needs a snack. I sketched a loose design around the stain rather than directly on top of it at first. The mark was uneven, so I chose a floral design with leaves and small curved stems. Flowers are ideal for stain camouflage because nature itself is uneven. Nobody has ever looked at a wildflower and said, “Excuse me, that petal lacks corporate alignment.”
I applied the first layer of paint very thinly. This felt wrong at first because I wanted instant coverage, but thin coats are the secret to a smoother, more flexible finish. Thick paint can clump and crack, especially on leather or faux leather. After the first coat dried, I added another. Then another. The stain slowly disappeared under petals, leaves, and tiny highlights.
Once the artwork was finished, I let it dry fully. I resisted touching it every eight seconds, which was spiritually difficult. Finally, I applied a clear finisher in a thin coat to protect the painted area. The purse looked refreshed, personal, and honestly more interesting than it had before the stain.
Design Ideas for Painting a Stained Purse
If you are not sure what to paint, start with the stain’s personality. Yes, stains have personalities. Coffee stains are chaotic academics. Ink stains are tiny villains. Makeup stains are glamorous but rude.
Floral Cover-Up
Paint roses, daisies, lavender, tulips, poppies, or wildflowers over the stained area. Add leaves and stems to extend the design naturally across the purse.
Abstract Color Block
Use painter’s tape to create geometric sections. Paint one corner, a stripe, or a half-circle. This works especially well on structured bags with clean lines.
Celestial Theme
Stars, moons, tiny planets, and sparkles can hide small marks beautifully. Metallic paint can add shine, but use it sparingly for a more polished look.
Fruit or Food Motifs
Cherries, lemons, oranges, strawberries, and peaches are cheerful and easy to recognize. A tiny lemon branch can make a stain look like it was simply waiting to become citrus.
Minimal Line Art
For a modern look, try a simple face outline, botanical line drawing, or delicate hand-drawn pattern. Use a fine brush and practice on paper first.
Common Mistakes to Avoid
The biggest mistake is painting too thickly. A heavy coat may cover the stain quickly, but it can dry stiff and uneven. Build color slowly with thin layers.
The second mistake is skipping the test patch. Even gentle cleaners and specialty paints can react differently depending on the purse finish. Test somewhere hidden, such as the underside of a flap or inside edge.
The third mistake is using the purse too soon. Let paint and sealer cure properly. Dry to the touch does not always mean ready for daily use. Give the finish time to become durable before tossing the bag into real life with keys, lip gloss, and that one pen that cannot be trusted.
Another mistake is ignoring the purse’s movement. Areas that bend, fold, or rub against clothing will experience more wear. Designs last longer on flatter, more stable sections.
How to Protect the Finished Design
After painting, protection matters. A clear finisher or sealer can help guard the design from rubbing, moisture, and daily handling. Use a product that matches the paint and purse material. Leather paint usually pairs best with leather finishers, while fabric paint may need heat-setting or a textile-safe protective layer.
Store the purse upright in a dust bag or cotton pillowcase. Keep it away from direct sunlight for long periods, which can fade both the original material and the painted design. Avoid overstuffing the bag because stretching can stress the painted surface.
For cleaning, wipe gently with a soft cloth. Do not scrub the artwork. Painted purses like compliments, not exfoliation.
Why This DIY Project Feels So Satisfying
Painting over a purse stain is not just about saving money, although saving money is delightful and deserves applause. It is also about changing the story of an object. The purse went from damaged to customized. The flaw became the feature.
There is something deeply satisfying about refusing to discard something useful simply because it is imperfect. We live in a world where replacing things is often easier than repairing them. But DIY restoration asks a better question: Can this still become something beautiful?
In this case, the answer was yes. Very yes. Yes with tiny painted leaves.
500-Word Experience Section: What I Learned From Painting My Stained Purse
The most surprising part of painting my purse was how quickly embarrassment turned into curiosity. At first, I saw only the stain. It seemed huge, even though it probably looked much smaller to everyone else. That is the strange thing about stains on personal items: they become emotional. A mark on a purse can feel like a public announcement that says, “Hello, I do not have my life together.” Of course, nobody else is paying that much attention. They are busy wondering where they parked or whether they replied to that email.
Once I decided to paint it, the mood changed. The purse became less of a problem and more of a canvas. I spent time choosing colors, testing brushstrokes, and imagining how the design could wrap around the mark. I learned that a successful DIY purse painting project is not about pretending the stain never happened. It is about working with the stain’s shape and making it disappear into something more interesting.
I also learned that patience is not optional. The first coat looked unimpressive. It did not cover everything, and for a moment I wondered if I had made the purse worse. This is the part of every craft project where confidence briefly leaves the room. But the second coat improved it. The third coat made it look intentional. By the time I added details, the original stain was no longer the main character.
Another lesson: small imperfections make handmade items charming. One leaf was slightly larger than the others. One flower leaned dramatically to the left, like it had heard gossip. But the overall effect worked. Handmade designs do not need factory-level sameness. In fact, that is the point. The purse became mine in a way it had not been before.
The project also made me more thoughtful about taking care of my accessories. Now I store purses better, clean them gently, and avoid placing them on restaurant floors, which are basically obstacle courses for handbags. I also carry a tiny pouch inside my bag for pens, lipstick, and anything else capable of betrayal.
Most importantly, painting my stained purse reminded me that creativity often starts as damage control. We do not always begin with a perfect plan. Sometimes we begin with a spill, a smudge, a scratch, or a mistake. Then we make a decision: hide it, toss it, or transform it. I chose transform, and I would absolutely do it again.
Now, whenever someone compliments the purse, I smile because I know the secret. Under those painted flowers is a stain that tried to ruin the bag and accidentally gave it a personality upgrade. That feels like a win. A stylish, slightly messy, very human win.
Conclusion
If your purse has a stain, do not rush to banish it to the back of the closet. With the right preparation, flexible paint, a thoughtful design, and a protective finish, a stained purse can become a custom accessory with charm and character. Whether you paint flowers, stars, abstract shapes, or a tiny lemon branch with main-character energy, the goal is not perfection. The goal is transformation.
A stain may be annoying, but it can also be an invitation. Your purse is already carrying your keys, wallet, lip balm, and emotional support receipts. It might as well carry a little art, too.
Note: This article is based on practical handbag-care, leather-painting, fabric-painting, and upcycling principles. Always test cleaners, paint, and finishers on a hidden area before applying them to the visible part of your purse.