Every electronics hobbyist eventually reaches the same dramatic moment: you open a drawer looking for one humble 10k resistor and discover a geological layer of jumper wires, mystery capacitors, orphaned screws, random LEDs, and at least one connector you are absolutely sure you bought for a project in 2019. This is not a parts drawer anymore. It is a tiny landfill with ambition.
The good news is that organizing components does not require a corporate warehouse, a laser-guided robot, or a spreadsheet so complicated it needs its own coffee mug. The easy way is to build a practical system around how you actually work. That means your electronic component storage should make parts easy to find, easy to return, easy to reorder, and hard to accidentally destroy with static electricity, moisture, or “I’ll just put this here for now” energy.
This guide breaks down a simple, maker-friendly method for organizing resistors, capacitors, ICs, modules, wires, fasteners, sensors, and all the little bits that make a project possible. We will cover bins, binders, labels, QR codes, inventory tools, ESD-safe storage, moisture-sensitive devices, and the underrated art of not buying the same MOSFET three times because you forgot where the first two went.
Why Component Organization Matters More Than You Think
Organizing components is not just about making your bench look pretty for social media. Although, yes, a tidy wall of labeled bins does have a certain “I have my life together” glow. The real reason is workflow. When your parts are easy to find, you build faster, make fewer mistakes, and stay in the creative zone longer.
In electronics, momentum is fragile. You can be halfway through a circuit, holding the perfect idea in your head, then lose twenty minutes hunting for a voltage regulator. By the time you find it, your brain has moved from “innovative engineering mode” to “why is there a guitar pick in my resistor drawer?” mode.
A good component organizer reduces that friction. It also prevents duplicate purchases, protects sensitive parts, and helps you understand what you actually own. Most makers do not have too few parts. They have too many unknown parts in too many unknown places.
The Core Rule: Store Components by How You Use Them
The easiest mistake is organizing parts according to someone else’s perfect system. A production lab, a repair shop, a YouTube maker, and a weekend Arduino tinkerer all need different layouts. The best system is the one that matches your projects, your space, and your level of patience.
Start by dividing your collection into working categories:
- Common passives: resistors, capacitors, inductors
- Semiconductors: diodes, transistors, MOSFETs, regulators, ICs
- Modules and boards: microcontrollers, sensors, displays, motor drivers
- Connectors and cables: headers, JST, USB, Dupont, terminal blocks
- Mechanical hardware: screws, nuts, standoffs, washers, spacers
- Consumables: solder, heat shrink, tape, flux, wire
- Project leftovers: custom PCBs, partially assembled boards, special-order parts
This is your first victory. You are no longer fighting “the drawer.” You are managing categories. The drawer has lost its power.
Small Bags and Binders: The Compact Component Storage Hero
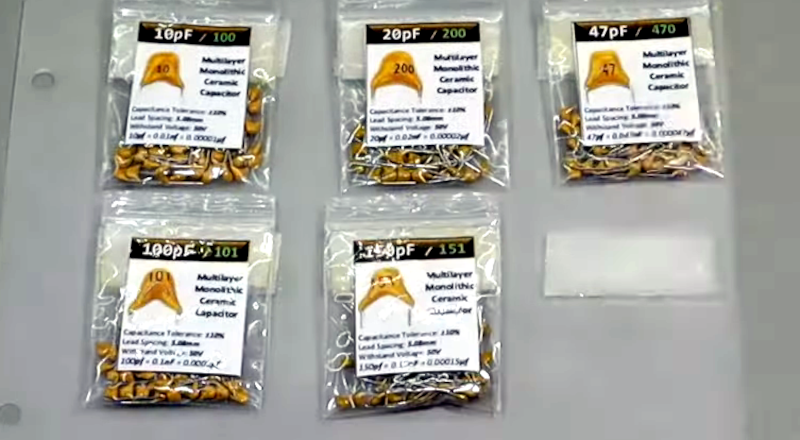
One of the smartest low-cost methods for organizing components is the small-bag-and-binder system. The idea is simple: place components in small zipper bags, label each bag clearly, and attach or store those bags in binder pages, plastic sheets, or pocket organizers.
This works especially well for small quantities of components: sensors, ICs, transistor samples, breakout boards, crystals, connectors, and specialty parts. A binder can hold hundreds of components in a surprisingly small footprint. Instead of digging through a box, you flip pages like a catalog. It feels wonderfully civilized, like your resistors finally got library cards.
What to Put on Each Label
A label should tell you what the part is without requiring a detective hat. For most components, include:
- Part name or value
- Package type, such as 0805, TO-220, DIP-8, or SOT-23
- Voltage, current, tolerance, or power rating when relevant
- Manufacturer part number
- Quantity
- Storage location code
- Optional QR code linking to a datasheet or inventory record
The label is the difference between “100nF ceramic capacitor, 50V, X7R, 0805” and “small beige rectangle of mystery.” The first one helps you finish a board. The second one helps you develop trust issues.
Bins, Drawers, and Shelves: Best for Larger Parts
Binders are great for small components, but they are not magic. You do not want to store a spool of wire, a box of stepper motors, or a pile of USB cables in a binder unless you enjoy chaos with holes punched in it.
Use bins and drawers for bulkier parts. Clear bins are useful because you can see what is inside. Drawer cabinets are excellent for fasteners, knobs, standoffs, LEDs, switches, and connectors. Open-front bins on shelving work well for cables, tools, project boxes, and larger modules.
The most important rule is simple: every bin needs a label. A bin without a label is just a drawer with better posture.
Use Location Codes
If you have more than a handful of containers, create location codes. For example:
- B1-R3: Binder 1, row 3
- D2-14: Drawer cabinet 2, drawer 14
- S1-B5: Shelf 1, bin 5
- WALL-A7: Wall rack, bin A7
Location codes are powerful because they separate the inventory record from the physical storage. You can move a part later and only update one location field. Future you will be grateful. Future you may even stop muttering under their breath while looking for JST connectors.
Resistor Storage: Do Not Overcomplicate the Tiny Stripes
Resistors deserve special treatment because they multiply like socks in reverse: you never find the one you need, yet somehow have hundreds. For through-hole resistors, envelopes, coin sleeves, labeled zipper bags, test tubes, or small compartment boxes can all work. The key is sorting by value and keeping the label visible.
For SMD resistors and capacitors, sample books are extremely convenient. They keep common values sorted, labeled, and flat. Cut tape can also be stored in small bags or binder pockets. Avoid dumping loose SMD parts into open compartments unless you enjoy identifying dust-sized rectangles with tweezers while questioning your life choices.
A Practical Resistor Label Format
Use a consistent format such as:
10kΩ | 1% | 1/4W | Through-hole | Qty 80
For SMD parts:
10kΩ | 1% | 0805 | Qty 100 | Reel cut tape
This keeps selection fast and reduces mistakes. A 10k resistor and a 100k resistor may look like cousins, but your circuit will definitely notice the difference.
ESD-Safe Storage: Protect the Parts You Cannot See Inside
Many electronic components are sensitive to electrostatic discharge, commonly called ESD. The tricky part is that ESD damage is not always obvious. A component may fail instantly, or it may become weakened and fail later. That delayed failure is the villain in the movie: quiet, expensive, and deeply annoying.
For static-sensitive parts such as MOSFETs, ICs, sensors, RF devices, and some modules, use anti-static or static-shielding bags. Regular plastic bags are fine for screws, headers, and many passive through-hole parts, but they are not a universal solution for semiconductors.
For a home lab, you do not need to turn your bedroom into a semiconductor cleanroom. A sensible ESD-safe setup can include anti-static bags, conductive foam for loose ICs, an ESD mat, a wrist strap when handling sensitive devices, and a habit of keeping parts in their protective packaging until needed.
Moisture-Sensitive Components: Keep the Bag, Read the Label
Some surface-mount components are moisture-sensitive. Plastic IC packages can absorb moisture from the air. During high-temperature solder reflow, that trapped moisture may expand and cause internal damage. This is why many components arrive in moisture barrier bags with desiccant and humidity indicator cards.
If you are hand-soldering hobby modules, this may not matter every day. If you are doing reflow work, building batches, or using expensive ICs, it matters a lot. Keep moisture-sensitive devices in their original sealed packaging when possible. If you open the bag, record the date, keep the humidity card, and reseal parts with fresh desiccant if you will not use them soon.
Here is the easy version: do not casually toss moisture-sensitive ICs into a random drawer beside a half-eaten packet of silica gel and hope science looks the other way.
Inventory: The Simple Database That Saves Your Wallet
At some point, physical organization is not enough. If your parts no longer fit in one small box, you need an inventory system. This does not have to be complicated. A spreadsheet can work. So can dedicated electronics inventory software. The goal is to answer four questions quickly:
- What do I have?
- How many do I have?
- Where is it stored?
- Do I need to reorder it?
For each part, track the part number, description, value, package, quantity, location, supplier, and datasheet link. If you build projects from BOMs, add a project field so you know which parts are reserved. Otherwise, you may “borrow” a regulator from one project and later discover that your nearly finished board is missing exactly one regulator. This is how benches learn new bad words.
When to Use QR Codes or Barcodes
QR codes and barcodes are not required, but they become helpful when your collection grows. A QR code can link to a datasheet, inventory page, or project note. A barcode can make stock updates faster when parts arrive.
The easy approach is to start with plain text labels and add codes later. Do not let the perfect inventory system stop you from building a good enough one today.
The “Incoming Parts” Routine
Most organization systems fail at the same place: new parts arrive, you are busy, and the bag goes into a temporary pile. That temporary pile becomes a permanent mountain. The mountain becomes folklore.
Create a simple incoming-parts routine:
- Open the package in one place.
- Check the invoice or packing slip.
- Keep supplier labels when they contain useful part numbers.
- Add or update the part in your inventory.
- Print or write a clear label.
- Place the component in its assigned storage location.
- Throw away packaging you do not need.
This may take a few minutes per order, but it prevents hours of searching later. Treat incoming parts like groceries: they do not belong in the hallway forever.
Organizing for Speed: Put Common Parts Closest
Not every part deserves prime real estate. The components you use weekly should be within arm’s reach. The parts you use monthly can live nearby. Rare parts can live in clearly labeled storage further away.
For example, keep common resistors, capacitors, jumper wires, headers, heat shrink, microcontroller boards, and frequently used tools close to the bench. Store rarely used transformers, old displays, specialty connectors, and project leftovers on shelves or in secondary bins.
This method follows a simple workshop truth: convenience should match frequency. If you use it often, do not make yourself stand up, cross the room, move three boxes, and negotiate with gravity.
How to Handle Project Leftovers
Project leftovers are dangerous because they feel too useful to discard and too specific to sort. The solution is a “project leftovers” area with rules. Use one bin or binder section for current project extras. Add a label with the project name, date, and contents.
After the project is finished, sort the leftovers back into general inventory or archive them in a labeled project bag. Do not let every abandoned PCB become a historical artifact. Unless your workshop is also a museum, in which case please install better lighting.
Specific Examples of Easy Component Organization
Example 1: Beginner Arduino Workbench
A beginner setup might include one small drawer cabinet for LEDs, resistors, buttons, sensors, and headers; one box for microcontroller boards; one bin for jumper wires and USB cables; and one binder for small modules. A spreadsheet tracks only part name, quantity, and location. This is simple, cheap, and enough to stop most bench chaos.
Example 2: SMD Prototyping Station
An SMD-heavy bench benefits from resistor and capacitor books, labeled cut-tape bags, ESD-safe boxes for ICs, and a dry storage plan for moisture-sensitive parts. Labels should include package sizes because 0603, 0805, and 1206 parts do not politely announce themselves after falling onto the bench.
Example 3: Repair and Service Bench
A repair bench should prioritize speed. Keep common fuses, connectors, switches, regulators, capacitors, screws, and cables in clearly labeled drawers. Track fast-moving items with minimum stock levels. If you always use 100uF electrolytic capacitors, do not wait until the drawer contains one lonely capacitor rolling around like a tumbleweed.
Common Mistakes to Avoid
The first mistake is sorting too deeply too soon. You do not need a separate drawer for every possible value if you only own three of each. Start broad, then refine categories as your collection grows.
The second mistake is using containers that are hard to open. If returning a part is annoying, you will not return it. The system must make cleanup easy, not just storage impressive.
The third mistake is trusting memory. Memory is useful for birthdays, passwords you forgot to save, and the location of snacks. It is not a reliable inventory database for 1,000 tiny components.
The fourth mistake is ignoring labels from suppliers. Supplier labels often contain manufacturer part numbers, batch details, and package information. Keep them, copy them, or photograph them before discarding packaging.
A 30-Minute Starter Plan
If your bench is currently a component soup, do not try to fix everything in one heroic weekend. Start with a 30-minute reset:
- Choose one category, such as resistors or connectors.
- Gather every related part from drawers, bags, boxes, and the mysterious corner.
- Throw away obvious trash and broken packaging.
- Sort parts into broad groups.
- Label each group.
- Assign each group one storage location.
- Write the location down.
Repeat this process category by category. Organization becomes much easier when you stop treating it like one giant project and start treating it like routine maintenance.
Experience Notes: What Actually Works in Real Workshops
The biggest lesson from organizing electronic components is that the best system is rarely the fanciest one. A beautifully designed storage wall is useless if you do not put parts back. A plain cardboard box with excellent labels can outperform an expensive drawer cabinet full of unlabeled confusion. The goal is not to create a showroom. The goal is to make your next project less irritating.
One experience that comes up again and again is the value of visible labels. When labels face outward, cleanup becomes almost automatic. You do not have to remember where the MOSFETs go; the drawer tells you. You do not have to wonder whether a bin is for USB cables or oscilloscope leads; the bin tells you. A workshop that explains itself is easier to maintain.
Another practical lesson: keep parts in the packaging until you have a better reason not to. Supplier bags may look messy, but they often carry useful information. Instead of dumping parts into anonymous drawers, place the labeled supplier bag inside a larger labeled bin or pocket. That gives you both organization and traceability.
For small SMD parts, mixing values is usually a bad trade. It saves space for one minute and costs time forever. A neat strip of cut tape in a labeled pocket is much easier to trust than a compartment full of tiny beige rectangles. If the part has no marking, assume your future self will not be able to identify it quickly. Future self is talented, but not magical.
For through-hole resistors, many makers eventually choose envelopes, tubes, or binder pockets because the parts are light and easy to sort by value. Test tubes or slim containers can be surprisingly effective when stored upright. Envelopes are cheap and easy to label. Binder sleeves are compact and searchable. The winning method depends on whether you prefer flipping pages, pulling drawers, or grabbing containers.
The most underrated habit is the incoming-parts routine. When parts arrive, deal with them immediately. Add them to inventory, label them, and put them away. This feels slow at first, but it prevents duplicate orders and missing parts later. The worst time to organize a component is when solder paste is already on the board and your project is waiting.
It also helps to create a “quarantine box” for unknown parts. Do not let mystery components infect the main system. Put them in one labeled place, then review them when you have time. If you cannot identify a part and have no realistic use for it, consider letting it go. Not every tiny object deserves eternal housing.
Finally, leave room for growth. Empty drawers are not wasted space; they are future sanity. If every container is packed completely full, adding new parts becomes annoying, and annoying systems collapse. A little extra space keeps the whole setup flexible.
Organizing components the easy way is not about perfection. It is about reducing friction. When you can find the right part quickly, trust the label, update the quantity, and return it without thinking too hard, your workshop starts working with you instead of against you. That is when organization stops being a chore and becomes part of the build process.
Conclusion: Make Your Parts Easy to Find, Easy to Use, and Easy to Return
Organizing components is really about protecting your time. Bins, binders, drawers, labels, QR codes, and inventory software are only tools. The real win is a system that helps you build without stopping every ten minutes to search for a part you already own.
Start simple. Sort by category. Label everything. Keep sensitive components in proper packaging. Track quantities when your collection grows. Put frequently used parts close to your bench. Most importantly, build a routine for new parts before they become another box of shame.
The easy way is not the same for everyone, but the principle is universal: every component should have a home, and that home should be obvious. Once your parts are organized, your projects move faster, your purchases get smarter, and your bench becomes a place for building instead of archaeological excavation.
Note: This article is written as original web-ready content based on practical electronics workshop organization, component inventory, ESD-safe storage, and moisture-sensitive handling principles.