Fishing in Animal Crossing: New Horizons looks simple at first: hold a rod, stare at a suspicious fish shadow, press a button, and hope your island does not judge you. But like many cozy-game activities, fishing has more going on beneath the surface than a sea bass with an inflated ego. If you are new to the game, learning how to fish properly can help you earn Bells, fill the museum, complete Nook Miles goals, and finally stop yelling “I pressed A!” at your Nintendo Switch.
This beginner’s guide explains how to fish on Animal Crossing step by step, including how to get a fishing rod, where to find fish, how to cast, when to reel in, how fish bait works, how seasons and time affect catches, and what to do with your fish afterward. Whether you are trying to catch your first pale chub or hunting rare fish like the coelacanth, this guide will help you fish smarter, calmer, and with fewer dramatic controller squeezes.
What You Need Before You Start Fishing
Before you become the island’s unofficial seafood supervisor, you need one important tool: a fishing rod. In Animal Crossing: New Horizons, players usually begin with a flimsy fishing rod recipe early in the game. You can craft it at a DIY workbench using basic materials, and later you can upgrade to sturdier fishing rods or buy tools from Nook’s Cranny once your island services expand.
Basic Fishing Supplies
To start fishing, you need:
- A fishing rod
- Access to water such as rivers, ponds, or the ocean
- Patience, preferably more than you use when waiting for Blathers to stop talking
- Optional fish bait for spawning fish in specific spots
The flimsy fishing rod works fine for beginners, but it breaks after repeated use. Always carry extra materials or a backup rod if you plan to fish for a long session. Nothing ruins a peaceful night hunt for rare fish like your rod exploding into sadness right before a huge shadow appears.
How to Fish in Animal Crossing Step by Step
The basic fishing process is easy once you understand the rhythm. The trick is not just pressing the button quickly; it is pressing it at the right moment.
Step 1: Look for a Fish Shadow
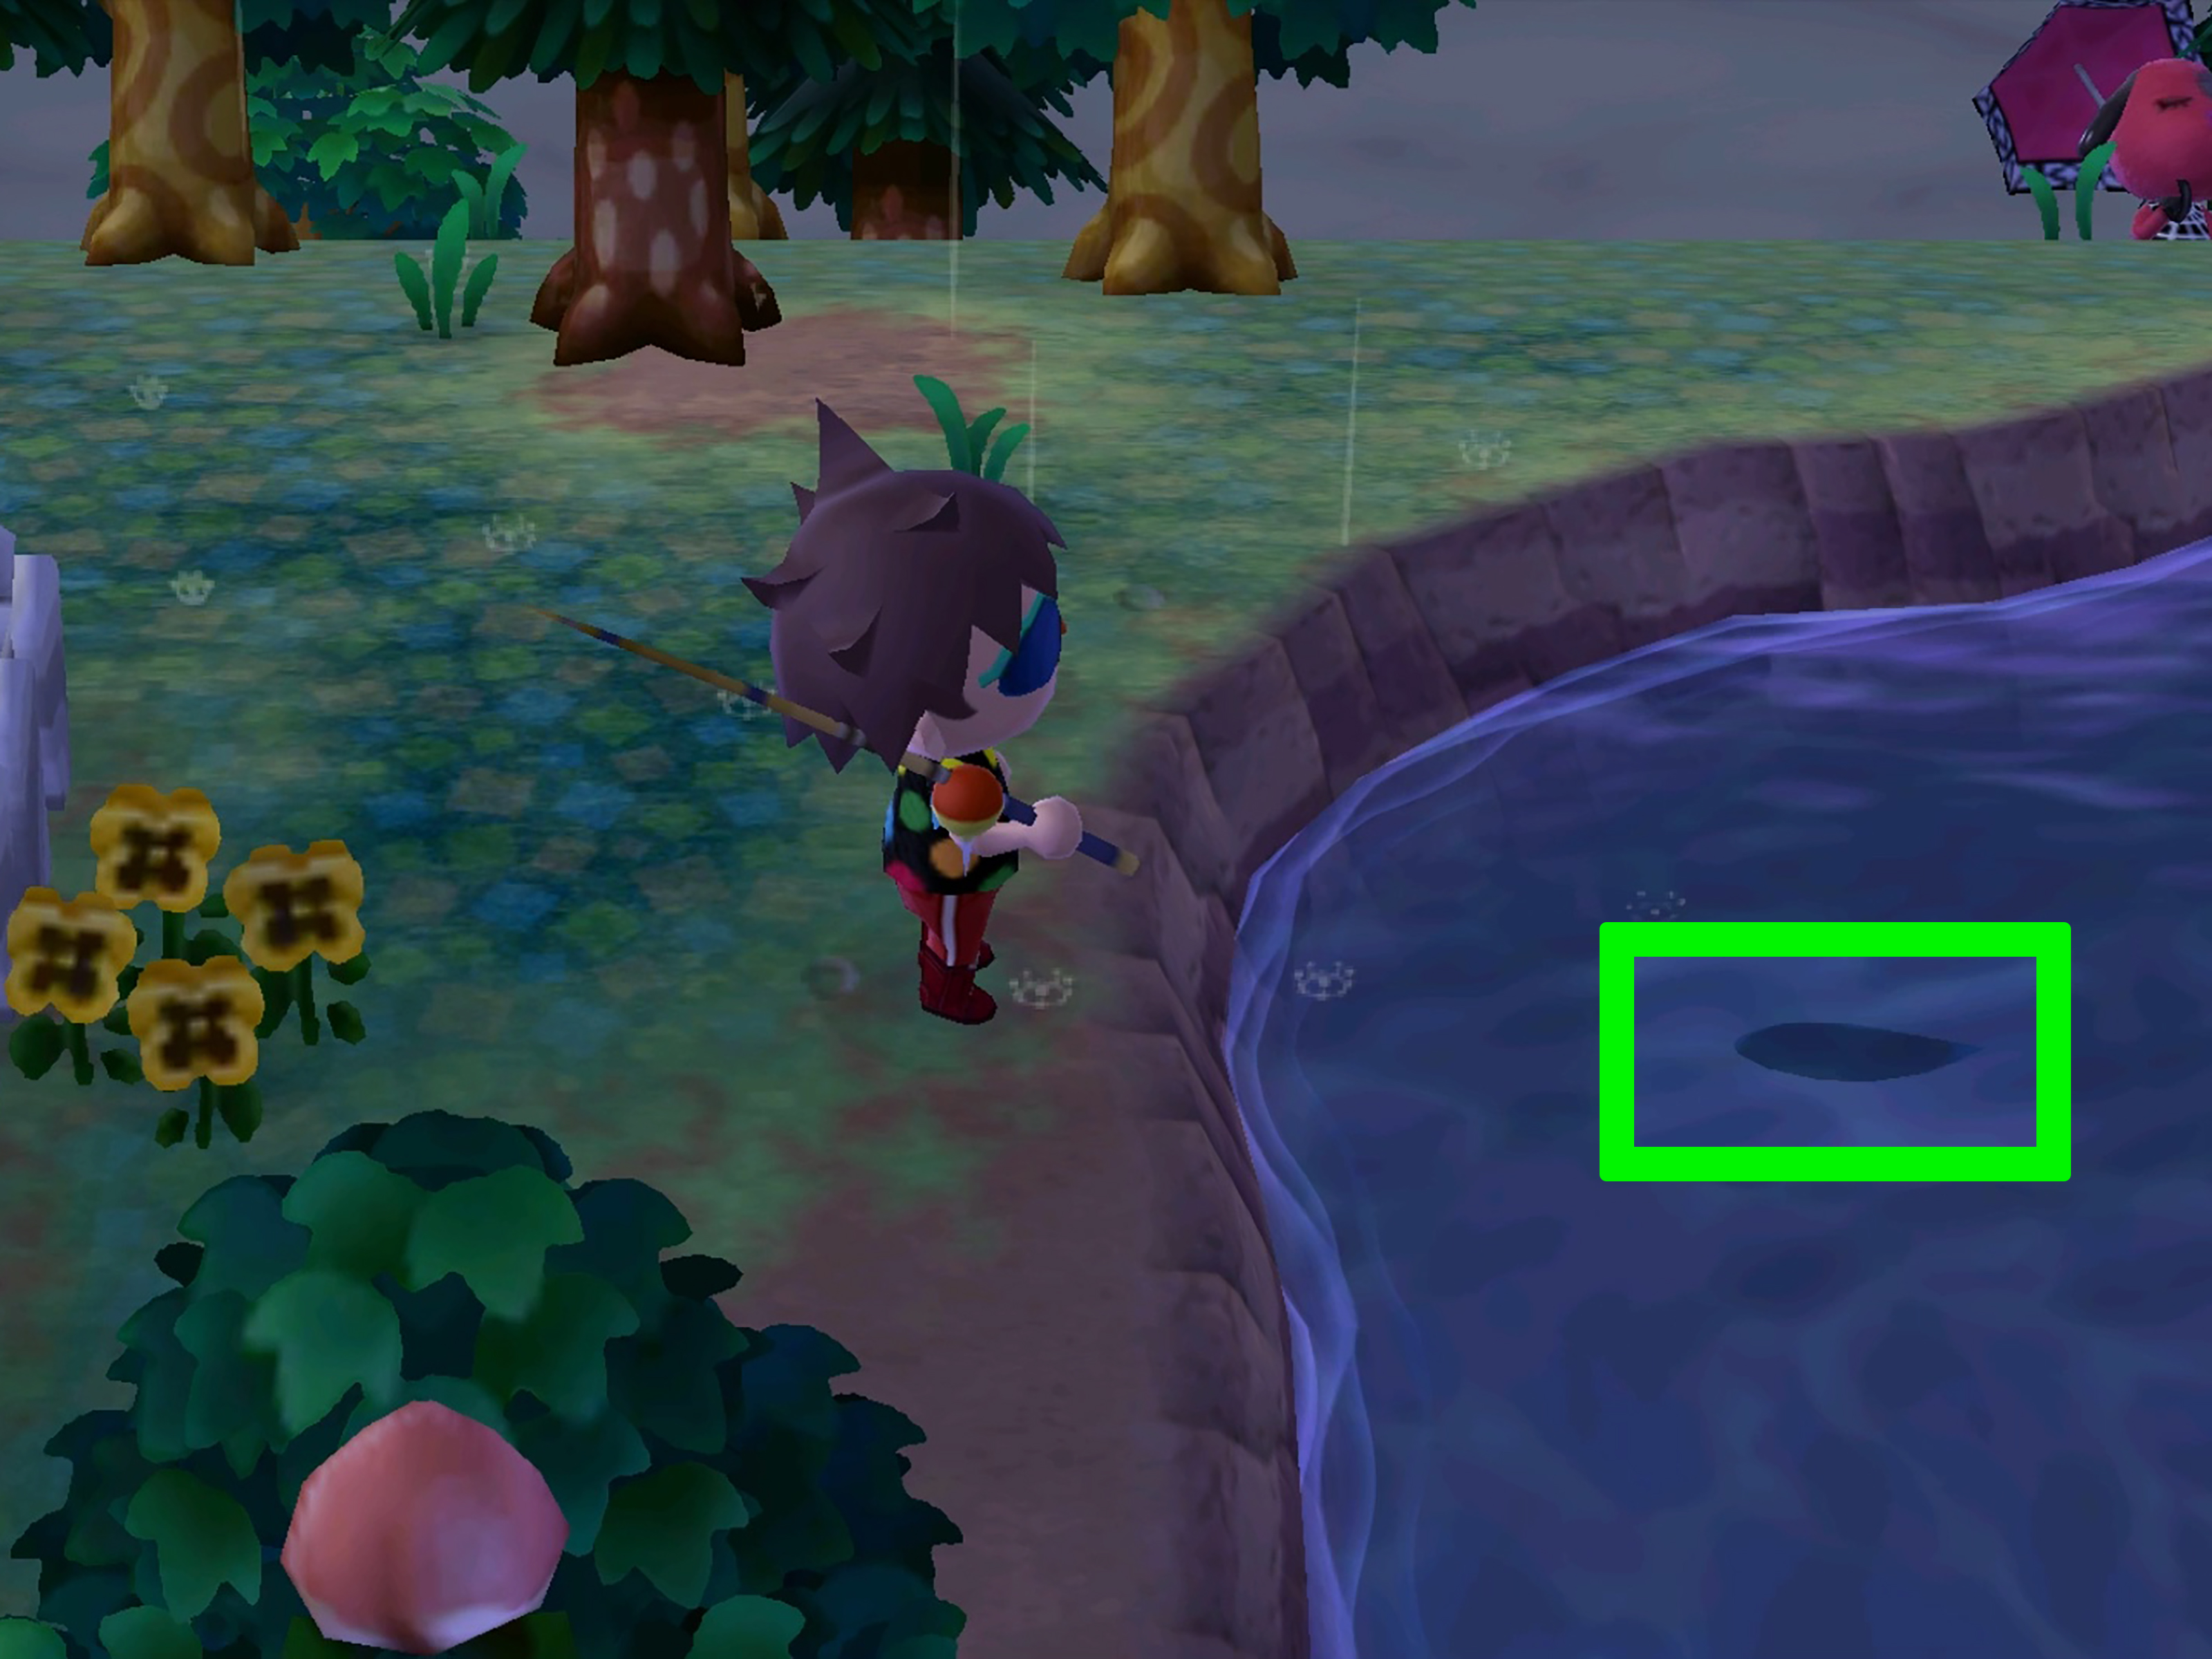
Fish appear as dark shadows moving in the water. You can find them in rivers, ponds, the ocean, river mouths, clifftop rivers, and near the pier. Each shadow represents a fish, and the size of the shadow gives you a clue about what you might catch.
Common shadow sizes include tiny, small, medium, large, very large, and finned shadows. A fin sticking out of the water usually means a shark-type fish or suckerfish, depending on the season and time. Do not get too excited, though. The game enjoys humbling players. Sometimes that dramatic fin is not the millionaire fish you imagined.
Step 2: Equip Your Fishing Rod
Open your inventory, select your fishing rod, and choose “Hold.” You can also use the tool ring later in the game to switch tools faster. This is especially helpful when you are running around your island doing ten chores at once, which is basically the Animal Crossing lifestyle.
Step 3: Stand in the Right Position
Move close to the edge of the water, but do not sprint directly at the fish. Running near water can scare some fish away, especially if you are careless around the shore. Walk calmly and line yourself up so the fish can see your bobber when you cast.
The best position is usually slightly in front of the fish’s face. Fish do not chase your line across the entire river like tiny aquatic athletes. If the bobber lands behind them or too far to the side, they may ignore it completely.
Step 4: Press A to Cast
Press the A button to cast your line. Your goal is to drop the bobber in front of the fish. If the fish notices it, the fish will turn toward the bobber and swim closer. If it does not react, reel in and try again.
Beginners often cast too far away or at an awkward angle. Do not worry. Everyone has accidentally thrown a line into the emotional distance while a fish calmly swims away. Adjust your position and try again.
Step 5: Wait for the Real Bite
This is where most beginners lose fish. Fish will often nibble at the bobber before actually biting. A nibble creates a small tap, but the bobber stays above water. A true bite makes the bobber sink underwater with a distinct “plop” sound.
Do not press A on the first nibble unless the bobber fully disappears. Fish can nibble several times before biting. If you reel in too early, the fish will vanish, and your villager will stand there holding a fishing rod like someone who just lost an argument with a sardine.
Step 6: Press A When the Bobber Goes Under
When the bobber sinks, press A immediately. If your timing is right, your character will reel in the fish automatically. You do not need to mash the button. One clean press is enough.
Many experienced players recommend listening instead of watching. The sound of the real bite is easier to recognize than the visual nibbles, especially when fish fake you out. Turn up the volume or use headphones if you keep reacting too early.
Where to Find Fish in Animal Crossing
Fish are not randomly scattered everywhere. Different fish appear in different bodies of water. Learning locations is one of the biggest upgrades you can make as a beginner.
River Fish
Rivers are the winding streams that run through your island. Many common fish appear here, including crucian carp, dace, pale chub, and black bass. Some valuable or seasonal fish also appear in rivers, so do not ignore them just because they are convenient.
Pond Fish
Ponds are small, still bodies of water that do not connect to the river or ocean. Pond fish include carp, koi, goldfish, and other species. If you are trying to catch a specific pond fish, make sure you are actually fishing in a pond and not a wide part of the river. The game can be picky, and yes, it knows when you are trying to cheat geography.
Ocean Fish
The ocean surrounds your island and offers some of the most exciting catches. Sea bass, horse mackerel, red snapper, barred knifejaw, sharks, and many other fish appear along the coastline. Ocean fishing is a great way to earn Bells because several valuable fish can appear there depending on the month and time.
Pier Fish
Your island pier is a special fishing location. Certain fish, such as blue marlin and tuna, are associated with the pier. If you are hunting pier fish, stand on the wooden dock and cast into the ocean from there. Fish bait is especially useful at the pier because natural spawns can be slow.
River Mouth Fish
The river mouth is where the river meets the ocean. Some fish only appear in this transition zone. If a guide says a fish appears at the river mouth, do not fish in the middle of the river and wonder why the game is being mysterious. Go to the exact spot where freshwater meets seawater.
Clifftop River Fish
Some rare fish appear only in rivers on higher elevations. These are known as clifftop rivers. To reach them, you need access to upper levels of your island, which means unlocking tools such as the ladder or terraforming later. Golden trout and stringfish are famous examples of fish players often hunt in clifftop areas.
How Time, Month, and Hemisphere Affect Fishing
Fishing in Animal Crossing follows real-time rules. The fish you can catch depends on the month, hour, location, and whether your island is in the Northern or Southern Hemisphere. This means your friend may catch a fish in June while you cannot find it because your island’s season is different.
Some fish appear all day, while others only show up during narrow time windows. For example, certain fish are active in the morning, some appear at night, and others are available from late afternoon until early morning. If you are trying to complete your Critterpedia, checking the time matters as much as checking the location.
Weather can also play a role. The coelacanth, one of the most famous rare fish in Animal Crossing, appears in the ocean when it is raining or snowing. That means rainy days are not just for moody screenshots and villagers wearing adorable hats. They are also prime fishing opportunities.
Understanding Fish Shadows
Fish shadows are one of the best clues in the game. While a shadow does not tell you the exact species, it helps you decide whether a fish is worth chasing.
Common Shadow Categories
- Tiny shadows: Often small fish such as goldfish or bitterling.
- Small shadows: Common river and ocean fish.
- Medium shadows: A wide mix of everyday catches.
- Large shadows: Better chance of valuable fish.
- Very large shadows: Often worth checking, especially in the ocean.
- Finned shadows: Usually shark-type fish or suckerfish during the right season.
If you are hunting rare fish, shadow size can save time. For example, if the fish you want has a huge shadow, you can ignore tiny shadows and keep moving. This is not rude. This is strategy.
How to Use Fish Bait
Fish bait is one of the most useful tools for serious fishing. It lets you force a fish to spawn in a specific body of water. This is especially helpful for pier fish, clifftop river fish, pond fish, and any fish that appears in an inconvenient location.
How to Make Fish Bait
To craft fish bait, walk along the beach and look for small dark spots in the sand that occasionally squirt water. Use your shovel to dig there, and you will find a manila clam. The first time you dig up a manila clam, you unlock the DIY recipe for fish bait. One manila clam makes one bag of fish bait.
After crafting bait at a workbench, stand near the water where you want a fish to appear. Open your inventory, select the bait, and scatter it. A fish shadow will immediately spawn. It may not be the exact fish you want, because Animal Crossing enjoys testing character development, but bait makes rare-fish hunting much more efficient.
Best Uses for Fish Bait
Use fish bait when:
- You are fishing from the pier for rare ocean fish.
- You need a clifftop river fish and do not want to run laps around your island.
- You are trying to catch pond fish in a small pond.
- You are participating in a Fishing Tourney.
- You are targeting fish available only during a short time window.
The downside is that making bait can be repetitive. Digging clams, running to a workbench, and crafting bait one piece at a time can feel like opening a very sandy factory. Still, for rare fish, it is often worth the effort.
What to Do After Catching Fish
Once you catch a fish, you have several options. The best choice depends on whether it is your first catch, how valuable it is, and what you are trying to accomplish.
Donate New Fish to the Museum
If you catch a fish you have never donated before, consider giving it to Blathers at the museum. Completing the fish collection is one of the most satisfying long-term goals in the game. Also, watching the museum aquarium slowly fill up is genuinely beautiful. It is one of those moments when you remember Animal Crossing is secretly a relaxation machine wearing a raccoon business suit.
Sell Fish for Bells
Fishing is a reliable way to earn Bells, especially early in the game. Common fish do not sell for much, but rare fish can be very profitable. If C.J. is visiting your island, he will buy fish for a higher price than Nook’s Cranny, making him the ideal buyer when you have valuable catches saved.
Keep Fish for Models
C.J. can also help you get fish models. If you give him three of the same fish, he can commission a model for you. This is a fun option for decorating homes, beaches, seafood restaurants, or that one dramatic basement aquarium you may or may not be planning.
Beginner Fishing Tips That Actually Help
Use Your Ears More Than Your Eyes
Many players miss fish because they react to the visual nibbles. Instead, listen for the deeper splash sound when the bobber goes under. The fake nibbles are sneaky, but the real bite has a stronger sound. If your room is noisy, headphones can make fishing much easier.
Do Not Stand Too Far Away
If you are too far from the water, your cast may not land where you want. Move closer to the edge and line up carefully. Small adjustments make a big difference.
Approach Slowly
Avoid sprinting near fish shadows. Walk when you get close to the water. This is especially important along beaches and riverbanks, where one careless dash can make a fish vanish like it had somewhere better to be.
Carry Extra Rods
Fishing rods break after enough uses. If you are going on a long fishing trip, carry a spare rod or crafting materials. This is especially important during rain, shark season, or Fishing Tourneys.
Check Your Critterpedia
Your Critterpedia tracks fish you have caught and shows useful availability details. Use it to see whether a fish is active during the current month and time. This saves you from hunting a fish that is not even available, which is the gaming equivalent of waiting for a bus on a holiday.
Common Fishing Mistakes Beginners Make
Reeling in Too Early
This is the classic mistake. A fish taps the bobber, your thumb panics, and suddenly the fish is gone. Wait until the bobber fully sinks before pressing A.
Casting Behind the Fish
Fish need to see the bobber. Cast in front of the fish’s face, not behind it. If the fish does not turn toward your bobber, reposition and try again.
Ignoring Time and Season
Not every fish is available all year. If you are looking for a specific fish, check its month, time, hemisphere, and location. Otherwise, you may spend hours catching black bass and questioning your life choices.
Forgetting About the Pier
The pier is easy to overlook, but several special fish are linked to it. Use bait there when targeting rare pier fish.
Selling First-Time Catches
If you care about completing the museum, donate your first new fish before selling duplicates. Bells are nice, but Blathers’ aquarium deserves love too.
How to Catch Rare Fish More Efficiently
Rare fish require preparation. First, confirm the fish is available in your hemisphere, month, time, weather, and location. Next, bring multiple fishing rods and plenty of bait. Then go to the correct spot and focus only on the right shadow size.
For example, if you are hunting a pier fish, stand on the pier and use bait repeatedly. If the shadow size is wrong, you can scare the fish away or catch it quickly and try again. If you are hunting a clifftop fish, clear space near the river so you can cast comfortably. If you are hunting the coelacanth, fish in the ocean during rain or snow and watch for large shadows.
Rare-fish hunting can take a while. Some players catch the target quickly; others go through dozens of bait bags and develop a personal rivalry with sea bass. The best approach is to treat it like a relaxing routine rather than a battle. Put on music, organize your pockets, and accept that the island gives when the island feels like giving.
Fishing Tourney Tips for Beginners
The Fishing Tourney is a timed event hosted by C.J. During the event, you catch as many fish as possible within a short time limit to earn points. These points can be exchanged for fish-themed rewards.
To perform better, prepare bait in advance, keep your inventory clear, and position yourself near easy fishing spots. Fish bait can save valuable seconds because you do not need to run around looking for shadows. If you are playing with friends, tourneys can become even more fun, chaotic, and mildly competitive in the way only Animal Crossing can make adorable.
My Beginner Experience: What Fishing in Animal Crossing Teaches You
Fishing in Animal Crossing is one of those activities that looks tiny but somehow becomes a full personality trait. At first, it feels like a simple mini-game. You see a fish shadow, cast your line, and try not to embarrass yourself in front of a digital carp. But after a few days, fishing becomes part of your island rhythm. You check the beach after shaking trees. You pause near a river because the shadow looks suspiciously large. You hear rain and immediately think, “Coelacanth weather.” That is when the game has you. There is no escape. Only bait.
One of the best beginner lessons is patience. New players often lose fish because they rush. The fish taps once, and the thumb reacts like it is defusing a bomb. After missing enough catches, you learn to wait for the sound. The moment the bobber drops becomes strangely satisfying. It is a tiny test of focus, and every successful catch feels like you and the game finally agreed on something.
Another useful experience is learning to plan. Early on, many players fish randomly and sell everything. That works for earning quick Bells, but eventually you realize some fish are seasonal, some appear only at night, and some require special locations. Suddenly, your casual island walk becomes a schedule. You are checking river mouths, climbing cliffs, watching the weather, and making bait like a clam-powered entrepreneur. Animal Crossing never forces you to play this way, but it rewards curiosity.
Fishing also makes your island feel alive. Rivers are not just decoration. Ponds are not just cute landscaping. The pier is not just a place to stand while pretending to be thoughtful. Every water area has a purpose. As you learn where fish spawn, you start seeing your island differently. You may even redesign areas to make fishing easier, leaving open riverbanks or building paths to favorite spots.
The funniest part is how personal the fish become. Everyone has a fish they are tired of catching. For many players, it is the sea bass, also known emotionally as “not the fish I wanted.” But even the disappointing catches create memories. The rare fish feel exciting because of all the ordinary catches that came before them. When you finally land the fish you were chasing, it feels earned.
For beginners, the best advice is to enjoy the process. Donate your first catches, sell duplicates, save valuable fish for C.J., and do not turn every fishing session into a job. Some days you will catch rare fish. Some days you will catch twelve black bass and a boot. Both days are part of the charm. Fishing in Animal Crossing is not only about completing the Critterpedia. It is about slowing down, listening carefully, and finding small wins in a peaceful digital world where even a frog can be furniture-adjacent.
Conclusion
Learning how to fish on Animal Crossing is one of the most useful beginner skills in the game. With a fishing rod, careful casting, good timing, and a basic understanding of locations, seasons, and fish shadows, you can earn Bells, complete museum donations, collect rare catches, and enjoy one of the most relaxing activities on your island.
The key is simple: cast in front of the fish, wait for the bobber to fully sink, press A once, and do not let fake nibbles bully your thumb. Once you add fish bait, weather tracking, pier fishing, clifftop hunting, and Critterpedia planning, you will go from confused beginner to confident island angler. And yes, you will still catch sea bass. That is not a mistake. That is Animal Crossing reminding you to stay humble.
Note: This article is written in original American English and based on real Animal Crossing: New Horizons fishing mechanics for web publication.