Wood flower arrangements have a special kind of magic. They look soft and romantic like fresh flowers, last far longer than a grocery-store bouquet, and never dramatically faint in the vase because someone forgot to change the water. Whether you are making a wedding bouquet, a rustic centerpiece, a farmhouse-style vase arrangement, or a sweet handmade gift, the right tools can turn a pile of sola wood flowers into something that looks intentional, balanced, and proudly display-worthy.
The good news? You do not need a professional floral studio, a secret florist handshake, or a craft room that looks like a reality TV set. Most beginner-friendly wood flower arrangement tools are simple, affordable, and easy to find. The trick is knowing which supplies truly matter, which ones are optional, and which ones only look important because they come in very convincing packaging.
This guide walks through the basic tools needed to make a great wood flower arrangement, including cutting tools, stems, glue, floral tape, foam, containers, dyeing supplies, greenery, fillers, and finishing details. You will also find practical tips, real-life examples, and experience-based advice to help your first arrangement look less like “craft night survived a tornado” and more like “yes, I absolutely meant to make it this beautiful.”
What Are Wood Flowers?
Wood flowers, often called sola wood flowers, are handmade decorative flowers usually crafted from soft plant-based wood material. They are lightweight, flexible, and commonly used for wedding bouquets, home décor, centerpieces, corsages, boutonnieres, wreaths, and long-lasting floral gifts. Unlike fresh flowers, wood flowers do not wilt, making them a favorite for DIY brides, budget-friendly decorators, and anyone who likes flowers but does not enjoy watching them slowly become salad in a vase.
Because wood flowers are artificial but still delicate, they need a slightly different toolkit than fresh flowers. Fresh stems require water, conditioning, and clean cutting. Wood flowers require sturdy stems, hot glue, floral wire, shaping, coloring, and secure mechanics. Once you understand those basics, arranging them becomes much easier and a lot more fun.
Why the Right Tools Matter
A great wood flower arrangement is not just about pretty blooms. It is about structure. Tools help you control height, spacing, color, movement, and stability. Without them, your arrangement may lean, wobble, shed flowers, or develop the personality of a lopsided umbrella.
The right tools help you:
- Attach flowers securely to stems
- Cut wire and bamboo stems cleanly
- Build a strong base inside a vase, box, or bouquet
- Add greenery and filler without overcrowding the design
- Customize flower colors for weddings, seasons, or home décor
- Create a finished arrangement that holds its shape over time
In short, tools are not there to make the project complicated. They are there to keep your flowers from staging a tiny decorative rebellion.
1. Sola Wood Flowers: The Star of the Arrangement
Before buying tools, start with the flowers themselves. Sola wood flowers come in many shapes, sizes, and styles, from roses and dahlias to peonies, mums, and small filler blooms. A strong arrangement usually includes a mix of focal flowers, medium flowers, and small accent flowers.
Recommended Flower Sizes
For a vase arrangement or centerpiece, use larger blooms as focal points. Flowers in the 2.5-inch to 3-inch range work well for the main visual impact. Medium blooms around 2 inches help fill the middle layer, while smaller 1-inch to 1.5-inch flowers can tuck into gaps and soften the edges.
For bouquets, choose a balanced mix. Too many large flowers can make the bouquet look heavy. Too many tiny flowers can make it look busy, like it had too much coffee. A good beginner formula is 40% focal flowers, 35% medium flowers, and 25% small accents or filler.
2. Floral Wire or Bamboo Stems
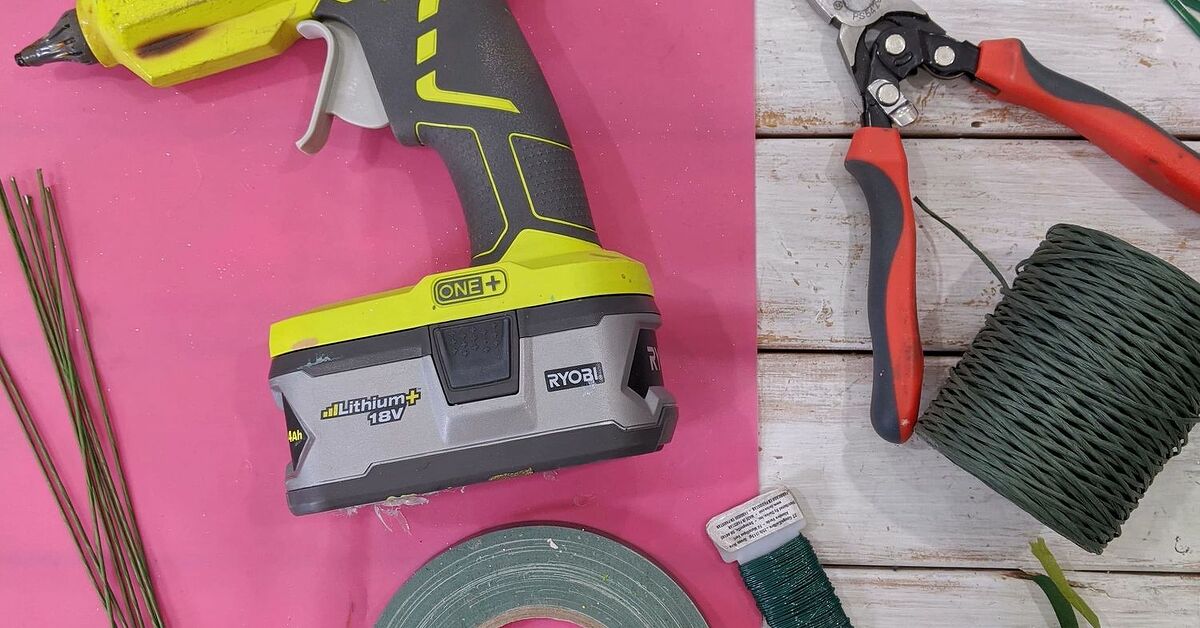
Wood flowers do not naturally come with flexible stems, so you need to add them. The most common options are floral wire and bamboo stems. Both work well, but they serve slightly different purposes.
Floral Wire
Floral wire is excellent for bouquets, corsages, boutonnieres, and vase arrangements that need bendable stems. Many crafters like 18-gauge floral wire because it is strong enough to support most wood flowers but still flexible enough to shape. Higher gauge numbers are thinner and more flexible; lower gauge numbers are thicker and sturdier.
If you are making a loose bouquet or want to angle blooms naturally, floral wire is your best friend. It lets you tilt a flower slightly left, lift another upward, and create a more organic shape. This is especially helpful when the flowers seem determined to face the wrong direction, because apparently even artificial flowers have opinions.
Bamboo Stems
Bamboo stems are firm, straight, and useful for centerpieces, vase arrangements, and floral foam designs. They provide excellent support and are easy to insert into floral foam. If you are creating a wooden box centerpiece or a mason jar arrangement, bamboo stems are simple and reliable.
For best results, keep both floral wire and bamboo stems in your craft kit. Wire gives flexibility. Bamboo gives strength. Together, they are the floral version of teamwork.
3. Hot Glue Gun or Hot Glue Pot
A hot glue gun is one of the most important tools for making wood flower arrangements. It secures the flower head to the stem, holds accents in place, and helps stabilize tricky pieces. A standard hot glue gun works well for beginners, while a glue pot can be convenient if you are stemming a large number of flowers for a wedding or event.
How to Use Hot Glue for Wood Flowers
To stem a wood flower, place a small amount of hot glue at the base of the flower, insert the wire or bamboo stem, and hold it briefly until the glue sets. Avoid using too much glue. A pea-sized amount is usually enough. Too much glue can create bulky lumps and stringy webs that make your flowers look like they were attacked by a very artistic spider.
Keep extra glue sticks nearby. Wood flower projects can use more glue than expected, especially if you are making multiple bouquets, centerpieces, or a full wedding set. Running out of glue halfway through arranging is a special kind of craft drama nobody needs.
4. Wire Cutters
Wire cutters are essential if you are working with floral wire, artificial greenery, wired picks, or thick faux stems. Regular scissors are not made for cutting wire and can become dull, damaged, or emotionally disappointed. A clean pair of wire cutters gives you better control and saves your scissors for paper, ribbon, and lighter materials.
Use wire cutters to trim stems to different lengths. Variation is important because flowers arranged at the same height can look flat and unnatural. For a centerpiece, cut some stems shorter for the front and sides, while keeping others taller for the center or back. For a bouquet, stagger stem lengths slightly while building the shape, then trim the handle evenly at the end.
5. Sharp Scissors or Floral Shears
While wire cutters handle tough stems, scissors or floral shears are useful for ribbon, twine, fabric strips, paper wrap, floral tape, and soft greenery. A sharp pair of scissors makes finishing details much cleaner. Dull scissors chew ribbon edges, and chewed ribbon edges are the craft world’s version of a bad haircut.
Keep one pair of scissors for clean materials and another older pair for messier jobs like trimming moss or cutting packaging. This small habit keeps your finishing work neat and professional.
6. Floral Tape
Floral tape is a stretchy, self-sealing tape used to wrap stems, cover wire, bind bouquet handles, and secure mechanics. It does not feel sticky like regular tape at first, but when stretched and pressed, it clings to itself. This makes it especially useful for wrapping floral wire and creating a cleaner stem finish.
When to Use Floral Tape
Use floral tape when building a hand-tied bouquet, wrapping boutonniere stems, covering visible wire, or grouping several stems together. It is also helpful when you want a green stem look instead of exposed metal wire.
For bouquets, wrap floral tape around the stems as you build. This helps hold the shape before you add ribbon, lace, jute twine, or another decorative handle finish. Pull the tape gently as you wrap so it activates and grips properly.
7. Floral Foam
Floral foam gives structure to arrangements in boxes, bowls, baskets, vases, and centerpiece containers. For wood flowers and other artificial materials, dry floral foam is usually the best choice. It grips stems and helps hold the arrangement in place without water.
Cut the foam so it fits snugly inside your container. If the foam shifts, secure it with hot glue, floral tape, or a small amount of adhesive at the base. The foam should be stable before you begin inserting stems. If your foundation wiggles, the whole arrangement may wiggle too, and nobody invited a wobbly centerpiece to dinner.
Foam Alternatives
Some crafters prefer alternatives such as chicken wire, floral frogs, pebbles, moss, or reusable mechanics. These options can work well depending on the container and arrangement style. For wood flowers, foam remains beginner-friendly because it is easy to cut, easy to use, and forgiving when you need to reposition stems.
8. Containers, Vases, Boxes, and Bases
The container sets the tone for the entire wood flower arrangement. A rustic wooden box feels farmhouse and cozy. A ceramic vase feels polished. A mason jar feels casual and charming. A metal bucket leans country. A low bowl creates an elegant centerpiece. Choose the container before finalizing stem lengths, because the container controls the height and spread of the design.
Container Sizing Tip
A good rule for beginners is to make the finished arrangement about one and a half to two times the height of the container. For example, if your vase is 6 inches tall, the full arrangement might be around 9 to 12 inches tall. This is not a law written in stone, but it helps prevent designs from looking too squat or too top-heavy.
For wide containers, you will need more filler and greenery to cover the base. For narrow containers, fewer stems may be enough. Always test the arrangement shape from multiple angles, especially if it will sit on a dining table, entry table, or wedding reception centerpiece display.
9. Dyeing Supplies for Custom Colors
One of the biggest advantages of wood flowers is that they can be dyed or painted to match nearly any color palette. This makes them popular for weddings, seasonal décor, nursery decorations, and personalized gifts.
Basic dyeing supplies may include:
- Acrylic craft paint or specialized sola flower dye
- Water for dilution
- Small bowls or cups for mixing
- Wooden skewers or disposable spoons for stirring
- Gloves to protect your hands
- Paper towels, parchment paper, or drying racks
- A softener such as vegetable glycerin or sola softener, if desired
When dyeing flowers, test one bloom first. Wood flowers absorb color differently depending on the flower style, thickness, and paint ratio. A color that looks perfect in the bowl may dry lighter or darker. Always let test flowers dry before committing to the full batch. This prevents the classic DIY surprise known as “I asked for dusty rose and got spicy salmon.”
10. Paint Brushes and Detail Tools
Paint brushes are useful for adding highlights, shading edges, deepening centers, or correcting small spots after dyeing. A dry brush technique can create a soft, realistic effect on petal tips. Small detail brushes are helpful for adding darker centers or subtle color gradients.
You do not need an expensive brush set. A few basic craft brushes in different sizes will do the job. Keep them clean, rinse them promptly, and avoid leaving them bristle-down in water unless you enjoy turning brushes into sad little brooms.
11. Greenery and Filler Stems
Greenery and filler are what make a wood flower arrangement feel complete. Flowers alone can look pretty, but greenery adds movement, shape, and natural texture. Fillers soften gaps and create fullness without making the design feel heavy.
Popular Greenery Options
Common choices include eucalyptus, lamb’s ear, ferns, dusty miller, ruscus, boxwood, olive branches, and assorted faux greenery. Preserved greenery can also be used, but it may be more delicate than artificial stems.
Popular Filler Options
Fillers may include baby’s breath, star flowers, lavender, berries, small dried flowers, wheat, grasses, or tiny faux blossoms. Choose fillers that match the style of your arrangement. For a rustic design, use dried grasses and seed pods. For a romantic wedding bouquet, use soft white filler and airy greenery. For a fall centerpiece, add berries, wheat, or muted orange accents.
The key is not to overdo it. Filler should support the wood flowers, not bury them like they are hiding from responsibility.
12. Ribbon, Twine, Lace, and Finishing Materials
Finishing materials turn a basic arrangement into a polished piece. For bouquets, ribbon, chiffon, lace, velvet, satin, or jute twine can wrap the handle. For centerpieces, moss can hide floral foam, while decorative stones, bark, fabric, or paper can cover exposed mechanics.
Choose finishing materials that match your theme. Burlap and twine work beautifully for rustic arrangements. Satin and chiffon feel elegant for weddings. Velvet ribbon adds drama for fall or winter designs. A simple cotton ribbon works well for everyday home décor.
13. Measuring Tape or Ruler
A measuring tape may not seem glamorous, but it helps with proportion. Use it to check container height, stem length, bouquet handle length, and centerpiece width. This is especially important if you are making multiple arrangements for an event and want them to look consistent.
For wedding centerpieces, measure the table and container before designing. Tall arrangements may block conversation. Wide arrangements may crowd plates, candles, or table numbers. A beautiful centerpiece is wonderful, but guests should not need a periscope to talk across the table.
14. Protective Workspace Supplies
Wood flower arranging can involve glue strings, dye drips, trimmed stems, loose petals, and tiny bits of foam. Protect your table with newspaper, craft paper, a silicone mat, cardboard, or a washable table cover. Keep paper towels nearby for spills and a small trash bowl for scraps.
If you are dyeing flowers, work in a ventilated area and wear gloves. If you are using hot glue, keep the glue gun on a heat-safe surface. These small precautions make the process smoother and help prevent your dining table from becoming a permanent abstract art project.
15. A Lazy Susan or Turntable
A lazy Susan is optional, but incredibly helpful for centerpieces. It lets you rotate the arrangement as you work, so you can check balance from all sides. This is especially useful for round table centerpieces that guests will see from every angle.
If you do not have a lazy Susan, simply turn the container by hand every few stems. The goal is to avoid designing only from the front unless the arrangement will sit against a wall. A one-sided arrangement can look great on a mantel or entry table, but a dining table centerpiece should look good all the way around.
How to Build a Simple Wood Flower Arrangement
Step 1: Choose Your Style and Color Palette
Before touching the glue gun, decide on the mood. Are you making a soft romantic arrangement, a bright spring centerpiece, a rustic fall design, or a neutral farmhouse display? Choose two to four main colors. Too many colors can make the arrangement feel chaotic, especially for beginners.
Step 2: Prepare and Stem the Flowers
Attach wire or bamboo stems to each wood flower with hot glue. Let the glue set fully before arranging. Prepare more flowers than you think you need, because gaps often appear once you start building the shape.
Step 3: Prepare the Container
Cut floral foam to fit the container. Secure it firmly. Cover the top lightly with moss if needed, but do not block yourself from inserting stems.
Step 4: Add Greenery First
Greenery creates the outline. Place taller greenery toward the back or center, depending on whether the design is one-sided or all-around. Let some pieces extend slightly beyond the container to create movement.
Step 5: Place Focal Flowers
Add the largest wood flowers first. These are the stars of the arrangement. Space them in a triangle or loose cluster so the eye moves naturally through the design.
Step 6: Fill with Medium and Small Flowers
Place medium blooms around the focal flowers, then tuck smaller blooms into gaps. Vary the height slightly so the arrangement does not look flat.
Step 7: Add Fillers and Final Texture
Use filler flowers, berries, grasses, or small accents to soften empty spaces. Step back often. The arrangement should feel full, but not crowded.
Step 8: Finish and Clean Up
Hide visible foam with moss, ribbon, or greenery. Trim glue strings. Adjust any flowers that look too low, too high, or too eager to escape the arrangement.
Common Mistakes Beginners Make
Using Too Many Large Flowers
Large blooms are beautiful, but too many can make an arrangement look bulky. Mix sizes for depth and balance.
Skipping Greenery
Greenery is not just decoration. It creates shape, movement, and structure. Without it, wood flowers can look like colorful dots floating in a container.
Cutting Stems Too Short Too Soon
Always start longer than needed. You can trim stems shorter, but you cannot magically make them taller unless you enjoy craft-related regret.
Ignoring the Back and Sides
If the arrangement will be seen from all angles, rotate it often. Check for empty spots, awkward gaps, and flowers facing strange directions.
Overloading the Glue
More glue does not always mean stronger. Use enough to secure the stem, but avoid large blobs that show through the design.
Best Beginner Tool Kit for Wood Flower Arrangements
If you are just starting, keep your tool kit simple. Here is a practical beginner list:
- Sola wood flowers in mixed sizes
- 18-gauge floral wire or bamboo stems
- Hot glue gun and glue sticks
- Wire cutters
- Sharp scissors
- Floral tape
- Dry floral foam
- Container, vase, box, or bouquet wrap
- Greenery and filler stems
- Ribbon, twine, moss, or finishing accents
- Dyeing supplies if custom colors are needed
- Protective table covering and paper towels
This kit is enough for most DIY wood flower arrangements. As your skills grow, you can add specialty tools such as a glue pot, floral frogs, stem wrap, detailed paint brushes, a lazy Susan, or professional floral shears.
Experience-Based Tips for Making Better Wood Flower Arrangements
After making a few wood flower arrangements, one lesson becomes very clear: the flowers are forgiving, but the process rewards patience. Rushing usually leads to uneven spacing, glue strings, crowded blooms, and that suspicious moment when one flower slowly tilts sideways like it has given up on the project. The best experience-based advice is to prepare everything before you start arranging. Stem the flowers first, sort them by size, group greenery by type, and place your tools within reach. A clean setup makes the creative part much easier.
Another helpful habit is to design in layers. Beginners often want to place every favorite flower immediately, but arrangements look better when built gradually. Start with the container and greenery. Then add focal flowers. Then add medium blooms. Then add small flowers and filler. This layered method keeps the arrangement balanced and prevents the “everything everywhere all at once” look. Unless that is your theme, in which case congratulations, you are very committed.
Color planning also matters more than many people expect. Wood flowers can be dyed in almost any shade, but not every pretty color works well with every other pretty color. Before dyeing a full batch, create a small sample set. Place the dried flowers next to your greenery, ribbon, and container. Natural light helps you see the real color. Indoor lighting can make soft blush look peach, ivory look yellow, and dusty blue look like it is having an identity crisis.
For wedding bouquets, comfort is just as important as appearance. A bouquet may look gorgeous on a table but feel awkward if the handle is too thick or uneven. As you build, hold the bouquet occasionally and check the grip. Wrap stems firmly with floral tape, then finish with ribbon. Keep the handle smooth so it feels comfortable during photos, ceremonies, and long periods of holding it while pretending your arm is not tired.
For centerpieces, always think about where the arrangement will live. A dining table arrangement should not be so tall that guests have to dodge flowers to make eye contact. A mantel arrangement can be taller and more dramatic because it is usually viewed from the front. A coffee table arrangement should be lower and sturdier, especially in homes with pets, kids, or adults who talk with their hands near beverages.
One practical trick is to take photos while you work. The camera catches gaps and uneven spots that your eyes may miss. Snap a quick picture, look at the arrangement on screen, and adjust. This is especially useful for all-around centerpieces and bridal bouquets. It is amazing how often a design looks finished in person but reveals one bare patch in a photo, usually right where everyone will notice it.
Do not be afraid to remove and reposition stems. Wood flowers are durable, and floral foam allows adjustments. If a bloom looks wrong, pull it out carefully, trim the stem if needed, and place it again. Good arranging is not about getting every stem perfect on the first try. It is about making thoughtful adjustments until the whole piece feels balanced.
Finally, remember that handmade arrangements should have personality. A slight tilt, a playful sprig of greenery, or an unexpected filler can make the design feel warm and custom. Perfection is not the goal. Beauty, balance, and joy are the goal. If the arrangement makes you smile when you step back, you are doing it right.
Conclusion
Making a great wood flower arrangement begins with the right basic tools: wood flowers, sturdy stems, hot glue, wire cutters, scissors, floral tape, floral foam, a good container, greenery, filler, dyeing supplies, and finishing materials. These tools help you control shape, color, structure, and style without needing professional florist training.
The best arrangements are built slowly and thoughtfully. Choose a color palette, prepare your flowers, create a stable base, layer greenery and focal blooms, then finish with texture and detail. With a little practice, wood flower arranging becomes a relaxing, creative, and budget-friendly way to make décor that lasts. And unlike fresh flowers, your finished piece will not wilt before the compliments arrive.