Note: This is body-only HTML in standard American English, prepared for direct web publishing with unnecessary source-code artifacts removed.
Three-point perspective in art has a reputation for being the drama queen of perspective drawing. One-point perspective is calm and orderly. Two-point perspective is practical and dependable. Three-point perspective? It kicks open the door, points at a skyscraper, and says, “Let’s make this look epic.”
For beginners, that can sound a little intimidating. The good news is that three-point perspective is not some secret wizard skill reserved for architects, comic-book artists, or people who own twelve mechanical pencils. It is simply a system for drawing objects so they look believable when viewed from a very high or very low angle. Once you understand the logic behind the three vanishing points, the whole method becomes much less scary and much more fun.
In this beginner’s guide, you’ll learn what three-point perspective is, how it differs from one-point and two-point perspective, when to use it, how to build a drawing step by step, and which mistakes tend to send new artists straight into the land of accidental weirdness. By the end, you’ll have a practical understanding of how to create depth, scale, and drama without making your building look like it melted in the summer sun.
What Is Three-Point Perspective in Art?
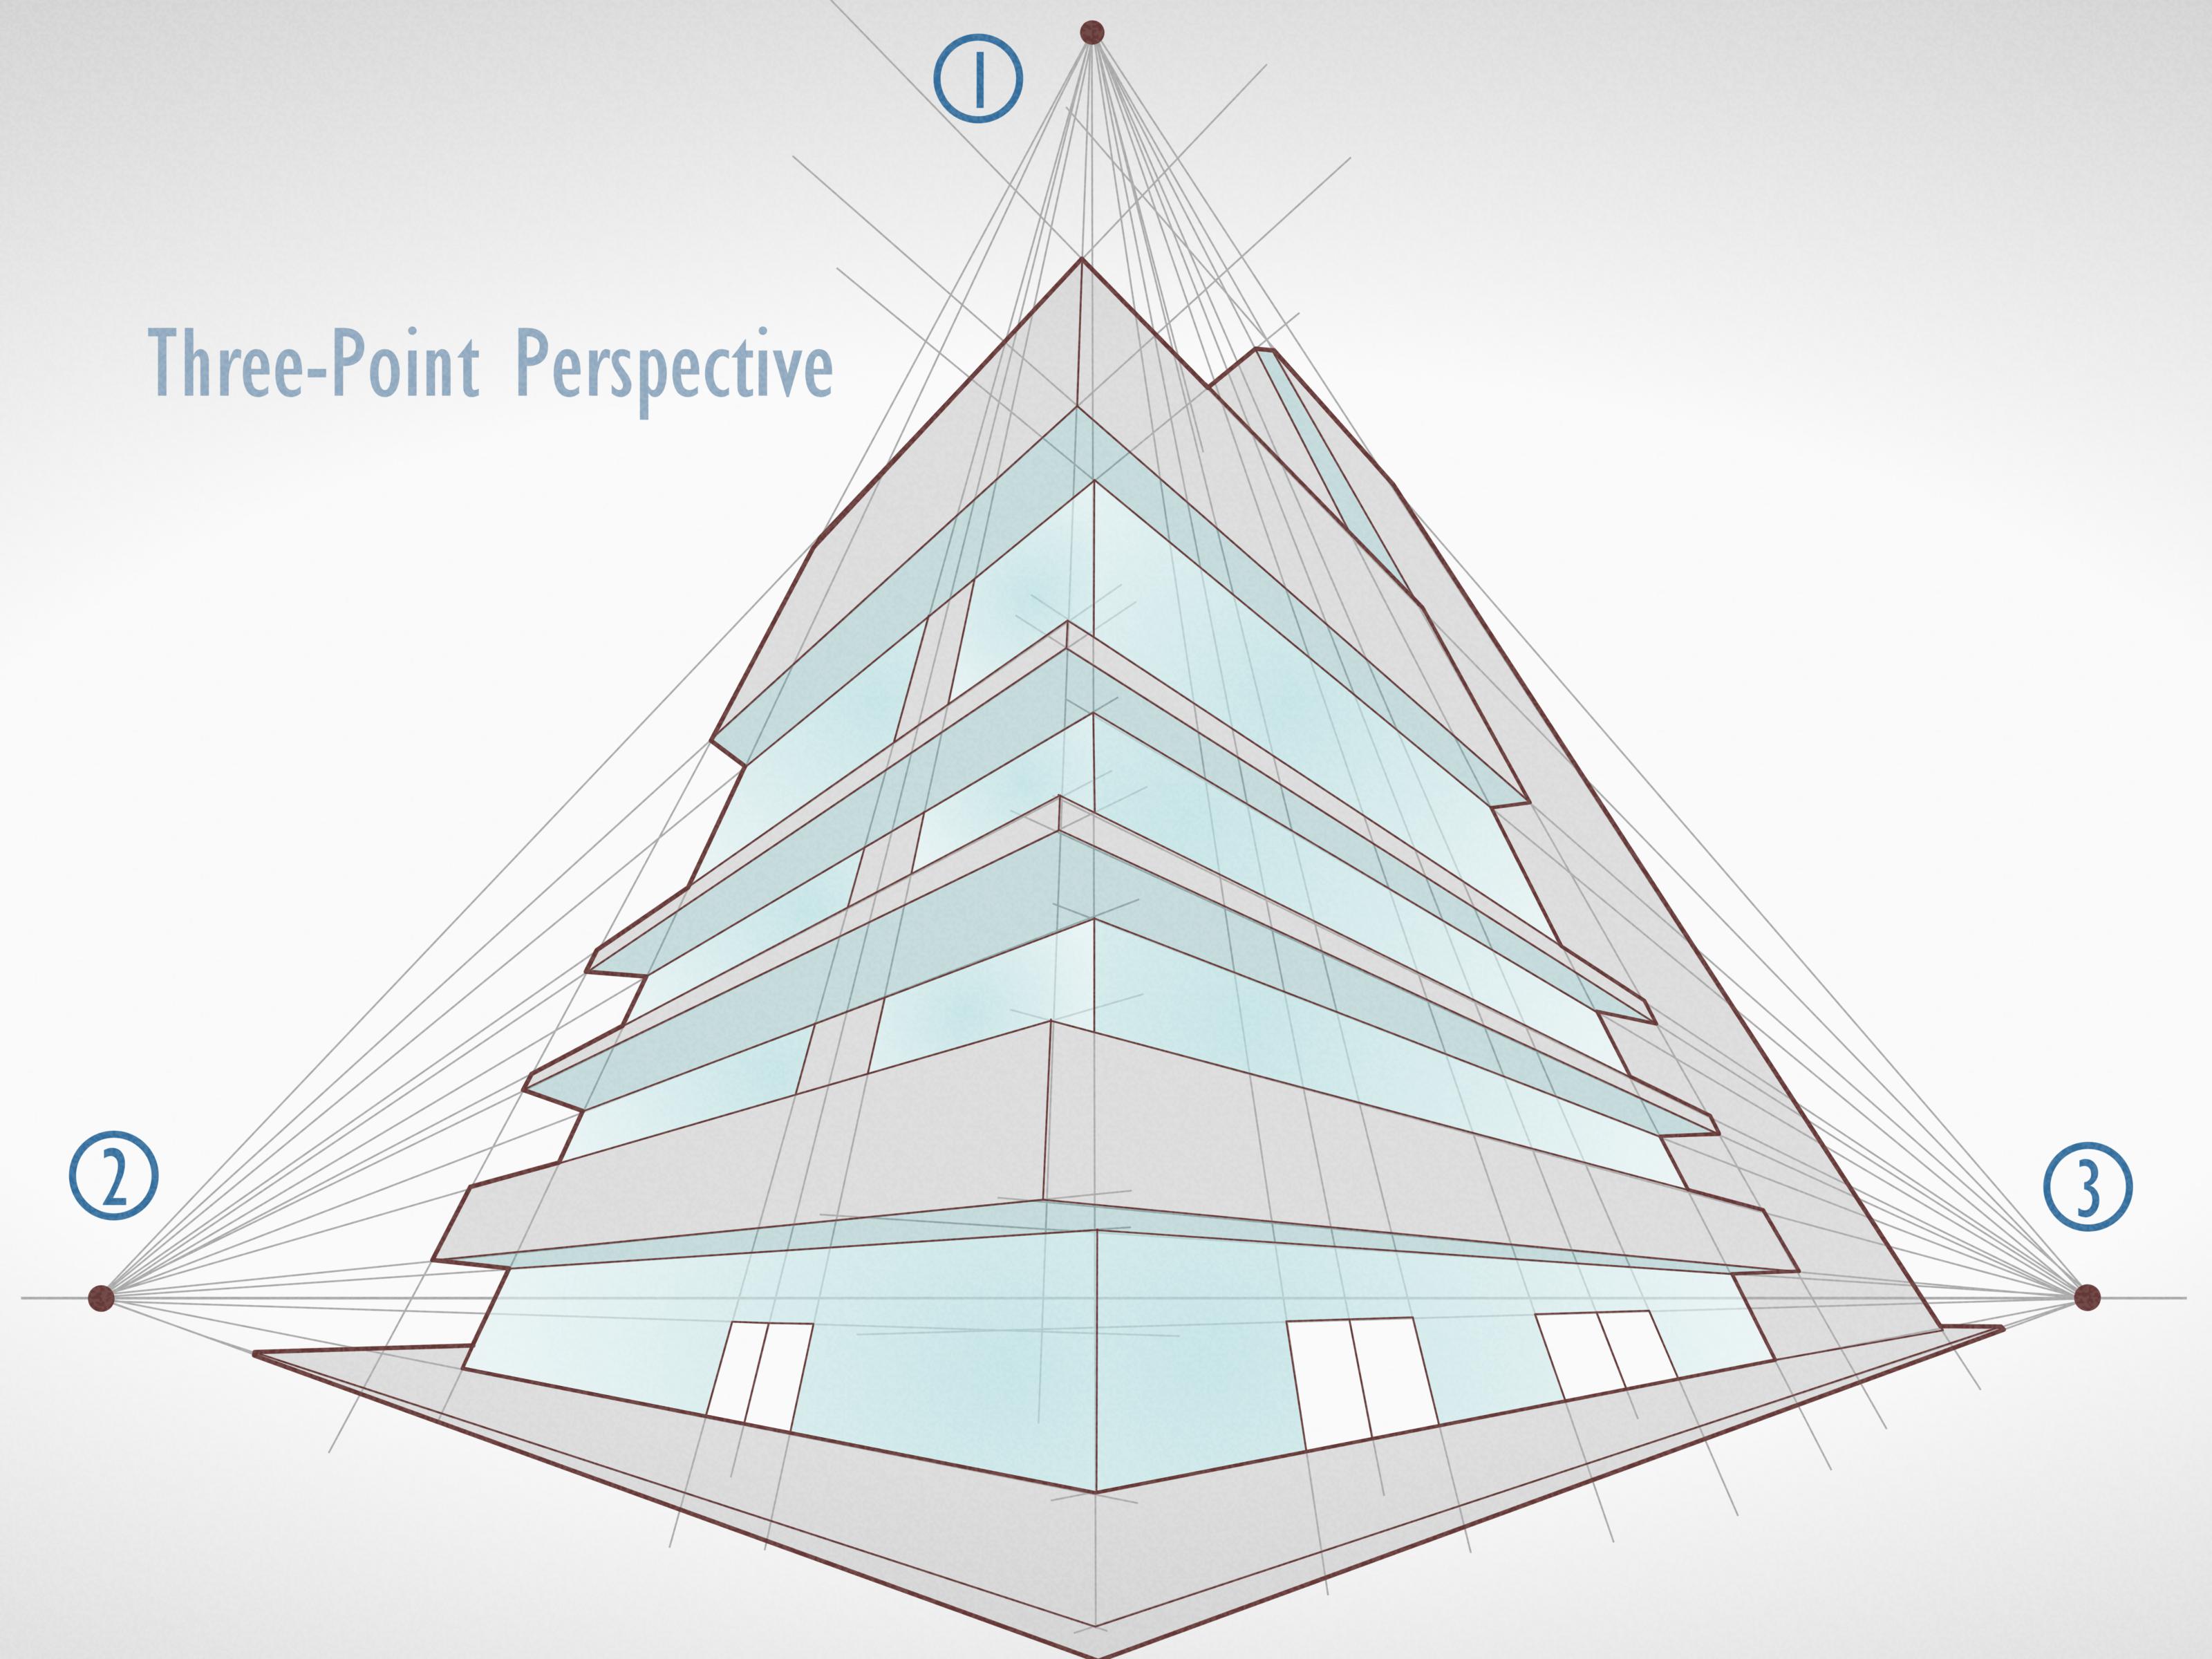
Three-point perspective is a type of linear perspective that uses three vanishing points to create the illusion of depth on a flat surface. Two of those vanishing points usually sit far apart on the horizon line, while the third vanishing point sits either far above or far below the horizon.
That extra vanishing point is what changes everything. In one-point perspective, only one set of parallel lines appears to recede. In two-point perspective, two sets of lines recede. In three-point perspective, the width, depth, and height all appear to shift in space. That makes the drawing feel more dramatic, more cinematic, and much closer to the way we experience tall structures or steep viewpoints in real life.
This is why three-point perspective is often used for scenes like looking up at a skyscraper from the sidewalk, looking down from a rooftop, drawing a city from a bird’s-eye view, or creating a comic-book panel with a lot of visual punch. It is especially useful when nothing in the subject feels perfectly flat to the viewer. In other words, when the scene starts feeling intense, three-point perspective starts feeling helpful.
Why Beginners Should Learn It
At first, three-point perspective can look like a geometry test disguised as art. But learning it actually makes drawing easier, not harder. It gives you a structure for understanding how forms exist in space. That means fewer random guesses, fewer lopsided buildings, and fewer moments where your chair somehow looks like it is falling into another dimension.
It also trains your eye. Once you start noticing horizon lines, vanishing points, and converging edges in the world around you, you begin to see how artists construct believable environments. Streets, hallways, towers, staircases, furniture, and city skylines all start making more visual sense.
Even better, three-point perspective teaches more than accuracy. It teaches point of view. A high viewpoint can make the viewer feel detached, powerful, or observant. A low viewpoint can make a structure feel massive, intimidating, heroic, or awe-inspiring. That emotional effect is a big reason perspective matters in art. It is not just about technical correctness. It is also about storytelling.
The Core Terms You Need to Know
Horizon Line
The horizon line represents the viewer’s eye level. In an outdoor scene, it may line up with where the sky seems to meet the land. In an indoor drawing, it still represents eye level, even if there is no visible horizon. Move the horizon line higher, and the viewer seems to be looking downward. Move it lower, and the viewer seems to be looking upward.
Vanishing Points
Vanishing points are the places where sets of parallel lines appear to meet as they move away from the viewer. In three-point perspective, there are three of them. The left and right vanishing points control the horizontal directions of the form. The third vanishing point controls the vertical recession, which is what creates the sense of height or plunge.
Orthogonals
Orthogonals are the guide lines that travel toward a vanishing point. They are the invisible logic behind the drawing. When your orthogonals behave, your drawing behaves. When they do not, your building starts looking like it lost an argument with gravity.
Vantage Point
Your vantage point is the position from which the scene is viewed. In three-point perspective, the vantage point is usually extreme. You are either below the subject looking up, sometimes called a worm’s-eye view, or above it looking down, often called a bird’s-eye view.
Three-Point Perspective vs. One-Point and Two-Point Perspective
One-point perspective works best when the front face of an object is directly facing the viewer. Think of looking straight down a hallway or directly at a road.
Two-point perspective is useful when you are looking at the corner of an object and both sides recede into space. Think of standing at the corner of a building.
Three-point perspective takes that same corner view and adds vertical convergence. Now the vertical edges are no longer perfectly upright. They also angle toward a third vanishing point. This makes the object feel taller, steeper, and more dramatic.
A simple way to remember it is this: one-point is stable, two-point is realistic for many everyday views, and three-point is the “wow” angle. It is the perspective equivalent of switching from a normal camera shot to a scene in a movie trailer where everything suddenly looks ten times more intense.
When to Use Three-Point Perspective
Three-point perspective in art is especially helpful for:
- Drawing tall buildings from street level
- Looking down on city blocks from a rooftop or drone-like angle
- Creating dynamic comic-book scenes
- Designing dramatic concept art environments
- Sketching interiors from unusual high or low viewpoints
- Making simple objects, like chairs or boxes, feel more dynamic
It is not always necessary. If your viewpoint is fairly normal and your subject is not dramatically above or below eye level, two-point perspective may be enough. But when you want scale, motion, tension, or cinematic flair, three-point perspective is your friend.
How to Draw Three-Point Perspective Step by Step
1. Draw the Horizon Line
Start by deciding whether the viewer is looking up or looking down. For a worm’s-eye view, place the horizon line low on the page. For a bird’s-eye view, place it high on the page. This choice immediately changes the mood of the drawing.
2. Place the Left and Right Vanishing Points
Put one vanishing point far to the left and one far to the right on the horizon line. Keep them very far apart. This matters more than beginners think. If the vanishing points are too close together, the drawing becomes distorted and starts to feel exaggerated in a bad way.
3. Add the Third Vanishing Point
Place the third vanishing point either far above the page or far below it. If the viewer is looking up, the third vanishing point usually goes below the object. If the viewer is looking down, it usually goes above the object. This point controls the tilt of the vertical edges.
4. Start with a Simple Corner
Draw a short vertical line somewhere between the left and right vanishing points. This line represents the nearest corner of your object. It is your starting anchor.
5. Connect the Top and Bottom to the Left and Right Vanishing Points
From the top and bottom of that short line, draw light guide lines toward the left and right vanishing points. You should now have the basic sides of a form beginning to appear.
6. Pull the Vertical Edges Toward the Third Vanishing Point
Choose where the outer edges of the object will be and draw those edges so they angle toward the third vanishing point. This is the step that gives the drawing its unmistakable three-point perspective look.
7. Close the Form
Use additional lines directed toward the appropriate vanishing points to close the planes of the object. At this stage, you should have a box-like structure. Congratulations. You have built the basic skeleton of your dramatic masterpiece.
8. Refine and Add Details
Once the main form is correct, you can add windows, doors, ledges, signs, beams, stair rails, or interior details. Make sure each new set of lines follows the same vanishing-point logic as the larger structure. Tiny details may seem harmless, but a single rebellious window can throw off the whole illusion.
Common Beginner Mistakes
Placing Vanishing Points Too Close Together
This is one of the most common problems in perspective drawing. When the vanishing points are too close, the subject looks warped. A little drama is great. Unintentional funhouse mirror energy is less great.
Forgetting That Verticals Also Converge
In two-point perspective, vertical lines usually stay vertical. In three-point perspective, they do not. Beginners often draw the sides correctly but accidentally leave the vertical edges perfectly straight. That weakens the illusion immediately.
Adding Details That Ignore the Grid
Windows, roof lines, shelves, and signs all need to obey the perspective system. A structure can look solid until the details go rogue. Keep checking which vanishing point each line should relate to.
Overworking the Drawing Too Soon
Do not jump into shading and texture before the structure is right. Get the framework solid first. Perspective is like baking. You do not frost the cake before you know it actually baked into something edible.
Tips for Making Three-Point Perspective Easier
- Start with boxes before drawing full buildings or rooms.
- Use a ruler at first. Freehand confidence can come later.
- Keep your guide lines light so you can adjust them.
- Work from large shapes to small details.
- Study photos of skyscrapers, city streets, stairwells, and balconies.
- Add a tiny human figure for scale. Suddenly your giant building really feels giant.
It also helps to notice three-point perspective in movies, comics, games, and architectural photography. Once you start spotting it, you will see it everywhere. It is the visual language of grandeur, tension, and scale.
Examples of Three-Point Perspective in Art and Design
Imagine standing at the foot of a tall office building and tilting your head back. The side edges of the building appear to angle inward as they rise. That is a classic worm’s-eye three-point perspective view.
Now imagine leaning over a balcony and looking down at a street corner. The buildings, sidewalks, and traffic recede below you, and the vertical structures seem to drop toward a distant point. That is bird’s-eye three-point perspective.
Artists use these views to create more than realism. They use them to shape emotion. A low-angle tower can feel powerful or threatening. A high-angle city scene can feel thrilling, lonely, or beautifully controlled. This is why perspective is so important in visual storytelling, from Renaissance experiments with spatial illusion to modern illustration, comics, animation, and concept art.
Practice Exercises for Beginners
Exercise 1: The Basic Box
Draw a single box in three-point perspective. Keep it simple. Focus on getting the converging directions correct.
Exercise 2: Stack the Boxes
Once one box makes sense, stack another on top of it or place one behind it. This helps you understand how larger scenes are built from simple forms.
Exercise 3: Draw a Skyscraper
Use a worm’s-eye view and turn your box into a tall building with repeating windows. This is a great way to practice consistency.
Exercise 4: Draw a Rooftop View
Try a bird’s-eye view of simple buildings below. Add streets, signs, or tiny cars. Keep the details simple and focus on the overall spatial logic.
Exercise 5: Add Value and Atmosphere
Once the structure works, add shading, line weight, or atmospheric softness to increase depth. Perspective builds the stage, but value helps light the scene.
Final Thoughts
Three-point perspective in art may look advanced, but its logic is surprisingly approachable. At its core, it is just a system for showing how forms behave when seen from a dramatic angle. Learn the horizon line, understand the three vanishing points, build simple forms, and then slowly make those forms more interesting.
Most beginners do not struggle because the idea is impossible. They struggle because they expect themselves to master it instantly. Perspective rarely works that way. It gets clearer through repetition, observation, and practice. Draw the awkward box. Draw the slightly better box. Draw the skyscraper that looks almost right. Then draw another one.
Before long, you will stop seeing three-point perspective as a technical monster and start seeing it as one of the most exciting tools in your drawing toolbox. And that is when things get really fun.
Experiences Beginners Commonly Have While Learning Three-Point Perspective
One of the most relatable experiences beginners have with three-point perspective is the moment they realize the drawing looks wrong, but they are not sure why. Everything seems close enough. The lines are there. The building is tall. The ruler has been used with sincere determination. And yet the result feels slightly cursed. This is normal. In fact, it is practically a rite of passage.
Many artists first encounter three-point perspective when trying to draw city scenes, comic-book buildings, or dramatic game-inspired environments. At first, the temptation is to jump straight into the exciting stuff: windows, signs, rooftop details, moody shadows, maybe a heroic figure in a trench coat. Then the structure underneath collapses because the foundation was never fully worked out. That experience teaches a valuable lesson: the boring-looking guide lines are actually the secret sauce.
Another common experience is discovering that placement matters more than people expect. A beginner might place the vanishing points too close together and wonder why the building looks bent like a banana with office windows. Then they spread the vanishing points farther apart and suddenly the drawing feels calmer, more natural, and much more believable. That single adjustment often feels like turning on a light in a dark room.
There is also a funny shift that happens when students begin noticing perspective in real life. A person walking downtown stops and stares at a skyscraper, not because they are lost, but because they are silently tracing imaginary orthogonals in the air like a very determined art detective. Sidewalk corners, stair rails, hallways, balconies, chairs, and bookshelves all start revealing their structure. The world begins to look less random and more constructed.
Some beginners are surprised by the emotional effect of perspective. A worm’s-eye view can make an ordinary building feel huge and dramatic. A bird’s-eye view can make a simple street corner feel cinematic or even lonely. That emotional discovery is often the moment perspective stops feeling like homework and starts feeling like art. It becomes clear that perspective is not just about “correct drawing.” It is about controlling how a viewer feels inside a scene.
There is usually frustration, too. Plenty of it. Artists erase the same edge six times. Windows drift off course. Verticals refuse to behave. Someone inevitably mutters, “Why is this so hard?” The answer is simple: because the brain is learning to translate 3D space into 2D marks. That takes practice. The encouraging part is that improvement is visible. Perspective rewards repetition. The tenth box is almost always better than the first.
Eventually, many beginners reach a small but thrilling milestone. They draw something in three-point perspective, step back, and think, “Wait, that actually looks real.” It may only be a simple building or corner, but it feels like magic. That moment is worth a lot. It builds confidence, and confidence keeps artists going.
So yes, learning three-point perspective can be messy, nerdy, humbling, and oddly addictive. But it is also one of the most satisfying skills a beginner can develop, because once it clicks, the whole page opens up.