Adobe Illustrator does not technically use “pages” the way Microsoft Word, Google Docs, or Adobe InDesign does. Instead, Illustrator uses artboards. Think of an artboard as a page, canvas, poster space, app screen, logo variation, sticker sheet, social media post, or tiny digital island where your vector artwork lives rent-free. If you want to create a multi-page Illustrator file, design several screens, build a brand presentation, or export multiple layouts from one document, adding artboards is the way to do it.
The good news? Adding pages or artboards in Adobe Illustrator is wonderfully simple once you know where the buttons are hiding. The slightly funny news? Illustrator has a few ways to do the same thing, because apparently one door was not dramatic enough. You can add artboards from the Artboards panel, use the Artboard Tool, duplicate an existing artboard, or create multiple artboards when starting a new document.
In this guide, you will learn how to add pages or artboards in Adobe Illustrator in 4 steps, plus how to rename, resize, rearrange, duplicate, and export them without turning your workspace into a digital junk drawer. Whether you are designing business cards, icons, app screens, packaging concepts, printable worksheets, or a multi-page PDF, these steps will help you work faster and stay organized.
What Is an Artboard in Adobe Illustrator?
An artboard is the printable or exportable area inside an Illustrator document. If the document is the studio, the artboard is the actual table where the design happens. You can have one artboard or many artboards in a single file, and each artboard can have its own size, name, and position.
Designers often call artboards “pages” because they behave like pages when exporting a PDF. For example, if you create five artboards and save the file as a PDF, each artboard can become a separate PDF page. That makes artboards extremely useful for multi-page layouts, presentation boards, social media sets, icon collections, web mockups, and print projects.
Artboards vs. Pages: What Is the Difference?
The difference is mostly about purpose. A traditional page is usually part of a text-heavy document, while an Illustrator artboard is built for visual design. Artboards are flexible, can sit side by side, and can be different sizes within the same file. You might have one artboard for an Instagram square, another for a web banner, and another for a business card design. Illustrator will not panic. In fact, this is exactly the kind of organized chaos it was born to handle.
Why Add Multiple Artboards in Illustrator?
Adding multiple artboards in Illustrator keeps related designs in one place. Instead of creating separate files for every version of a logo, every page of a flyer, or every size of a digital ad, you can use one Illustrator document with multiple artboards. This makes editing, comparing, exporting, and presenting much easier.
Multiple artboards are especially helpful when you need consistent colors, shared typography, repeated design elements, or side-by-side comparisons. For example, a brand designer might use separate artboards for logo variations. A UI designer might use artboards for app screens. A marketer might create artboards for Facebook, Instagram, Pinterest, and email graphics. A print designer might use them for front and back business cards, postcards, labels, or packaging panels.
In short, artboards help you stop creating files named “final,” “final-final,” “actually-final,” and “client-final-v7.” Your desktop deserves peace.
How to Add Pages or Artboards in Adobe Illustrator in 4 Steps
Below is the cleanest beginner-friendly method for adding artboards in Illustrator. This method works well whether you are starting with a blank file or adding more pages to an existing design.
Step 1: Open Your Illustrator Document and Show the Artboards Panel
Start by opening Adobe Illustrator and either creating a new document or opening an existing file. If you are starting fresh, go to File > New. In the New Document dialog box, you can choose your document type, size, color mode, bleed, and number of artboards. This is the fastest method if you already know you need several pages from the beginning.
For example, if you are designing a four-page mini brochure, you can create four artboards right away. If you are designing six Instagram carousel slides, set the number of artboards to six and choose a square size such as 1080 by 1080 pixels. Illustrator will create the artboards for you, neatly arranged like tiny creative parking spaces.
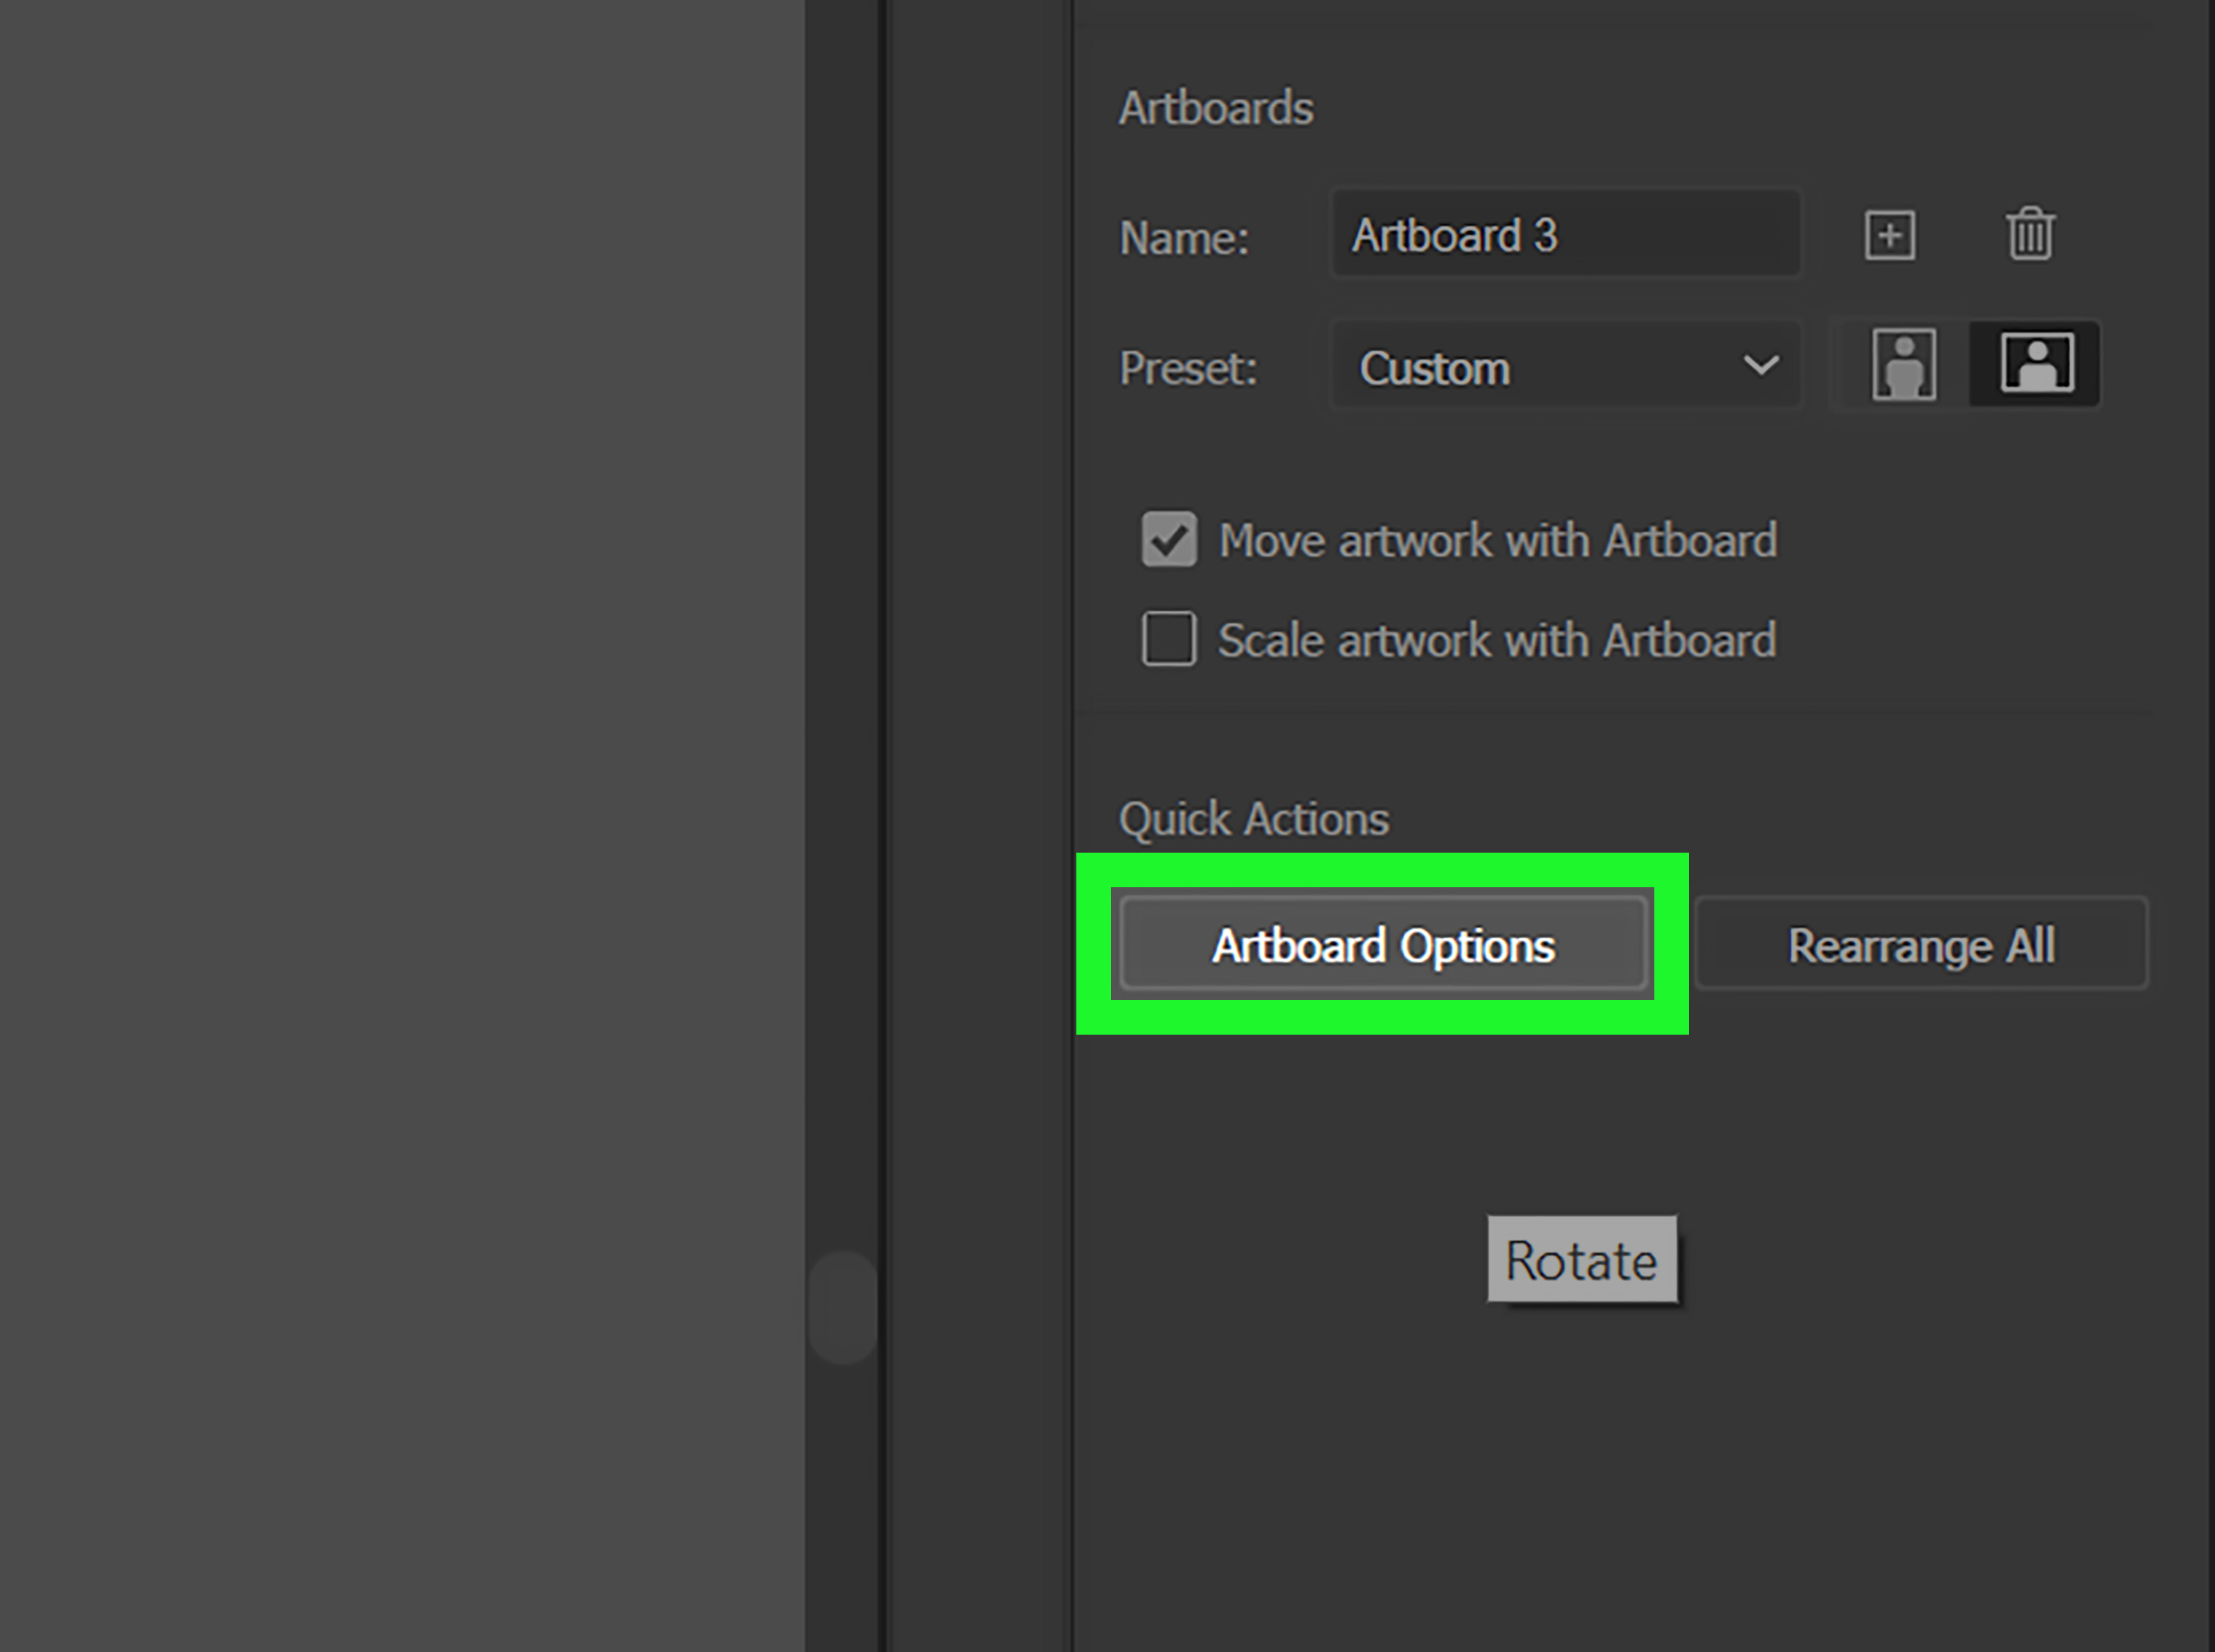
If you already have a document open, go to Window > Artboards. This opens the Artboards panel, where you can view, add, rename, duplicate, reorder, and manage your artboards. You may also want to open the Properties panel by choosing Window > Properties, because it gives you quick access to size, position, and alignment options.
Step 2: Click “New Artboard” or Use the Artboard Tool
Once the Artboards panel is visible, you can add a new artboard by clicking the New Artboard button. Illustrator will add another artboard to your document, usually based on the size of the currently selected artboard. This is the most straightforward way to add a page in Illustrator.
You can also use the Artboard Tool. Select it from the Tools panel or press Shift + O on your keyboard. With the Artboard Tool active, you can drag anywhere on the canvas to draw a new artboard manually. This is useful when you want a custom size or want to place a new artboard in a specific location.
Here is a practical example: imagine you are creating a logo presentation. Artboard 1 contains the main logo, Artboard 2 contains a black-and-white version, Artboard 3 contains a horizontal version, and Artboard 4 contains a social media profile icon. Instead of making four separate Illustrator files, you can add four artboards and keep the whole project together.
If you want to duplicate an existing artboard, select the artboard and choose the duplicate option in the Artboards panel menu. Duplicating is perfect when you want to create a new page with the same layout, guides, background, or design structure. It saves time and reduces the chance of accidentally making one page slightly different for no good reason.
Step 3: Resize, Rename, and Arrange Your Artboards
After adding new artboards, take a moment to organize them. This step is where beginners often skip ahead and later wonder why exporting feels like sorting socks in the dark. A clean artboard setup makes the entire project easier.
To resize an artboard, select the Artboard Tool and click the artboard you want to adjust. You can drag its edges or corners, or enter exact width and height values in the Properties panel or Control panel. This is helpful when you need precise dimensions for print or web design.
To rename an artboard, open the Artboards panel and double-click the artboard name. Use clear names such as “Cover,” “Page 2,” “Instagram Post,” “Logo White,” or “Business Card Back.” Good artboard names are especially important when exporting, because Illustrator can use those names in your exported file names.
To rearrange artboards visually, open the Artboards panel and use the rearrange option. You can choose a layout, adjust spacing, and decide whether artwork should move with the artboard. In most cases, you want Move Artwork with Artboard turned on. Otherwise, the artboard may move while your artwork stays behind, which is the Illustrator equivalent of leaving your suitcase at the airport.
You can also reorder artboards in the Artboards panel. This affects the order in which artboards export or appear in a PDF. If Artboard 4 should become Page 2, move it up in the panel. This small detail can save you from sending a presentation where the conclusion appears before the introduction. Bold creative choice? Maybe. Professional? Not usually.
Step 4: Save or Export Your Illustrator Artboards
Once your artboards are created and organized, you can save or export them depending on your goal. If you want to keep editing the file later, save it as an Adobe Illustrator file by choosing File > Save As and selecting the AI format.
If you want to create a multi-page PDF, choose File > Save As or File > Save a Copy, then select Adobe PDF. Illustrator can use your artboards as PDF pages, which is useful for presentations, digital guides, printable documents, and client proofs.
If you want to export artboards as separate image or design files, use File > Export > Export for Screens. In the Export for Screens dialog box, choose the Artboards tab, select the artboards you want, choose formats such as PNG, JPG, SVG, PDF, WebP, or TIFF, and export them to your chosen folder.
This is especially useful for social media kits, app icons, web graphics, and design systems. Instead of exporting each artboard one by one, you can export the whole set at once. It feels like cheating, but it is allowed.
Alternative Method: Add Multiple Artboards When Creating a New File
If you know your project needs multiple pages before you start designing, create the artboards during document setup. Go to File > New, choose your preset or custom size, then enter the number of artboards you need. You can also set spacing and layout options, depending on the version and dialog view you are using.
This method is ideal for predictable projects. For example, if you are creating a 10-slide Instagram carousel, start with 10 artboards. If you are designing a front-and-back flyer, start with two artboards. If you are making a product label series, create one artboard for each label variation.
The advantage is simple: your project begins organized. You do not have to add and rearrange everything later. It is like cleaning the kitchen before cooking, except Illustrator will not judge your snack choices.
How to Duplicate an Artboard in Illustrator
Duplicating an artboard is one of the fastest ways to add a new page while keeping the same design structure. Select the artboard you want to copy, then use the duplicate command from the Artboards panel menu. You can also use the Artboard Tool and drag-copy an artboard, depending on your workflow and keyboard shortcuts.
This is useful for designs with repeated elements. For instance, if you are building a brand presentation, you may want the same header, footer, logo placement, or background grid on every artboard. Duplicate the first artboard, then update the content on each copy. This keeps your design consistent and saves time.
How to Change the Size of an Artboard
To change an artboard size, select the Artboard Tool with Shift + O, click the artboard, and adjust the dimensions in the Properties panel. You can also use preset sizes for common formats such as letter, A4, mobile screens, or web layouts.
Exact sizing matters. A business card, for example, needs proper print dimensions and bleed. A social media graphic needs the correct pixel size. An app screen needs consistent proportions. If your artboard is the wrong size, your exported file may look cropped, stretched, or oddly spacious, like a couch floating in the middle of a gymnasium.
How to Rename Artboards for Better Exporting
Renaming artboards may seem optional, but it is a smart habit. Open the Artboards panel, double-click an artboard name, and type something descriptive. Instead of leaving names like “Artboard 1” and “Artboard 2,” use names such as “Homepage Hero,” “Email Banner,” “Logo Blue,” or “Menu Front.”
Clear names make exporting easier because your files become easier to identify. This is especially helpful when exporting dozens of assets for a website, app, campaign, or client presentation. Nobody wants to open 27 files named “Artboard copy copy 3.” That is not a naming system; that is a cry for help.
Common Mistakes When Adding Artboards in Illustrator
Mistake 1: Forgetting to Move Artwork with the Artboard
When rearranging artboards, make sure the artwork moves with them. If that option is turned off, you may move only the artboard boundary while the artwork stays in its old position. Always check this before reorganizing a busy file.
Mistake 2: Leaving Artboards Out of Order
The visual position of artboards on the canvas is not always the same as their order in the Artboards panel. If you are exporting a PDF, check the panel order first. This helps ensure Page 1 is actually Page 1, not an ambitious plot twist.
Mistake 3: Using One Huge Artboard for Everything
Some beginners place every design on one oversized artboard. This can work for rough brainstorming, but it is not ideal for exporting individual assets or pages. Separate artboards keep designs clean, exportable, and easier to manage.
Mistake 4: Not Naming Artboards
Unnamed artboards become confusing fast. Rename them as soon as your project grows beyond two or three pages. Your future self will thank you, possibly with coffee.
Best Practices for Working with Multiple Artboards
Use consistent spacing between artboards so your workspace stays readable. Keep related artboards near each other, and use logical naming conventions. If you are designing for print, include bleed settings and check final dimensions carefully. If you are designing for screens, use pixel-perfect sizes and export in the correct format.
For multi-page documents, decide early whether Illustrator is the right tool. Illustrator is excellent for visual, vector-heavy pages, brand boards, icons, packaging, and short presentation-style layouts. For long text-heavy documents, Adobe InDesign is usually a better choice. Illustrator can make multi-page designs, but it is not designed to be a full publishing layout machine.
Specific Examples of Using Artboards
Example 1: Social Media Carousel
Create 10 square artboards at 1080 by 1080 pixels. Use each artboard as one carousel slide. Keep typography, margins, and colors consistent. Export all artboards as PNG files using Export for Screens.
Example 2: Business Card Design
Create two artboards: one for the front and one for the back. Set the correct print size and bleed. Name them “Business Card Front” and “Business Card Back.” Export as a print-ready PDF when finished.
Example 3: Logo Variations
Create separate artboards for full-color, black, white, horizontal, stacked, icon-only, and small-size logo versions. This keeps every logo variation inside one organized Illustrator file.
Example 4: App Screen Mockups
Create one artboard for each app screen. Use consistent screen dimensions, align elements carefully, and export artboards as PNG or SVG files for review and handoff.
Troubleshooting: Why Can’t I Add a New Artboard?
If you cannot add a new artboard, first make sure you are not accidentally using the Selection Tool instead of the Artboard Tool. Press Shift + O and try again. Next, open Window > Artboards to confirm the Artboards panel is visible.
If the new artboard appears but your artwork does not move with it, check your artboard movement settings. If your artboards export in the wrong order, reorder them in the Artboards panel. If exported files have confusing names, rename your artboards before exporting.
For very large projects, keep performance in mind. Illustrator can handle many artboards, but complex artwork, heavy effects, embedded images, and excessive file size can slow things down. Use linked images when appropriate, clean up unused objects, and avoid turning one file into a haunted mansion of forgotten design experiments.
of Real-World Experience: What Working with Illustrator Artboards Teaches You
After working with Illustrator artboards on real design projects, one lesson becomes obvious: artboards are not just “extra pages.” They are a workflow system. When used well, they make a project feel calm, structured, and professional. When used poorly, they become a confusing field of rectangles where nobody knows which design is final and which one was created during a 1:00 a.m. burst of questionable confidence.
One of the most useful habits is creating artboards with a plan before the design gets too complicated. For example, if you are building a social media campaign, create every required size at the start: Instagram post, Instagram story, Facebook cover, Pinterest pin, email header, and website banner. Even if some artboards stay empty for a while, they remind you what needs to be designed. This turns the Illustrator file into a visual checklist.
Another experience-based tip is to duplicate artboards instead of rebuilding layouts from scratch. If a campaign uses the same headline style, logo position, background texture, or call-to-action button, duplicate the first finished artboard and adapt it. This keeps spacing and branding consistent. It also prevents tiny errors, such as one logo sitting three pixels lower than the others. Three pixels may sound harmless, but designers have lost sleep over less.
Naming artboards is also more important than beginners think. When a file has only two artboards, names do not matter much. But once a project grows to 12, 20, or 50 artboards, clear names save time. A file with artboards named “Homepage,” “Mobile Banner,” “Product Card,” and “Email Header” is easier to export, review, and revise than one filled with default names. Good naming is not glamorous, but neither is searching through exported files while a client waits.
Spacing matters too. Artboards placed too close together make the workspace feel cramped. Artboards placed too far apart make navigation annoying. A neat grid layout helps you compare designs quickly. When presenting options to a client or team, arranged artboards make the file look intentional, not like a design tornado passed through.
One common professional workflow is to keep exploration artboards separate from final artboards. Early sketches, rejected versions, and experiments can live off to the side, while approved designs stay in a clean row. This gives you creative freedom without sacrificing order. It also makes revisions easier because you can revisit earlier ideas without digging through old files.
Finally, artboards teach you to think about output from the beginning. Are you exporting a PDF? Individual PNG files? SVG icons? Print-ready artwork with bleed? The answer affects artboard size, naming, order, and layout. A beautiful Illustrator file is nice, but a beautiful exported file is what clients, printers, developers, and audiences actually see. Artboards are the bridge between your working design and the final deliverable.
So, the best advice is simple: treat artboards like organized pages, not random containers. Create them intentionally, name them clearly, arrange them logically, and export them carefully. Do that, and Illustrator becomes much easier to control. Ignore it, and you may find yourself yelling at “Artboard 17 copy 4” like it personally betrayed you.
Conclusion
Learning how to add pages or artboards in Adobe Illustrator in 4 steps makes multi-page and multi-format design much easier. The basic workflow is simple: open your file and Artboards panel, create a new artboard, resize or arrange it, then save or export your work. Once you understand that Illustrator “pages” are really artboards, the process becomes much less mysterious.
Artboards help you organize related designs, create multi-page PDFs, export multiple assets, and manage different design sizes in one file. Whether you are making a logo set, a flyer, an app mockup, a social media carousel, or a print project, mastering artboards will save time and reduce design chaos. And honestly, any tool that helps reduce chaos deserves a tiny round of applause.