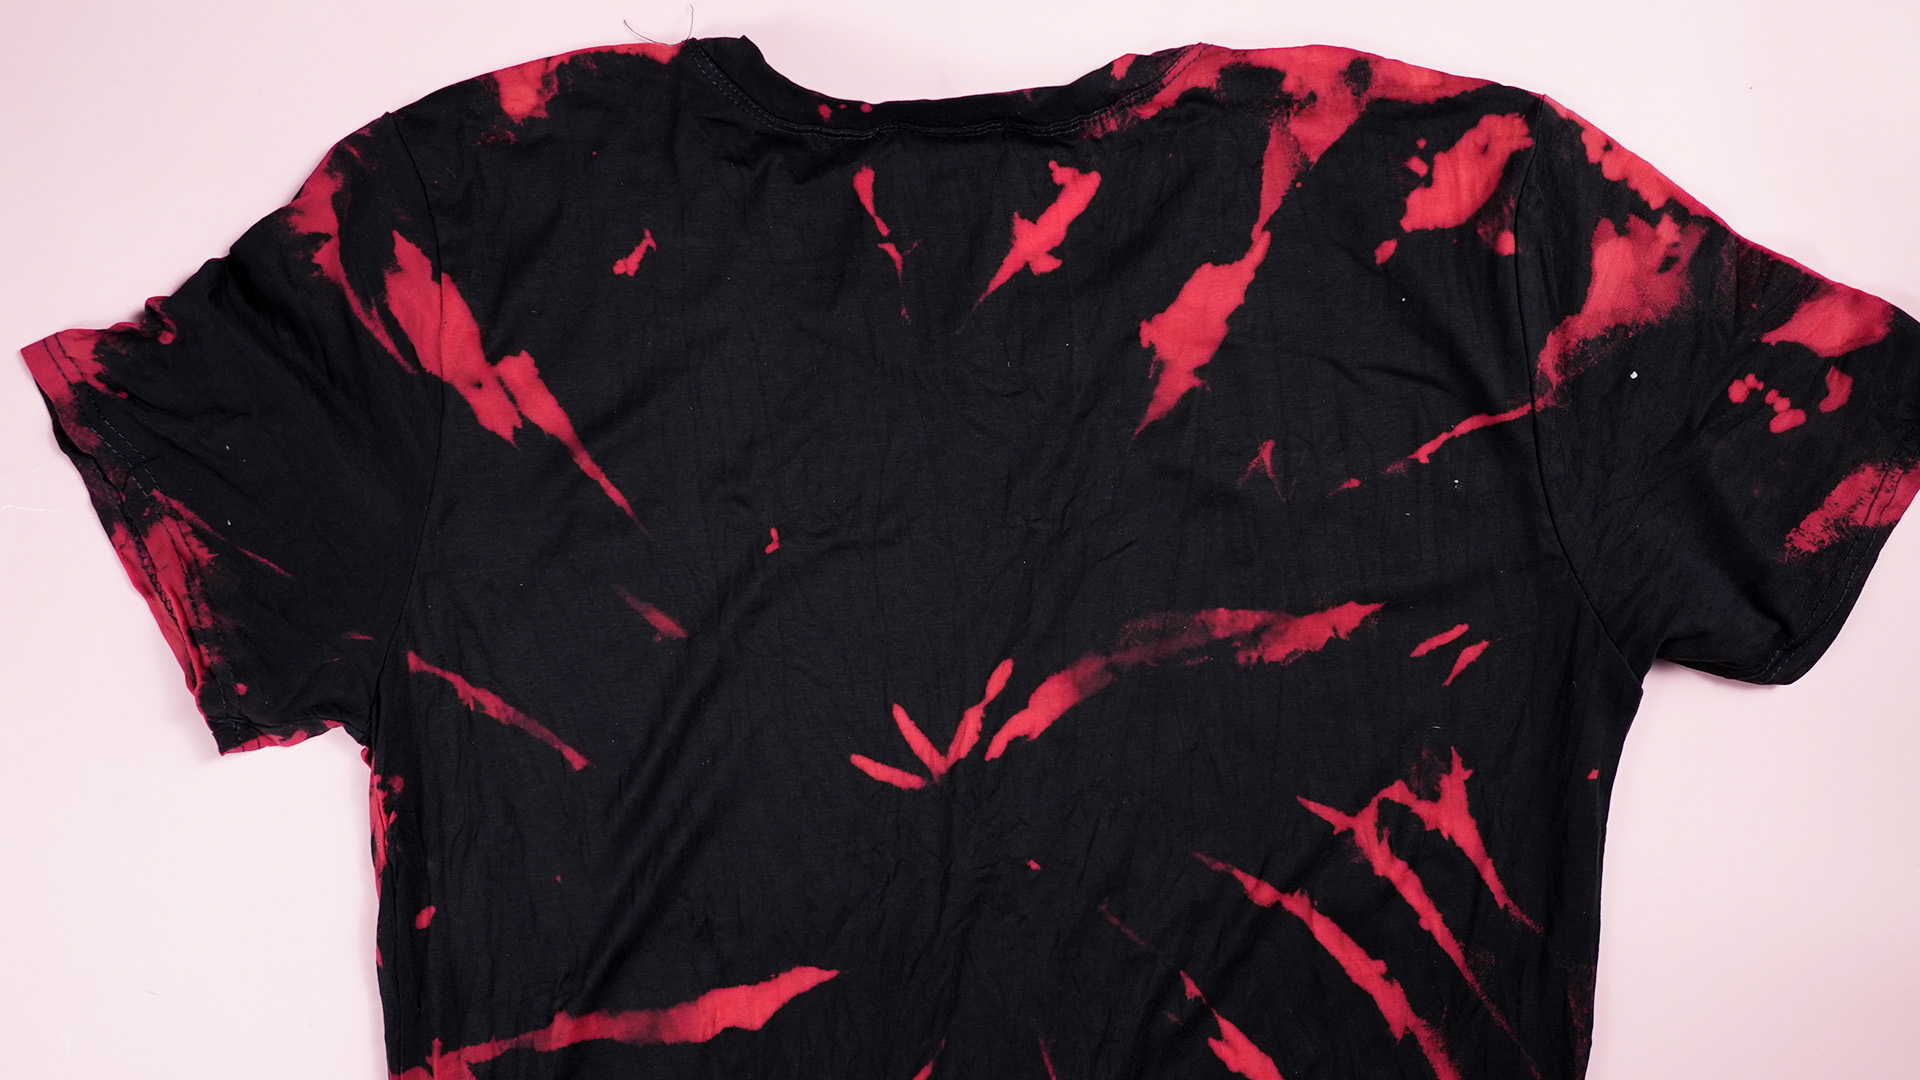
Bleach tie dye, often called reverse tie dye, has become a favorite DIY fashion trend because it flips the usual tie-dye process upside down. Instead of adding bright colors to white fabric, the technique removes color from dark fabric to create smoky swirls, lightning-like streaks, soft bursts, and vintage patterns that look like they came from a tiny art studio with excellent lighting and suspiciously clean floors.
But here is the important part: bleach is not just “spicy water.” It is a strong household chemical that can irritate skin, eyes, lungs, and fabric fibers when handled carelessly. So while bleach tie dye looks fun on social media, it deserves a safety-first approach in real life. This guide explains what bleach tie dye is, why it works, what materials react best, what risks to understand, and how to plan a reverse tie-dye project responsibly. For minors, this project should only be considered with direct adult supervision, and safer non-bleach alternatives are strongly recommended.
What Is Bleach Tie Dye?
Bleach tie dye is a reverse dyeing method. Traditional tie dye adds pigment to fabric. Bleach tie dye removes or lightens existing dye from colored fabric, creating contrast. That is why black, navy, dark green, burgundy, and charcoal shirts often produce the most dramatic results. The final color is not always white; depending on the original dye, the fabric may turn orange, tan, rust, pink, gray, or even a moody mushroom shade that looks like it has opinions about indie music.
The effect depends on several factors: the fabric fiber, the garment dye, the original color, the pattern technique, and how the item was manufactured. Two black cotton shirts can react differently because clothing brands use different dye formulas. This is why bleach tie dye always has a surprise element. Sometimes it is gorgeous. Sometimes it looks like a raccoon designed it during a power outage. Both outcomes are part of the adventure.
Before You Try Bleach Tie Dye: Safety Comes First
Because bleach is a strong chemical, the safest approach is to treat bleach tie dye as an adult-supervised project, not a casual bedroom craft. Work should happen in a well-ventilated area, away from pets, children, food, carpet, upholstery, and anything you would be sad to ruin. Protective gloves and eye protection are important, and bleach should never be mixed with vinegar, ammonia, rubbing alcohol, toilet cleaners, stain removers, or any other cleaning product.
If you want the reverse tie-dye look without handling bleach, consider safer options such as a pre-made reverse tie-dye kit, fabric color remover made for clothing, or a standard tie-dye kit on a light-colored shirt. These alternatives can still create bold, creative results without relying on household bleach.
Best Fabrics for Reverse Tie Dye
Natural fibers usually react best to reverse dyeing. Cotton is the classic choice because it absorbs liquid well and often shows clear contrast. Cotton blends may work, but results can be uneven. Linen and rayon may also respond, though they can be more delicate. Polyester, acrylic, nylon, and other synthetic fabrics may barely change because their dyes and fibers are less reactive to household bleach.
For beginners, a dark cotton T-shirt is the most forgiving practice item. Avoid expensive clothing for a first attempt. The universe has a sense of humor, and it loves teaching craft lessons on your favorite hoodie.
How to Tie Dye with Bleach: 15 Safety-First Steps
Step 1: Understand the Project Before Handling Anything
Start by learning what bleach tie dye does: it removes color rather than adding it. That means the final pattern is partly controlled by you and partly controlled by the original fabric dye. Read the garment label, check the fiber content, and decide whether the item is worth experimenting on.
Step 2: Choose a Safer Option When Possible
If you are new to fabric crafts, consider using a reverse tie-dye kit or a fabric color remover designed specifically for clothing. These products usually include clearer instructions for textile use. You can also create a similar visual effect with regular tie dye on a light or pastel shirt.
Step 3: Make Sure an Adult Supervises the Project
Bleach projects should not be handled casually by kids or teens. An adult should manage chemical handling, setup, cleanup, and disposal. This is not the moment for “I saw a thirty-second video, so I am basically a scientist.”
Step 4: Pick the Right Garment
Choose a dark cotton or mostly cotton item that you do not mind altering permanently. Black shirts are popular because they often reveal warm copper, orange, or tan tones. Navy and burgundy can also produce interesting results.
Step 5: Test a Hidden Area First
Before changing the whole garment, test a small hidden spot or a scrap of similar fabric. This helps you see whether the color changes attractively or refuses to cooperate like a printer five minutes before homework is due.
Step 6: Prepare a Ventilated Workspace
Work outdoors when possible. If indoors, choose an area with strong airflow, open windows, and washable surfaces. Keep the project away from food, dishes, bedding, pets, and anything absorbent.
Step 7: Protect Surfaces
Cover the work area with a disposable or washable barrier. Bleach can discolor tables, floors, counters, towels, and clothing. A protected surface prevents your craft project from becoming a home renovation project.
Step 8: Wear Protective Gear
Use non-porous gloves and eye protection. Wear old clothing and closed-toe shoes. Bleach can damage fabric and irritate skin, so protection is not optional decoration.
Step 9: Keep Chemicals Separate
Never mix bleach with other cleaners or household chemicals. Do not combine it with vinegar, ammonia, rubbing alcohol, hydrogen peroxide, toilet bowl cleaner, drain cleaner, or stain removers. Mixing chemicals can create dangerous fumes.
Step 10: Choose a Pattern Style
Common reverse tie-dye patterns include spirals, scrunch designs, stripes, bullseyes, and accordion folds. The tighter the folds, the more contrast you may see. Loose folds create softer, cloudier shapes.
Step 11: Fold or Bind the Fabric
The folding method controls where the original color remains. Rubber bands, string, or clips can help hold folds in place. A spiral pattern starts from a center twist, while a scrunch pattern is made by gathering fabric randomly into textured hills and valleys.
Step 12: Let the Adult Handle the Chemical Application
If bleach is used, the adult should follow the product label and avoid over-saturating the fabric. Too much chemical exposure can weaken fibers, create holes, or make the fabric feel rough. Controlled application is safer than soaking the garment.
Step 13: Watch the Color Change Carefully
Reverse dyeing can develop quickly, and every fabric behaves differently. The garment should be monitored closely instead of left unattended. Once the color shift is visible, the project should move toward rinsing and washing according to product safety directions.
Step 14: Rinse and Wash Separately
After the color has changed, the item should be rinsed and washed separately from other clothing. This helps remove residue and prevents accidental discoloration of other laundry. Use care, because wet fabric that has been chemically treated may be more fragile.
Step 15: Dry, Inspect, and Style the Finished Piece
Once clean and dry, inspect the garment for texture, color, and fiber strength. If the result looks bold and balanced, congratulations: your shirt has officially entered its main-character era. If the result is uneven, it can still become a gym shirt, sleep shirt, painting shirt, or “I meant for it to look abstract” shirt.
Popular Bleach Tie-Dye Patterns
Spiral Pattern
The spiral is the classic tie-dye look. It creates a circular motion from the center of the shirt. On dark fabric, reverse spirals often look like smoky galaxies or vintage band merch.
Scrunch Pattern
The scrunch method is beginner-friendly because it does not require perfect folding. The result is organic, cloudy, and unpredictable. It is ideal for people who like art but do not enjoy measuring things with the seriousness of a NASA launch.
Bullseye Pattern
A bullseye design creates rings that spread from one or more points. It works well on shirts, tote bags, and sweatshirts. Multiple bullseyes can create a playful, almost cosmic look.
Stripe Pattern
Accordion folds create stripes. Vertical folds produce vertical movement, while horizontal folds create a more relaxed, beachy feel. Diagonal folds can make a shirt look more dynamic.
Common Mistakes to Avoid
One common mistake is choosing the wrong fabric. Synthetic garments may not react strongly, leaving you with a wet shirt and disappointment. Another mistake is using clothing that is too valuable. Reverse tie dye is permanent, and the first attempt is best done on an inexpensive item.
A bigger mistake is ignoring safety. Bleach should never be used in a closed room, near pets, or around other cleaning products. It should also never be treated like regular dye. Unlike fabric dye, bleach can weaken fibers if used carelessly.
Finally, do not expect every black shirt to turn the same color. Some black dyes lift to orange. Others turn beige, red, gray, or brown. That mystery is part of the charm. Your shirt may become edgy streetwear, or it may become something your lawn mower wears emotionally.
How to Care for Reverse Tie-Dye Clothing
Wash reverse tie-dye clothing separately the first time. After that, wash it with similar colors in cool water. Gentle cycles are best because chemically lightened fabric may be more delicate than untreated fabric. Avoid harsh laundry combinations, and do not use additional bleach on the finished garment.
Air drying can help preserve the fabric, especially if the item feels thinner after the project. If using a dryer, choose a low setting. The goal is to keep the design looking intentional, not like it survived a tiny textile tornado.
Safer Alternatives to Bleach Tie Dye
If you love the reverse tie-dye look but do not want to use bleach, there are several creative alternatives. A fabric color remover made for clothing can create a similar faded effect. A reverse tie-dye kit may offer more controlled instructions. You can also use traditional tie dye on white, gray, or pastel garments to get a bold pattern without removing color first.
Another option is faux bleach tie dye using fabric paint. Apply light-colored fabric paint to dark clothing with a sponge, brush, or spray effect. It will not remove dye, but it can mimic the look. This is especially useful for younger crafters, school projects, or indoor craft days where chemical handling is not appropriate.
Real-World Experience: What Bleach Tie Dye Teaches You
The first lesson of bleach tie dye is that fabric has secrets. You may buy two black shirts from two different stores and discover that one turns a beautiful copper color while the other barely changes. That does not mean you failed. It means the dye chemistry was different. In practical terms, always test first and treat every garment as an experiment.
The second lesson is that less drama often creates better design. Beginners sometimes imagine that more liquid means better results. In reality, heavy saturation can blur the pattern, weaken fabric, and remove too much color. The most attractive reverse tie-dye pieces often have contrast: dark areas, light areas, and enough negative space for the design to breathe.
The third lesson is that folding matters more than people think. A messy scrunch can look fantastic, but it still needs shape. If the folds are too flat, the design may look plain. If the fabric is bunched with texture, the final pattern usually has more movement. Spiral folds require patience, but they reward you with that classic swirl people instantly recognize.
The fourth lesson is that safety habits make the project more enjoyable. When the workspace is prepared, gloves are ready, ventilation is handled, and the garment is not precious, the process feels creative instead of chaotic. Good setup turns a risky mess into a controlled craft session. Bad setup turns into “Why is the kitchen towel orange now?”
The fifth lesson is that imperfections are not automatically mistakes. Reverse tie dye is supposed to look handmade. Uneven edges, smoky gradients, random bursts, and strange color shifts often make the garment more interesting. The best pieces do not look factory-perfect; they look personal.
The sixth lesson is that some projects are better with alternatives. If the crafter is young, sensitive to fumes, working indoors, or making a group activity, a non-bleach method is smarter. Fabric paint, standard tie-dye kits, and textile color removers can still produce exciting results with fewer concerns.
From a style perspective, reverse tie dye works especially well with casual outfits. A black reverse-dyed T-shirt pairs easily with jeans, cargo pants, denim shorts, sneakers, or layered flannels. A reverse-dyed hoodie can look vintage and cozy. A tote bag can become a fun beginner project because it is flat, useful, and less emotionally risky than your favorite sweatshirt.
From a creative perspective, the project teaches patience. You cannot fully control the final color, and that is part of the fun. Reverse tie dye is a conversation between your plan and the fabric’s personality. Sometimes the fabric politely agrees. Sometimes it says, “Actually, today I am rust orange.”
The best experience comes from treating the project like a test kitchen. Start with inexpensive cotton items, document what works, compare fabric labels, and keep notes about pattern styles. Over time, you will learn which garments create crisp contrast and which ones produce softer, vintage effects.
Most importantly, do not let social media make the process look simpler than it is. A perfect ten-second video may hide the setup, safety gear, failed attempts, rinsing, washing, and cleanup. Real crafting is slower, messier, and more educational. That is not a downside. That is where the skill lives.
Conclusion
Bleach tie dye can create striking reverse-dye patterns on dark cotton clothing, but it must be approached with caution. The best results come from choosing the right fabric, planning the pattern, protecting the workspace, and respecting the chemical risks. For younger crafters or anyone working indoors, safer alternatives such as reverse tie-dye kits, fabric color remover, or fabric paint are often the better choice.
Whether you create smoky spirals, bold stripes, or cloudy scrunch patterns, the goal is the same: turn ordinary clothing into something personal. Just remember that safety is not the boring part of the craft. Safety is what lets the fun part happen without turning the day into a cautionary tale.