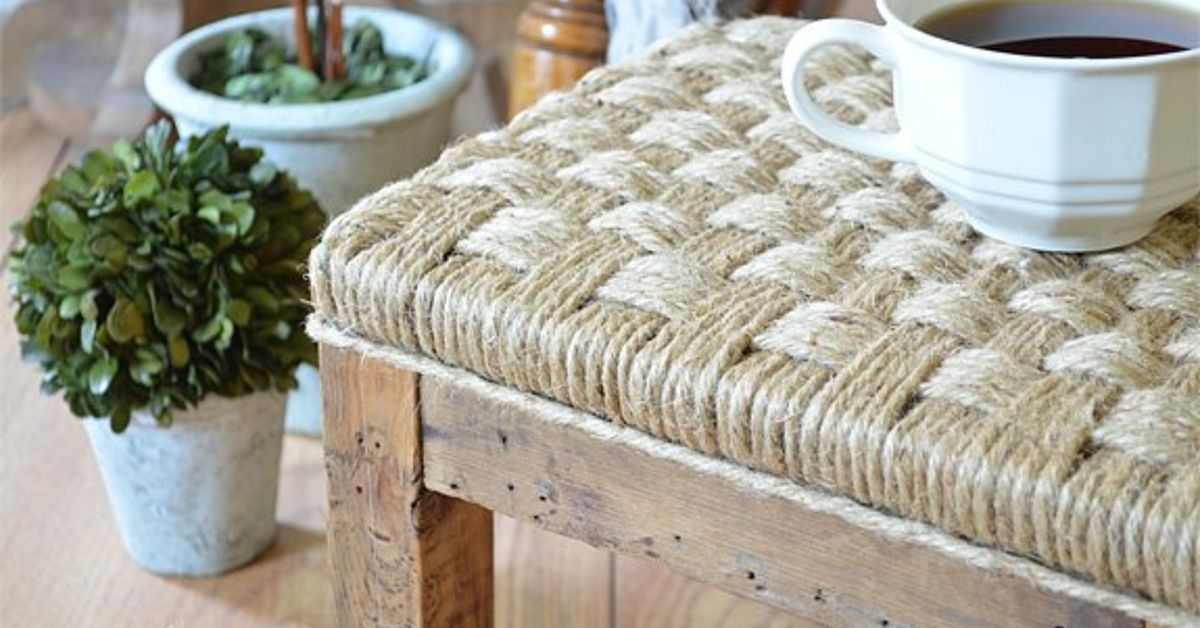
A rustic wood footstool is the kind of home project that quietly says, “Yes, I own tools,” without also saying, “I accidentally built a wobbly medieval torture device.” Add jute twine, and suddenly a simple wooden stool becomes a warm, farmhouse-style accent piece with texture, charm, and just enough handcrafted personality to make store-bought furniture look a little nervous.
This DIY rustic wood footstool project is beginner-friendly, affordable, and flexible. You can make it from pine, cedar, reclaimed lumber, or leftover boards from another project. The jute twine adds a natural woven detail that works beautifully with farmhouse decor, cottage interiors, coastal rooms, boho spaces, and cozy reading corners. Even better, the finished piece can serve as a footrest, plant stand, low accent stool, or decorative riser for a basket of throws.
The goal is not to build a museum piece that makes guests whisper. The goal is to create something sturdy, attractive, and usefulsomething that looks as if it came from an old country porch but does not wobble like it survived a bar fight.
Why Make a Rustic Wood Footstool With Jute Twine?
A handmade footstool brings together three things people love: natural wood, practical comfort, and the smug satisfaction of saying, “I made that.” Rustic furniture does not need to be perfect. In fact, a tiny knot, a weathered edge, or a visible grain line can make the finished stool feel more authentic.
Jute twine gives the piece extra texture. Wrapped around the lower frame, around the legs, or across the top as a woven accent, it softens the look of the wood and adds that handmade farmhouse feel. Jute is also lightweight, inexpensive, and easy to work with. Unlike polished upholstery or complicated joinery, twine is forgiving. If one wrap looks odd, unwind it and try again. No drama, no furniture therapy required.
Materials and Tools You Will Need
Materials
- One solid wood board for the top, about 14 to 18 inches long and 10 to 12 inches wide
- Four wooden legs, about 8 to 10 inches tall
- Four apron pieces or support rails for the underside frame
- Wood glue
- 1 1/4-inch or 1 1/2-inch wood screws
- Jute twine or jute rope
- Wood stain, whitewash, Danish oil, or clear polyurethane
- Sandpaper in 80-, 120-, 180-, and 220-grit
- Felt furniture pads for the bottom of the legs
- Optional wood filler for knots, gaps, or screw holes
Tools
- Measuring tape
- Pencil
- Saw or miter saw
- Drill and drill bits
- Screwdriver bit
- Clamps
- Sanding block or orbital sander
- Staple gun or hot glue gun for securing jute
- Paintbrush or lint-free cloth for finish
- Safety glasses and a dust mask
Choosing the Right Wood
Pine is one of the easiest and most budget-friendly choices for a DIY wood footstool. It is soft, widely available, simple to cut, and accepts stain well when properly sanded. Cedar is another excellent option if you want a warmer tone and a naturally rustic look. Reclaimed wood can look fantastic, but inspect it carefully for nails, cracks, rot, and mystery stains. If a board smells like an old basement argument, choose another board.
For the top, use a board thick enough to feel solid under your feet. A thickness of 3/4 inch is workable for light use, but a thicker board or doubled-up top feels sturdier. For legs, you can buy pre-made furniture legs, cut square legs from 2×2 lumber, or repurpose legs from an old stool. If the stool will be used only as a footrest, 8 to 10 inches tall is comfortable for most chairs and sofas.
Recommended Dimensions
A good beginner size is approximately 16 inches wide, 11 inches deep, and 9 inches tall. This is compact enough for a living room, bedroom, or reading nook, but large enough to support both feet comfortably. If you want a wider farmhouse bench-style footstool, try 20 inches wide by 12 inches deep. Keep the height modest. A footstool should invite relaxation, not force your knees into a geometry lesson.
Step-by-Step Guide: How to Create a Rustic Wood Footstool With Jute Twine
Step 1: Cut the Wood Pieces
Measure and cut the top board first. A 16-by-11-inch top works well for most spaces. Then cut four legs to equal length. This part matters. Even a small difference in leg height can make the stool rock back and forth like it is trying to make a decision.
Next, cut four apron pieces for the underside frame. These rails connect the legs and help prevent wobbling. Two longer rails should run along the front and back, while two shorter rails fit along the sides. Dry-fit all pieces before adding glue or screws. Dry-fitting is the woodworking equivalent of reading the recipe before dumping everything into a bowl.
Step 2: Sand Everything Before Assembly
Sand the top, legs, and apron pieces before putting them together. Start with 80-grit sandpaper if the wood is rough, then move to 120-grit and 180-grit. For a smoother finish, use 220-grit before staining or sealing. Always sand with the grain to avoid scratches that show up later like tiny wooden regrets.
Slightly round over the edges of the top board. Sharp corners do not feel rustic; they feel like furniture with a grudge. A softened edge looks better, feels better, and helps stain blend naturally.
Step 3: Build the Base Frame
Lay the stool upside down on a flat work surface. Position the legs near each corner, leaving a small inset from the edges for a cleaner look. Attach the apron rails between the legs with wood glue and screws. Drill pilot holes before driving screws to reduce the chance of splitting the wood. This is especially important near the ends of boards.
Use clamps to hold pieces in place while the glue sets. Check that the frame is square by measuring diagonally from corner to corner. If both diagonal measurements match, your frame is square. If not, adjust it before the glue dries and your stool becomes permanently quirky.
Step 4: Attach the Top
Place the top board face down, then center the assembled leg frame on it. Apply wood glue along the top edges of the frame where it contacts the underside of the seat. Drill pilot holes through the aprons into the top board, making sure your screws are not too long. Nobody wants a screw tip poking through the top like a tiny metal cactus.
Drive the screws carefully and wipe away any glue squeeze-out with a damp cloth. Let the glue cure according to the manufacturer’s instructions before putting weight on the stool.
Step 5: Add Rustic Character
This is where the footstool begins to look less like a school shop project and more like something from a charming farmhouse corner. You can distress the wood lightly by softening the edges, adding subtle dents with a rounded tool, or brushing the surface along the grain. Do not go overboard. Rustic means aged and warm, not “attacked by raccoons.”
If using new pine, consider applying a wood conditioner before staining. Pine can absorb stain unevenly, creating blotchy areas. A pre-stain conditioner helps the color go on more evenly. For a weathered look, use a gray or walnut stain and wipe it back quickly. For a cottage look, dry-brush white paint over the stained wood and sand lightly after it dries.
Step 6: Wrap With Jute Twine
There are several ways to add jute twine to a rustic wood footstool. The easiest method is to wrap the twine around the apron rails just below the top. Start at the back or underside where the end will be less visible. Secure the first end with a staple, a small dab of hot glue, or both. Then wrap the twine tightly around the rail, keeping each pass snug against the previous one.
For a cleaner finish, add a small dot of glue every few inches on the underside or back side of the rail. Avoid overusing glue on visible areas because dried glue can leave shiny spots. When you reach the end, trim the twine and tuck it neatly under the final wrap. Secure it with glue or a staple.
You can also wrap the lower portion of each leg with jute for a more decorative look. Another option is to create a woven jute panel across the underside frame, though that requires more patience. If your patience has already left the workshop and made coffee, stick with rail wrapping.
Step 7: Seal the Wood and Protect the Twine
After staining or painting, apply a protective finish. Clear polyurethane offers strong protection for a footstool that will be used often. Danish oil or tung oil creates a softer, hand-rubbed look that suits rustic wood beautifully. If the stool will live indoors, a matte or satin finish usually looks more natural than high gloss.
Be careful when applying finish near jute twine. Some finishes can darken natural fibers or make them stiff. If you want to preserve the raw texture of the jute, finish the wood before wrapping the twine. If you want the jute slightly protected, test the finish on a scrap piece first.
Design Variations for a Custom Look
Farmhouse Whitewashed Footstool
Stain the stool light brown, then dry-brush white paint over the surface. Sand the edges gently so the brown undertone peeks through. Use natural jute twine for a classic farmhouse finish.
Coastal Rustic Footstool
Use a gray wash or driftwood stain, then wrap the rails with thicker jute rope. This version works well in beach-style rooms, sunrooms, and casual living spaces.
Dark Cabin-Style Footstool
Choose walnut or espresso stain, then use chunky jute around the legs. Add black screw heads or dark metal corner brackets for a cabin-inspired accent.
Boho Woven Footstool
Wrap the apron rails in jute and add a simple woven pattern across the top using upholstery tacks along the edges. This version is more decorative than heavy-duty, but it looks great beside a reading chair.
Safety Tips for Building a DIY Footstool
Wear safety glasses when cutting, drilling, or sanding. Wood chips have an impressive talent for flying directly toward human eyeballs. Use a dust mask or respirator when sanding, especially if working with reclaimed wood or old finishes. Work in a well-ventilated area when applying stain, paint, glue, or polyurethane.
Do not use this rustic footstool as a ladder unless you specifically build it as a step stool with proper structural support. A footstool is designed for resting feet, not for reaching the top shelf while balancing a box of cereal and questionable confidence.
Before using the stool, test it on a flat floor. Press down gently, then gradually add more weight. If it wobbles, check the leg lengths, tighten screws, or sand the bottom of the longer leg. Add felt pads to protect floors and reduce sliding.
Common Mistakes to Avoid
Skipping Pilot Holes
Pilot holes help screws drive cleanly and reduce splitting. This is especially important with narrow apron rails and softwood legs.
Using Too Much Glue on Jute
Jute looks best when it keeps its natural texture. Too much glue can make it stiff, shiny, and messy. Use small dots only where needed.
Not Sanding Enough
Rustic does not mean rough enough to exfoliate ankles. Sand the wood until it feels comfortable to touch, especially on the top and edges.
Making the Stool Too Tall
A comfortable footstool should sit lower than most chair seats. If it is too tall, it can strain your legs instead of helping you relax.
Forgetting Floor Protection
Felt pads are inexpensive and useful. They protect hardwood, tile, laminate, and vinyl flooring from scratches.
Care and Maintenance
Dust the stool regularly with a soft cloth. Avoid soaking the jute twine with water because natural fiber can absorb moisture and loosen over time. If the twine gets dusty, use a vacuum brush attachment or a dry toothbrush to clean the grooves gently.
If the wood finish starts to look dull, refresh it with a light cleaning and a compatible topcoat. For oil-finished wood, a new thin coat of oil can bring back warmth. For polyurethane, lightly scuff the surface with fine sandpaper before adding another coat.
Keep the stool away from damp areas unless you use an exterior-grade finish and moisture-resistant materials. Jute and unfinished wood are happiest indoors, where they can look charming without battling rain, mildew, and the general betrayal of weather.
Where to Use Your Rustic Wood Footstool
This DIY wood footstool works well in many rooms. Place it in front of a reading chair with a folded throw over one side. Use it beside a sofa as a low accent piece. Set it near an entryway as a place to rest a small basket, not as a heavy-duty shoe bench. In a bedroom, it can sit at the foot of a chair or hold a stack of books.
You can also use the stool as a plant stand, but protect the top with a saucer or tray. Water rings on handmade furniture are especially painful because you know exactly how many hours you spent sanding that top.
Experience Notes: What This Project Teaches You
Building a rustic wood footstool with jute twine is one of those projects that looks simple from the outside but teaches several useful DIY skills along the way. The first lesson is patience. Measuring four legs sounds easy until you realize one is slightly longer than the others and the stool has developed a tiny rocking-chair personality. Taking time to cut accurately, dry-fit parts, and check for square makes the finished piece feel far more professional.
The second lesson is that surface preparation matters more than beginners expect. A quick sanding job may look fine before stain, but once color touches the wood, every scratch and uneven patch becomes visible. Working through the grits slowly gives the stool a smoother feel and helps the finish look intentional. It is not the most exciting part of the project, but sanding is where homemade furniture quietly levels up.
Another useful experience is learning how natural materials behave. Jute twine is charming, but it has opinions. It can fray, twist, loosen, or show uneven gaps if wrapped too quickly. The best approach is to work in short sections, keeping steady tension without pulling so hard that the twine distorts. A small amount of glue on the hidden side keeps the wrap secure while preserving the natural look on the visible side.
This project also teaches restraint in rustic design. It is tempting to distress every corner, darken every edge, and wrap twine around everything that stands still. But the best rustic pieces usually balance roughness with simplicity. A few softened edges, visible grain, and clean jute detail often look better than heavy artificial aging. The stool should look collected and handmade, not like it was dragged behind a tractor for authenticity.
One of the most satisfying parts of the process is seeing how quickly the piece changes personality. Bare wood looks plain. Sanded wood looks promising. Stained wood looks warm. Add jute, and suddenly it has character. That transformation is why small furniture projects are so rewarding. You do not need a professional workshop or expensive lumber to make something useful and attractive.
A final experience worth mentioning is confidence. Once you build a footstool, other projects start to feel less intimidating. A small bench, side table, crate shelf, or plant stand uses many of the same basic skills: measure, cut, sand, assemble, finish, and decorate. This rustic wood footstool is not just a finished object. It is practice disguised as home decor, which is the best kind of practice because you can put your feet on it afterward.
Conclusion
Creating a rustic wood footstool with jute twine is a practical, stylish, and satisfying DIY project for anyone who loves natural textures and handmade decor. With a few boards, basic tools, careful sanding, and a patient twine-wrapping session, you can make a cozy accent piece that feels custom without costing a small furniture-store fortune.
The key is to build for stability first and style second. A beautiful footstool that wobbles is just a decorative hazard with ambition. Use strong joints, pre-drill your screw holes, sand thoroughly, and choose a finish that protects the wood while keeping the rustic charm intact. Then let the jute twine do what it does best: add warmth, texture, and a little handcrafted magic.
Note: This article was written from synthesized, real-world DIY woodworking, furniture finishing, jute craft, and workshop safety practices. It is intended for informational home improvement content and should be adapted to your tools, materials, skill level, and safety needs.