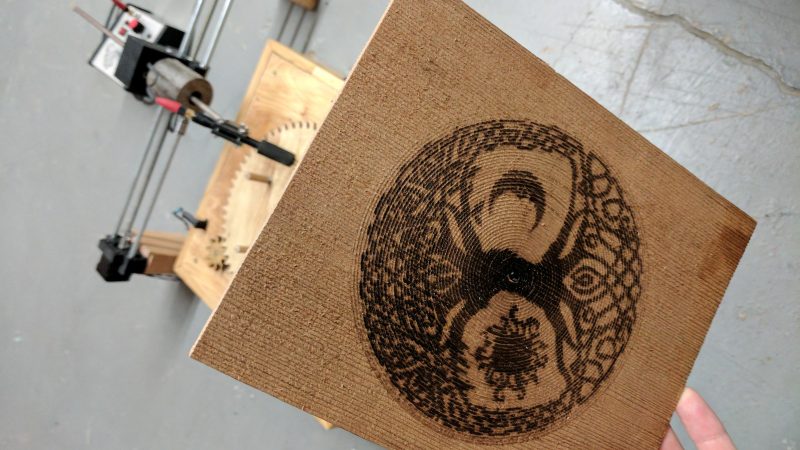
There are two kinds of people in a workshop: the ones who smell hot wood and immediately think “beautiful handmade art,” and the ones who sprint toward the fire extinguisher. A CNC pyrography machine sits delightfully between those two reactions. It uses computer-controlled motion to guide a heated tip across wood, creating dark lines, gradients, patterns, portraits, and decorative textures without asking your hand to behave like a precision robot after three cups of coffee.
Traditional pyrography, also called wood burning, is a slow and expressive craft. CNC, or computer numerical control, is the world of stepper motors, lead screws, coordinates, and repeatable motion. Put them together and you get a machine that can “draw” with heat. Add a rotary axis, and suddenly the machine is not just moving across flat boards; it can burn spirals, bands, patterns, and images around round objects. That is where the “turning and burning” magic begins.
This guide explores how CNC pyrography works, why rotary motion makes it exciting, what materials and settings matter, and how to approach safety without turning your shop into a smoky little dragon cave.
What Is a CNC Pyrography Machine?
A CNC pyrography machine is a computer-controlled wood-burning tool. Instead of using a router bit, laser beam, or pen, the machine uses a heated pyrography tip to scorch the wood surface. The controller tells motors where to move, when to pause, and sometimes when to turn the heat on or off. The result is controlled burning: lines, shading, geometric patterns, photos, lettering, logos, and textured artwork.
At its simplest, the machine needs three things: a motion system, a heat source, and software instructions. The motion system may be a flat X-Y plotter, a modified desktop CNC, or a custom machine with a rotary table. The heat source is usually a pyrography pen, wire-nib burner, or custom nichrome-wire tip. The software converts artwork into motion commands, often in the form of G-code or a similar control language.
Unlike laser engraving, CNC wood burning usually relies on direct contact or very close contact between the hot tip and the wood. That makes pressure, feed rate, temperature, surface preparation, and wood species extremely important. The machine is precise, but the wood still has opinions. Wood always has opinions.
The “Turning” Part: Why a Rotary Axis Changes Everything
Most hobby CNC machines move along flat X, Y, and Z axes. That is perfect for signs, plaques, cutting boards, and panels. But a rotary axis introduces a different style of movement: the workpiece turns while the burner moves along its length. Instead of drawing across a rectangle, the machine can burn around a cylinder.
Imagine a wooden dowel mounted horizontally. A stepper motor rotates it a tiny amount. A lead screw moves the burner sideways. The hot tip touches the wood. As the wood rotates and the tool advances, the burn can form a spiral, wave, checkerboard, portrait wrap, or decorative border. It is like a lathe, a plotter, and a branding iron all met at a makerspace and decided to start a slightly smoky band.
This setup is especially useful for round objects such as tool handles, wooden cups, rolling pins, turned ornaments, decorative rods, drumsticks, cylindrical boxes, and custom furniture parts. A flat engraving can look great, but a burned pattern that wraps around a turned object feels integrated into the piece.
How the Machine Actually Works
1. The Controller
The controller is the brain. In many DIY builds, it may be an Arduino, Raspberry Pi, GRBL-based board, or CNC controller. Its job is to translate instructions into motor movement and tool control. For pyrography, the controller may also switch the burner on and off, adjust dwell time, or coordinate movement speed with burn intensity.
2. The Motors
Stepper motors are common in desktop CNC machines because they move in small, repeatable increments. One motor may rotate the workpiece, while another drives a carriage along a lead screw. This two-axis setup can still produce complex art because one axis controls rotation and the other controls travel.
3. The Burner
The burner may be a standard pyrography pen or a custom hot-wire tool. Wire-nib burners are popular because they heat quickly, cool quickly, and offer better temperature control than basic soldering-iron-style burners. For CNC use, the pen must be mounted securely but not so rigidly that small surface changes cause gouging, snagging, or uneven pressure.
4. The Workholding
Workholding is not glamorous, but neither is watching your beautiful walnut handle wobble like a shopping cart wheel. A rotary pyrography setup needs a centered, stable workpiece. Chucks, mandrels, tailstock supports, clamps, and custom jigs all help keep the burn consistent.
5. The Software
Artwork usually begins as a vector design, bitmap image, pattern, or generated toolpath. For simple spirals and geometric designs, the code can be surprisingly straightforward. For portraits or tonal images, the software needs to translate darkness into heat, speed, line spacing, or dwell time. Darker areas usually need more burn; lighter areas need less.
CNC Pyrography vs. Laser Engraving
CNC pyrography and laser engraving both mark wood with heat, but they feel very different in practice. A laser engraver uses focused light to burn or vaporize the surface. It can be very fast and detailed, especially on flat materials. CNC pyrography uses a hot physical tip, which gives the burn a more handmade, tactile look.
A laser can produce crisp detail, but it requires careful enclosure, eye protection, smoke extraction, and material screening. A pyrography machine is often simpler and less expensive, but it is slower and more sensitive to wood grain, tip shape, and contact pressure. The best choice depends on the project. For sharp logos on flat plywood, a laser may win. For warm, hand-burned texture on a turned maple handle, CNC pyrography has a charm that feels less factory and more campfire-with-a-college-degree.
Choosing the Right Wood for CNC Wood Burning
Not every wood behaves nicely under a hot tip. Light-colored, fine-grained woods usually produce the cleanest pyrography results. Basswood is a favorite because it is pale, soft, and consistent. Birch, maple, poplar, beech, and sycamore can also work well. Harder woods may require slower movement or higher heat. Open-grain woods like oak can create dramatic texture, but the burn may look less smooth.
The most important rule is simple: burn only clean, dry, unfinished wood. Avoid pressure-treated lumber, painted wood, stained wood, plywood with unknown glue, MDF, particleboard, plastics, and reclaimed boards with mystery chemistry. Mystery chemistry belongs in detective novels, not in your lungs.
Moisture matters too. Damp wood cools the tip, creates uneven marks, and may produce more smoke. Sand the surface smoothly before burning, remove dust, and test on scrap from the same board whenever possible. Two boards from the same species can burn differently because grain density, sap, moisture, and surface prep all change the result.
Burn Quality: Heat, Speed, Pressure, and Patience
Great CNC pyrography is a balancing act between heat, speed, and contact. If the tip is too cool or moves too fast, the line looks pale and scratchy. If the tip is too hot or moves too slowly, the burn becomes too dark, fuzzy, or cratered. If pressure is uneven, the artwork may look like it was made during an earthquake.
For line art, consistent speed and steady contact are the top priorities. For shading, the machine can vary dwell time, line spacing, or feed rate. Closely spaced lines create darker tones; wider spacing creates lighter tones. Some systems pulse the burner on and off. Others keep the temperature stable and let movement control the darkness.
Before committing to a final piece, run a calibration strip. Burn a series of lines at different speeds and temperatures, label them, and keep the strip near the machine. It is not just a test board; it is a cheat sheet made of smoke and wisdom.
Design Ideas for Turning and Burning
Decorative Spirals
A rotary CNC pyrography machine is excellent for spiral patterns. By rotating the workpiece while the burner moves steadily along its length, the machine creates a continuous helix. Change the rotation speed or carriage speed and the spiral becomes tighter or looser.
Wave Bands
Wave bands look beautiful on handles, ornaments, and cylindrical boxes. The burner can create repeating sine-wave-like patterns that wrap around the object. These designs feel simple, elegant, and slightly hypnotic.
Personalized Handles
Tool handles, kitchen utensils, and rolling pins are perfect candidates. Add names, dates, small icons, or decorative bands. A custom-burned rolling pin may not make the cookies taste better, but it does make the baker look like they have a secret artisanal empire.
Photo-Style Burns
Portraits and grayscale images are possible, especially on flat machines, but they require more tuning. The software must convert tonal values into burn intensity. For rotary work, photo wrapping is more advanced because the image must be mapped around a curved surface.
Safety: The Non-Negotiable Shop Companion
CNC pyrography involves heat, smoke, electricity, moving parts, and combustible material. That combination deserves respect. Use ventilation, keep a fan or fume extractor moving smoke away from your face, and wear appropriate respiratory protection when needed. Eye protection is smart, especially when working close to the burn area.
Keep flammable liquids, finishes, paper scraps, sawdust piles, and loose rags away from the machine. Do not leave the burner unattended. A CNC machine may be automatic, but automatic does not mean babysitter-free. The hot tip can scorch too deeply, catch on material, or stay in one place if the program stalls.
Cable management also matters. A hot pyrography tip can damage insulation quickly, so cords should be routed away from the burner and moving parts. Add an emergency stop, use a stable power supply, and test motion without heat before running a burn. The best burn is the one that ends with art, not a dramatic call to the fire department.
Common Problems and Practical Fixes
Uneven Burn Lines
Uneven lines usually come from inconsistent pressure, warped wood, loose workholding, or grain changes. Improve the mount, sand the surface, reduce wobble, and use a spring-loaded or floating tool holder if possible.
Burns Are Too Light
Increase heat slightly, slow the feed rate, clean the tip, or choose a softer wood. Avoid jumping straight to maximum heat. That is how delicate shading turns into barbecue calligraphy.
Burns Are Too Dark
Lower the temperature, increase speed, reduce dwell time, or use wider line spacing. If the wood is resinous, switch to a cleaner-burning species.
Pattern Does Not Line Up Around the Cylinder
Check the diameter setting, steps per rotation, workpiece centering, and whether the design width matches the circumference. Rotary projects reward careful math. The wood may be rustic; the setup should not be.
Experiences From the Shop: What Turning and Burning Teaches You
The first lesson of CNC pyrography is humility. You can spend hours preparing a design, tightening belts, checking steps per millimeter, and lovingly sanding a blank until it feels smoother than a motivational speaker’s handshake. Then the first test burn reveals that your “perfect” settings produce either a ghost line or a tiny trench of carbonized regret. This is normal. In fact, it is practically the initiation ceremony.
One of the most useful habits is treating every project as a conversation with the material. Basswood may respond politely, giving you clean lines and gentle shading. Maple may ask for more heat and patience. Oak may announce every grain line like it is reading from a legal document. When using a rotary CNC pyrography machine, the conversation gets even livelier because the workpiece shape affects contact. A cylinder that is slightly off-center can make the burner press harder on one side and barely touch on the other. The machine follows instructions perfectly; the wood does not always agree to cooperate.
Another real-world lesson is that simple patterns often look the best. It is tempting to load a complex image, wrap it around a handle, and expect gallery-level results on the first attempt. Sometimes that works. More often, a clean spiral, a repeating wave, or a set of evenly spaced decorative rings looks more professional. The rotary axis shines when the design respects the shape of the object. A burned band around a rolling pin or tool handle can look intentional, elegant, and expensive without requiring a supercomputer or a degree in wizardry.
Testing also becomes addictive. You start with one scrap board. Then you make a speed chart. Then a heat chart. Then a line-spacing chart. Before long, half your shop is covered in tiny burned samples that look like an ancient library of wooden barcodes. Keep them. They are valuable. A labeled test piece from the same wood species can save a final project from disaster.
The smell is part of the experience too, but it should never be treated casually. A faint toasted-wood scent can be pleasant; visible smoke drifting into your face is a warning. Good ventilation changes the whole process. With a fan pulling smoke away and a clean work area, CNC pyrography feels controlled and enjoyable. Without ventilation, it feels like arguing with a campfire indoors, and the campfire is winning.
The biggest reward is repeatability. Hand pyrography has soul, but CNC pyrography gives you consistency. Once a design works, you can burn it again on another blank, refine it, scale it, or personalize it. For makers selling products, that repeatability matters. For hobbyists, it means you can turn a successful experiment into a series instead of whispering, “Well, that was lucky,” and never touching the settings again.
In the end, turning and burning with a CNC pyrography machine is not about replacing the artist. It is about giving the artist a very patient assistant that does not blink, sneeze, or wander off mid-line. The best results still come from human judgment: choosing the wood, preparing the surface, designing for the object, testing the settings, and knowing when a burn looks finished. The machine provides precision. The maker provides taste. Together, they make wood art with a little smoke, a little math, and just enough danger to keep things interesting.
Conclusion
A CNC pyrography machine turns a traditional handcraft into a repeatable digital fabrication process. By combining controlled heat with stepper-driven motion, it can create detailed burns on flat boards, cylindrical objects, and custom wooden pieces. The rotary axis is what makes “turning and burning” especially exciting: it lets patterns wrap around the workpiece instead of sitting only on top of it.
Success depends on more than the machine. Choose clean, dry wood. Test heat and speed. Secure the workpiece. Use safe ventilation. Respect the hot tip. Start with simple patterns, learn from scrap, and let the machine earn your trust one burn line at a time. When everything comes together, CNC pyrography produces artwork that feels both engineered and handmadea rare combination that looks great on a shop bench, a gift table, or a finished product page.