Note: This original tutorial synthesizes established guidance on U.S. business-card dimensions, small-project construction, blade kerf, sanding, finishing, and wood-dust safety from 15 American
DIY Huntress
+3
OSHA
+3
https://www.rockler.com/
+3
Woodcraft
+7
FedEx Office
+7
OSHA
+7
Minwax
+6
Kreg Tool
+6
Instructables
+6
ticle>
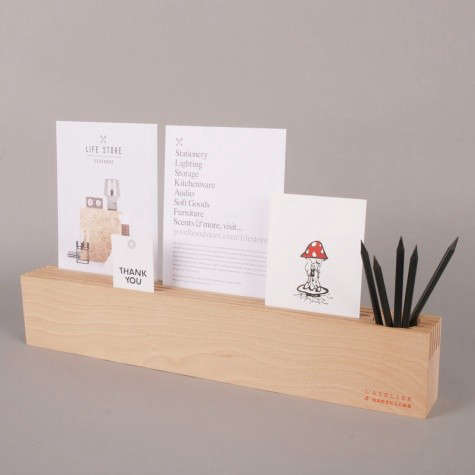
A wood block card-holder is proof that a useful woodworking project does not need sixteen drawers, hidden joinery, or a workshop large enough to have its own ZIP code. At its simplest, this desktop accessory is a carefully shaped block of wood with a clean slot for holding business cards, photographs, place cards, recipe cards, or small signs.
The project is compact, affordable, and friendly to beginners, but it still teaches several valuable woodworking skills. You will practice accurate measuring, controlled cutting, progressive sanding, edge shaping, test fitting, and finish application. The finished holder also makes an excellent handmade gift, craft-fair product, reception-desk accessory, or elegant way to use an attractive hardwood offcut.
This guide explains how to make a polished wood block card-holder while avoiding the most common mistakes, including unstable proportions, rough slots, excessive sanding, and the classic woodworking strategy known as “I measured it in my head.”
Why Make a Wood Block Card-Holder?
Plastic display stands are inexpensive, but they rarely add much personality to a desk. A wooden card holder brings warmth, texture, and craftsmanship to an otherwise ordinary object. Walnut can create a sophisticated executive look, maple feels clean and modern, cherry develops a richer tone with age, and oak provides visible grain with a sturdy appearance.
A homemade card holder can also be customized for its surroundings. A wide version can display a stack of business cards at a trade show. A narrow-kerf version can hold a photograph or wedding place card. A longer block with several slots can organize labels for a buffet, cards for a tabletop game, or product descriptions at a market booth.
Because the project requires very little lumber, it is an ideal use for quality scraps that are too small for furniture but too attractive to throw away. Every workshop has at least one such piecethe offcut that has survived three cleanouts because it is “definitely going to become something.” This is its moment.
Planning the Card-Holder
Start With the Cards
A standard U.S. business card measures 3.5 inches wide by 2 inches tall. The holder should therefore be slightly longer than 3.5 inches so the cards sit comfortably without looking squeezed between the ends.
However, the cards you intend to display should control the final dimensions. Thick cotton cards, laminated appointment cards, folded place cards, photographs, and recipe cards all behave differently. Stack the actual cards together and measure their total thickness before cutting the slot.
Suggested Finished Dimensions
| Part | Suggested Measurement | Purpose |
|---|---|---|
| Length | 4 to 4.5 inches | Provides clearance around standard business cards |
| Width | 1.75 to 2.25 inches | Creates a stable base without looking bulky |
| Height | 1 to 1.5 inches | Gives the slot enough depth and visual weight |
| Slot depth | Approximately 1/4 to 3/8 inch | Supports cards without hiding too much of them |
| Slot angle | About 10 to 15 degrees from vertical | Tilts the cards backward for easier viewing |
These measurements are practical starting points rather than woodworking law handed down on a stone tablet. A tall card may need a wider or heavier base. A single place card may need only a narrow saw kerf, while a stack of 20 business cards may require multiple passes to create a wider opening.
Choosing the Best Wood
Most stable, dry lumber can be used, but fine-grained hardwood usually produces the cleanest slot and most refined finish.
Maple
Maple has a pale, contemporary appearance and a relatively subtle grain. It works well in minimalist offices and allows engraved names or logos to remain highly visible. It is hard enough to resist everyday dents, although its density can make hand sanding slower.
Walnut
Walnut is a favorite for small desk accessories because its natural dark color looks luxurious without requiring a dark stain. A clear oil or wiping finish can emphasize its chocolate-brown tones and grain variation.
Cherry
Cherry is smooth, warm, and pleasant to shape. Freshly cut cherry may appear lighter than expected, but it typically develops a deeper reddish-brown character as it is exposed to light.
Oak
Oak offers bold grain and a traditional appearance. Its open pores can create a highly textured look, but the slot may require extra attention because coarse grain can leave small fibers along the cut.
Pine and Other Softwoods
Pine is inexpensive and easy to cut, making it suitable for practice pieces. It also dents more easily and may absorb stain unevenly. A painted or clear-coated pine holder can still look excellent, especially when the edges are carefully sanded and the knots are treated as design features rather than suspicious wooden blemishes.
Materials and Tools
Materials
- A dry wood blank longer than the finished holder
- 80-, 120-, 150-, 180-, and 220-grit sandpaper as needed
- Clear oil, wiping varnish, polyurethane, wax, stain, or paint
- Painter’s tape for marking and protecting surfaces
- Self-adhesive felt or cork for the bottom, if desired
- A sample stack of the cards the holder will display
Tools
- Measuring tape or steel ruler
- Combination square
- Pencil or marking knife
- Table saw, miter saw, circular saw, band saw, or handsaw
- Clamps
- Sanding block or random-orbit sander
- File, chisel, or folded sandpaper for cleaning the slot
- Safety glasses, hearing protection, and suitable dust protection
A table saw is convenient for producing a straight, consistent slot, but it is not the only option. A handsaw can create a narrow slot for one card, while a router or repeated saw passes can produce a wider channel for a stack. The correct method is the one you can perform accurately and safely with your available tools.
How to Make a Wood Block Card-Holder
1. Prepare a Longer Wood Blank
Do not begin with a tiny block if you plan to cut the slot on a table saw. Small workpieces can be difficult to control near a moving blade. Instead, start with a longer board that provides ample support and keeps your hands farther from the cutting area. Cut the slot first, then trim the slotted section to its finished length.
Inspect the board for cracks, loose knots, embedded metal, severe warping, or other defects. Joint or sand the bottom face flat so the completed holder will sit steadily on a desk.
2. Mark the Slot Position
Mark a line along the top of the blank. The slot can be centered, but moving it slightly toward the back creates more visual space in front of the cards. Leave enough material behind the slot to prevent the rear edge from becoming weak.
For an angled display, tilt the blade or support the workpiece with a properly secured jig. A backward lean of approximately 10 to 15 degrees is usually enough to improve visibility without making the cards look as though they are attempting to escape.
3. Test the Saw Kerf
Kerf is the width of material removed by a saw blade. Different blades create different kerf widths, so never assume that one pass will produce the slot you need.
Make a test cut in scrap wood from the same species. Insert one card or the intended stack. The fit should be secure enough to support the cards but loose enough that they can be removed without bending their corners. If the slot is too narrow, shift the fence slightly and make another controlled pass. Work gradually; replacing removed wood remains one of woodworking’s less successful techniques.
4. Cut the Slot
Set the cutting depth to approximately 1/4 to 3/8 inch, depending on the card height and base proportions. Use guards, push devices, featherboards, clamps, or a purpose-built jig as appropriate for the selected tool. Never freehand a small block over a table-saw blade.
Feed the longer blank smoothly through the cut without forcing it. If the cards require a wider slot, make additional passes in small increments. Stop and test the fit frequently rather than relying on optimistic guesswork.
5. Cut the Holder to Length
After completing the slot, mark the final length with a square. Cut the piece to approximately 4 to 4.5 inches for a standard business-card display. Check that both ends are square unless the design intentionally uses angled or sculpted ends.
For repeated production, use a stop block positioned so the offcut cannot become trapped between the blade and fence. Consistency matters when making matching holders for a wedding, office, or craft-market display.
6. Shape the Edges
Sharp corners can make a small block appear unfinished and may scratch a desktop. Ease the edges with sandpaper, a small chamfer, or a round-over bit. A restrained 1/16- or 1/8-inch round-over is often enough.
You can also create a faceted design by sanding shallow bevels along the top edges. Keep the bottom mostly flat and wide so the holder remains stable when loaded with cards.
7. Sand Progressively
Begin with the least aggressive grit that will remove milling marks and scratches. A rough blank may require 80 or 100 grit, while a clean hardwood offcut may begin at 120. Continue through progressively finer grits, such as 120, 150, 180, and 220.
Sand each face evenly and follow the grain during the final hand-sanding stage. Do not jump directly from coarse paper to very fine paper; the fine grit may polish the surface while leaving deeper scratches visible beneath it. Those scratches will wait patiently until the finish is applied, at which point they will introduce themselves to everyone.
Fold sandpaper around a thin putty knife, scrap of veneer, or dull card to smooth the inside walls of the slot. Avoid widening the opening unevenly. Vacuum the dust and inspect the surface under angled light before finishing.
8. Apply the Finish
A natural oil finish is simple and emphasizes the wood grain. Wipe on a thin coat, allow it to penetrate according to the manufacturer’s directions, and remove the excess. Wiping varnish or polyurethane provides more protection against fingerprints, moisture, and repeated handling.
Water-based finishes usually preserve a lighter wood color, while many oil-based finishes add warmth. Stain can change the color, but it should be tested on scrap first because end grain and softwoods may absorb pigment more heavily than surrounding surfaces.
Apply thin coats rather than one heroic puddle. Allow each coat to dry fully. When the product instructions permit, lightly sand raised grain or small imperfections between coats with fine abrasive, then remove every trace of dust before applying the next coat.
Keep oily finishing rags away from flames and follow the disposal directions printed on the product. Some oil-soaked materials can generate heat as they cure, so they should never be casually wadded into a trash can.
9. Protect the Desk Surface
Once the finish has fully cured, add a thin felt or cork pad to the bottom. Cut it slightly smaller than the base so it remains hidden from normal viewing angles. The pad protects furniture, reduces sliding, and compensates for tiny surface irregularities.
10. Load and Evaluate the Holder
Insert the actual cards and view the holder from seated and standing positions. Confirm that the cards are readable, easy to remove, and stable when someone takes the front card. If the holder tips forward, reduce the card angle, deepen the base, or use fewer cards.
Creative Design Variations
Minimalist Business Card Stand
Use straight sides, a centered slot, and a matte clear finish. Maple, walnut, or a contrasting laminated block works especially well. Add a small engraved logo to the front while leaving enough negative space for the grain to remain visible.
Wedding Place-Card Holders
Cut multiple holders from one long blank to maintain matching dimensions. A narrow slot is sufficient for folded paper cards. Number the bottoms lightly in pencil so pieces can be organized during finishing and setup.
Rustic Reclaimed-Wood Holder
Reclaimed lumber can provide nail holes, weathering, and character, but it must be clean, dry, and free of embedded hardware or questionable residue. Avoid heavily stained, odorous, or chemically treated material. Rustic should mean charmingly imperfect, not mysteriously contaminated.
Photo or Recipe-Card Stand
Increase the base width for taller cards and photographs. A longer slot distributes support across the lower edge, while a moderate backward angle improves viewing. For kitchen use, select a finish that can tolerate occasional splashes and allow it to cure completely before use.
Multi-Slot Organizer
A longer block can include two or three parallel slots for tabletop-game cards, reminders, labels, or small product signs. Space the slots far enough apart that the displayed items do not hide one another. Make a full-size cardboard mockup before cutting expensive wood.
Common Mistakes to Avoid
Making the Base Too Narrow
A narrow base may look sleek when empty but become unstable when loaded with tall cards. Test the proportions with a temporary foam or scrap-wood model before committing to the finished material.
Cutting the Slot Too Wide
An oversized opening allows cards to slump forward and look untidy. Approach the desired width gradually and test with the real card stack after every adjustment.
Sanding Without Removing Earlier Scratches
Each sanding grit should remove the scratch pattern left by the previous grit. Moving ahead too quickly produces a surface that feels smooth but reveals swirls and lines after finishing.
Applying Too Much Finish
Heavy coats can pool inside the slot, create runs along the ends, and take much longer to cure. Thin, controlled applications produce a cleaner surface and reduce the chance of sticky cards.
Using the Holder Before the Finish Cures
A surface may feel dry before it has fully hardened. Loading cards too early can leave impressions, transfer odor, or cause paper edges to stick. Follow the finish manufacturer’s curing guidance rather than conducting the traditional fingertip test every eleven minutes.
Woodworking Safety
Wear safety glasses during cutting, routing, drilling, and sanding. Use hearing protection around loud equipment and suitable respiratory protection when generating wood dust. Connect dust collection or a shop vacuum where possible, and clean accumulated dust instead of allowing it to gather around motors, outlets, or ignition sources.
Secure the workpiece with clamps or an appropriate jig. Keep hands away from cutting paths, maintain guards, and use push devices according to the machine manufacturer’s instructions. Unplug tools before changing blades or making adjustments.
Some wood species and finishing products can irritate the skin, eyes, or respiratory system. Review product labels and safety information, provide ventilation, and stop working if you experience an adverse reaction.
Workshop Experience: Lessons From a First Wood Block Card-Holder
A typical first attempt at this project begins with confidence. The builder finds a beautiful walnut offcut, holds a business card against it, and concludes that measuring is largely ceremonial. The block is cut, the slot is added, and only then does everyone discover that the card extends beyond both ends like a billboard mounted on a garden brick.
The second attempt usually involves more planning. The actual card stack is measured, a test kerf is cut in scrap, and the builder learns that a saw blade’s advertised width does not automatically equal the desired opening. One pass may grip a single card perfectly but refuse to accept a stack. Two passes may work, provided the fence is adjusted by a very small amount. A large adjustment turns the elegant slot into a wooden rain gutter.
Another common lesson concerns the cutting sequence. Working with a longer blank feels less convenient at first because the finished object is difficult to visualize. In practice, the extra length makes the piece much easier to guide, clamp, and control. Once the slot is complete, trimming the holder to size feels straightforward. It is a small change in procedure that produces a major improvement in safety and accuracy.
Sanding often becomes the most revealing stage. Under ordinary shop lighting, the block may appear flawless after a quick pass with fine paper. Moving it near a window or shining a light across the grain reveals saw marks, dents, and one mysterious scratch that appears to have been installed professionally. Returning to a slightly coarser grit and progressing carefully produces a far better surface than polishing over the defects.
The inside of the slot deserves equal attention. A holder can look beautiful from the outside while rough fibers inside catch and damage card edges. Wrapping fine sandpaper around a thin, rigid support makes it easier to smooth the slot without rounding its opening or widening one side more than the other.
Finishing provides the project’s most satisfying transformation. Plain walnut becomes deeper and more dramatic after a clear oil or wiping finish, while maple gains subtle contrast without losing its clean appearance. The temptation is to apply extra finish because the first wipe looks so good. Resisting that urge and removing the excess usually prevents sticky patches and glossy puddles.
The first completed holder also teaches an important design lesson: appearance and performance are linked. A dramatic card angle may photograph beautifully but make the holder tip when the front card is removed. A tiny base may look delicate but slide around during use. Testing the loaded holder on a real desk reveals more than staring at the empty block on a workbench.
By the third or fourth version, the project becomes an excellent exercise in repeatability. Stop blocks improve consistency, test pieces reduce waste, and a simple sanding sequence produces predictable results. Makers often begin experimenting with contrasting woods, engraved initials, painted ends, cork bottoms, or multiple slots.
That progression is part of the appeal. The wood block card-holder starts as an uncomplicated beginner project, yet it rewards the same habits used in larger furniture: plan around the object’s purpose, test uncertain cuts, remove defects before finishing, and treat small dimensions with serious attention. A project that fits in one hand can still teach a workshop full of lessons.
Conclusion
A wood block card-holder is simple enough for a new woodworker but refined enough to earn a permanent place on a professional desk. Its success depends on thoughtful proportions, a correctly sized slot, stable dry wood, patient sanding, and a finish suited to regular handling.
Begin with a longer blank, test the slot on scrap, and let the actual cards determine the opening width. These small precautions reduce waste and help transform an ordinary offcut into a useful display piece with genuine handmade character. Once the basic design is mastered, it can be adapted for photographs, place cards, menus, game cards, signs, and personalized gifts.
Note: Suggested dimensions are starting points. Always test the slot with the exact cards you plan to display, follow the instructions supplied with your tools and finishing products, and use appropriate protective equipment.
“`