There are hobbies, and then there are hobbies that make your friends pause mid-coffee and ask, “Wait, you built that?” Printing your own large format camera belongs proudly in the second category. It combines the patience of film photography, the satisfying click-and-whirr of 3D printing, and the old-school magic of composing an upside-down image on ground glass. It is part engineering project, part art tool, and part personality test for people who believe “just buy one” is a deeply uninspiring sentence.
A large format camera is wonderfully simple in concept: a lens in front, sheet film in the back, and light-tight bellows or a rigid body between them. The most common entry point is the 4×5 camera, which uses individual sheets of film measuring four by five inches. That negative is enormous compared with 35mm film, which is why large format photography is famous for rich detail, slow working methods, and images that feel less like snapshots and more like deliberate decisions.
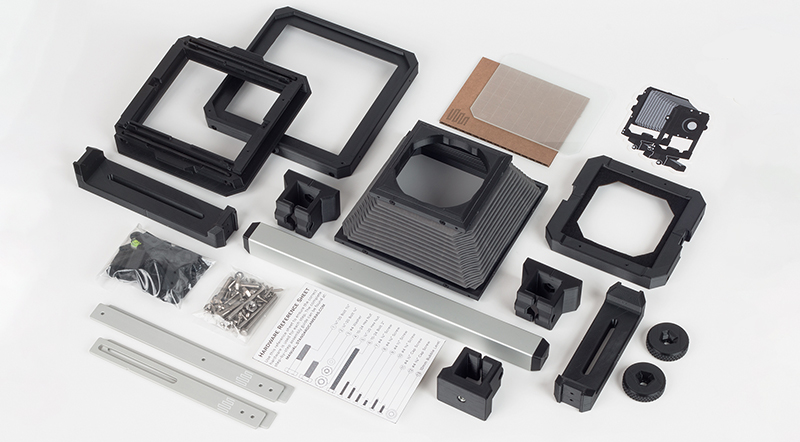
Today, 3D printing has made this once-expensive corner of photography more approachable. Makers can print camera bodies, lens boards, rails, frames, knobs, film holders, focusing parts, and replacement components at home. You still need a lens, film, a film holder or back, and a way to focus, but the dream of building a usable 4×5 camera is no longer reserved for machinists, cabinetmakers, or people with a basement full of mysterious clamps.
Why Print a Large Format Camera?
The main reason is control. When you print your own large format camera, you can decide what kind of camera you want to carry. Maybe you want a lightweight field camera for hikes. Maybe you want a fixed-focus travel camera with a wide-angle lens. Maybe you want a modular rail design that accepts different lens boards. Or maybe you simply want to understand photography from the inside out, which is easier when you have literally assembled the inside and the outside.
Cost is another powerful motivator. Traditional large format cameras can be beautiful, durable, and expensive. Vintage models can be affordable, but they often arrive with surprise problems: pinhole bellows, missing lens boards, stiff movements, odd tripod threads, or the faint aroma of a century-old attic. A printed camera can lower the barrier to entry, especially if you already own or have access to a 3D printer.
There is also the repair factor. Printed parts are replaceable. Break a knob? Print another. Need a different lens board? Modify a file and send it to the printer. Want to test a new handle, bracket, or focusing scale? Prototype it. That flexibility is one reason printed camera projects such as modular 4×5 systems, WillTravel-style bodies, and scalable field camera designs have gained attention among film photographers and makers.
Understanding the Basic Parts
Lens and Lens Board
The lens is the eye of the camera, and the lens board is the removable panel that holds it. In large format photography, lenses are usually mounted in mechanical shutters, often with aperture and shutter-speed controls built into the lens assembly. A printed camera may use a common lens board standard, such as Linhof-style boards, or a custom board designed for a specific lens.
Before printing anything, check the lens coverage. A lens must project an image circle large enough to cover the film size. For 4×5 photography, many beginners start with a 150mm lens, which is roughly a “normal” focal length for the format. Wide lenses, such as 90mm or 75mm, may need special bellows or camera designs. Longer lenses, such as 210mm or 300mm, require more extension between lens and film for focusing.
Bellows or Rigid Body
Traditional view cameras use bellows to connect the front standard, where the lens sits, and the rear standard, where the ground glass and film holder sit. Bellows allow focusing and camera movements such as tilt, swing, rise, fall, and shift. Some 3D-printed cameras use printed frames and commercial bellows. Others use rigid bodies designed for a single focal length and focus with a helicoid or threaded lens mount.
Bellows must be light-tight. That sounds obvious, but light is sneaky. It will find tiny seams, layer lines, screw holes, corners, and any place you confidently forgot to check. A camera does not need to be pretty on the inside, but it must be dark.
Ground Glass
The ground glass is where you compose and focus. Light enters the lens and forms an image on the glass at the same plane where the film will later sit. The image appears upside down and reversed left-to-right, which feels strange at first and then strangely elegant. Many photographers use a dark cloth or focusing hood to see the image clearly in daylight.
Accuracy matters here. If the ground glass is not positioned at the exact film plane, your photographs may look sharp while focusing and soft after exposure. That is the kind of betrayal only a camera can deliver with a straight face.
Film Holder or Back
Most 4×5 cameras use double-sided sheet film holders. Each holder carries two sheets of film protected by dark slides. You load them in complete darkness, slide one into the camera, pull the dark slide, make the exposure, replace the slide, and then flip or mark it so you know the sheet has been exposed. It is slow, but that slowness is part of the charm. Every frame costs money, so your brain suddenly becomes a very serious art director.
Choosing a Design to Print
There is no single “best” 3D-printed large format camera. The right design depends on your lens, printer size, skill level, and shooting style. Broadly, printed camera designs fall into three categories.
1. Modular 4×5 View Cameras
These are closest to traditional large format cameras. They may include a front standard, rear standard, bellows, rails, focusing mechanisms, and support for camera movements. A modular printed 4×5 camera gives you flexibility: you can use different lenses, experiment with tilt and rise, and learn how large format photography really works.
This style is best for people who want a complete learning experience. It requires careful assembly and more tuning, but it rewards you with creative control.
2. Fixed-Lens Travel Cameras
A fixed-body printed camera is simpler. It is usually designed around one lens and one focal length. Instead of bellows, it may use a rigid printed body, a focusing helicoid, or zone-focus scale. These cameras are excellent for hikers, street photographers, and anyone who wants a 4×5 negative without carrying a wooden suitcase with accordion lungs.
The tradeoff is limited flexibility. If the camera is designed for a 90mm lens, you cannot casually switch to a 210mm lens unless the design allows it. But for travel and landscape work, simplicity can be a superpower.
3. Experimental and Scalable Cameras
Some open-source makers design parametric cameras that can scale from 4×5 to 5×7 or even 8×10 with changes to the model. These projects are exciting because they treat the camera as a platform rather than a fixed product. They are also less beginner-friendly. If the phrase “edit the OpenSCAD variables” makes you smile, you may have found your weekend. If it makes you want to lie down, start with a proven 4×5 design.
Best Materials for a Printed Camera
The filament you choose affects strength, heat resistance, light-tightness, and long-term reliability. Black filament is usually preferred because it reduces internal reflections and helps block light. However, not all black plastics are equally opaque, and thin walls can leak light even if they look dark.
PLA
PLA is easy to print and widely available. It is a good choice for prototypes, lens boards, test parts, and indoor use. The drawback is heat. A PLA camera left in a hot car or under strong sun can soften, warp, or lose alignment. That is bad news when your entire photographic system depends on tiny distances being exactly where they should be.
PETG
PETG is a strong candidate for functional camera parts. It handles heat better than PLA, has good layer adhesion, and works well for larger prints. Many makers prefer black PETG for camera bodies, especially when durability matters. It can be stringier to print than PLA, but a little cleanup is a small price to pay for a camera that does not wilt at the first sign of summer.
ABS, ASA, and Carbon-Filled Materials
ABS and ASA can offer better heat resistance, but they are more demanding to print and usually need good ventilation and an enclosure. Carbon-filled PETG or nylon can be stiff and attractive, but abrasive filaments may require a hardened nozzle. For a first build, plain black PETG is often the sensible middle ground.
Printing Tips That Save Sanity
Large format cameras are not decorative dragons. They need to fit together accurately. Print slowly enough to preserve dimensional precision, use enough walls for opacity and strength, and avoid thin, single-wall sections anywhere light can pass through. For structural parts, use generous perimeters rather than relying only on high infill. A part with strong outer walls is often more useful than a honeycomb brick that still leaks through a seam.
After printing, dry-fit everything before gluing, sanding, or painting. Check that film holders seat cleanly. Make sure the lens board locks squarely. Test whether rails slide smoothly without wobble. Confirm that the tripod mount area is reinforced. The camera does not need surgical perfection, but it must hold alignment well enough that the lens, film plane, and focusing system agree with one another.
Matte black paint, flocking material, felt, foam seals, and black tape are common tools for defeating light leaks. Some builders paint both the inside and outside of printed bodies. Others add paper or felt baffles. A dark room, flashlight, and patience can reveal leaks before film does. Film is a very expensive diagnostic tool; use it last.
Assembly: From Plastic Parts to Picture Machine
Assembly varies by design, but the workflow is usually similar. First, print all body parts and clean them. Remove stringing, flatten mating surfaces, and chase screw holes if needed. Second, install hardware such as screws, threaded inserts, rods, magnets, springs, knobs, and tripod hardware. Third, mount the lens board and check that the lens opens, closes, and clears the body.
Next comes the focusing system. If the camera uses bellows and rails, confirm that the standards move without binding. If it uses a helicoid, calibrate the focusing scale for your specific lens. Lens focal lengths are not always exact in the practical sense, and infinity focus must be tested carefully. Aim at a distant subject, open the lens aperture, place the image on the ground glass, and adjust until infinity is sharp.
Finally, test the back. A standard 4×5 film holder should slide in smoothly and sit flat against the camera. Light seals should compress without forcing the holder out of position. If the holder is loose, the film plane may shift. If it is too tight, you may need three hands, a prayer, and a vocabulary your neighbors should not hear.
How to Use Your Printed Large Format Camera
Using a printed 4×5 camera follows the same basic process as using a commercial large format camera. Mount the camera on a sturdy tripod. Open the lens shutter and aperture for focusing. Compose on the ground glass under a dark cloth. Focus carefully. Apply movements if your camera supports them. Stop down the lens. Close and cock the shutter. Insert the film holder. Pull the dark slide. Make the exposure. Replace the dark slide. Breathe. Congratulations, you have taken one photograph with the emotional weight of twelve digital bursts.
Camera movements are one of the joys of large format work. Rise helps keep vertical lines straight when photographing buildings. Tilt can place the plane of focus across a landscape, making foreground and background sharp without using a microscopic aperture. Swing can help align focus along fences, walls, or angled subjects. Movements are not magic, and too much can cause vignetting or strange blur, but used gently they are powerful.
For beginners, the best first project is simple: choose a calm subject, use a normal lens, avoid extreme movements, and make a careful exposure. Keep notes. Write down lens, aperture, shutter speed, film, development plan, and any mistakes. Large format photography rewards the person who remembers what happened.
Common Mistakes to Avoid
Ignoring Light Leaks
Light leaks are the classic enemy. They may appear as fogging, streaks, soft patches, or mysterious glowing corners. Test the camera with a flashlight in a dark room, then test again outdoors. Pay special attention to seams, bellows corners, lens board edges, and the film holder interface.
Printing Too Thin
Thin walls may save filament, but they can also flex, warp, or leak light. A large format camera needs stiffness. The distance between lens and film must stay predictable, especially during focusing. Print critical parts with enough perimeters and consider reinforcing tripod mounts and standards.
Forgetting Heat
A black camera absorbs sunlight. A printed black camera absorbs sunlight with enthusiasm. Do not leave PLA parts in hot cars, direct summer sun, or tight bags sitting on asphalt. If your camera will travel, PETG, ASA, or another more heat-tolerant material is worth considering.
Using the Wrong Lens
A lens that does not cover 4×5 film will produce dark corners or hard vignetting. A lens that is too wide may not fit your camera design. A lens that is too long may require more extension than your camera can provide. Match the camera design, lens coverage, focusing system, and intended subject before printing a kilogram of regret.
Who Should Print a Large Format Camera?
This project is ideal for photographers who enjoy making things, 3D-printing enthusiasts who want a functional object, teachers looking for a hands-on optics project, and artists who prefer tools with a story. It is less ideal for people who want instant results or perfect factory polish. A printed camera may need sanding, shimming, painting, calibrating, reprinting, and occasional dramatic sighing.
But that is the point. The camera becomes personal. Every part has a reason. Every improvement teaches you something about light, mechanics, patience, and design. You are not just buying a camera; you are building a relationship with a box that must be absolutely dark inside.
Experience Section: What It Feels Like to Print Your Own Large Format Camera
The first experience is confidence, followed immediately by humility. You download a design, inspect the files, and think, “This looks doable.” Then the first large body section takes many hours to print, and you begin negotiating with the printer like it is a tiny plastic volcano. You learn that bed adhesion matters, filament dryness matters, and the phrase “just one more test print” is how weekends disappear.
Once the parts are printed, the project becomes more physical. You hold a front standard in one hand and a rear frame in the other, and suddenly large format photography stops being abstract. You can see why alignment matters. You can see why bellows must be square, why film holders need a precise seat, and why old camera makers cared so much about knobs. A knob is not just a knob. It is the difference between gentle adjustment and chasing focus like a squirrel in traffic.
The first light-leak test is both thrilling and mildly terrifying. You turn off the room lights, shine a flashlight into the camera, and discover that light behaves like a detective. It finds everything. A seam you thought was tight glows faintly. A screw hole leaks like a tiny lighthouse. A corner that looked perfect in daylight suddenly announces itself as the enemy of negative density. This is when matte black paint, foam, felt, and patience become your closest friends.
The first time an image appears on the ground glass is the moment the project becomes worth it. The world is upside down, dim, and strangely beautiful. A tree, a window, or a coffee mug becomes an event. You lean under the dark cloth, adjust focus, and realize that this is photography without hurry. There is no autofocus beep, no screen preview, no burst mode. Just light, glass, and your hands.
Loading film teaches another lesson: cleanliness is not optional. Dust loves sheet film the way cats love cardboard boxes. You learn to blow out holders, handle film by the edges, track exposed sheets, and develop a system for dark slides. White side out, black side out, tape, notes, rubber bandsevery photographer invents a ritual. The important thing is consistency. Confusion in the dark is not charming; it is expensive.
The first developed negative may not be perfect. It may have a small leak, a soft edge, a framing surprise, or an exposure that says, “Nice try, Ansel.” But it will be yours in a unusually complete way. You printed the camera, assembled it, sealed it, loaded the film, focused the image, and made the exposure. That physical chain of decisions gives the photograph a different emotional weight.
Over time, the camera improves. You reprint a stiffer part. You add a better handle. You flock the interior. You refine the focusing scale. You label the lens board. You replace a wobbly screw with a threaded insert. Each change makes the camera feel less like a prototype and more like an instrument. The best part is that the learning never feels separate from the photography. Every technical improvement shows up in the field as confidence.
Printing your own large format camera is not the fastest route to a photograph. It may not even be the cheapest if you count every failed print, tool, screw, and “while I’m ordering parts anyway” purchase. But it is one of the most rewarding ways to understand what a camera really is. At its heart, a camera is a controlled path for light. Build that path yourself, and every image feels a little more alive.
Conclusion
Printing your own large format camera is a beautiful collision of old and new technology. Large format photography brings the deliberate pace, huge negatives, and creative movements of classic film work. 3D printing brings accessibility, customization, repairability, and experimentation. Together, they create a project that is practical enough to use and strange enough to make you grin every time someone asks, “Is that really a camera?”
Start with a proven design, choose a suitable lens, print in a durable dark material, test for light leaks, and keep your first build simple. Your first camera does not need to be perfect. It needs to be light-tight, stable, focused at the film plane, and enjoyable enough that you want to take it outside. Once you make your first 4×5 negative with a camera you printed yourself, ordinary photography may feel a little too easyand that is not a bad problem to have.
Note: This HTML article is written for web publishing and educational use. Before building or shooting, always verify the specific camera design, lens coverage, film holder fit, and material settings for your own printer and equipment.