A basement entrance has a special talent for attracting muddy shoes, dripping coats, abandoned backpacks, sports equipment, and at least one glove whose partner vanished under mysterious circumstances. Left unmanaged, the area becomes less of an entryway and more of an archaeological site documenting everything your family has carried indoors since October.
A DIY basement mudroom transformation can turn that neglected landing into a hardworking transition zone between the outdoors and the rest of your home. With moisture-resistant materials, practical basement storage, durable flooring, good lighting, and a thoughtfully designed mudroom bench, even a small corner can become organized, attractive, and remarkably useful.
The secret is to approach the project in the correct order. Do not begin by buying decorative baskets because they are adorable. Begin with water, traffic flow, surfaces, and storage requirements. The adorable baskets may enter the story later.
Why Turn a Basement Entrance Into a Mudroom?
A mudroom does not require a large room or a grand front entrance. It simply needs to intercept outdoor clutter before that clutter migrates through the house. A basement stair landing, walkout entrance, laundry area, or unused section beside an exterior door can perform this job surprisingly well.
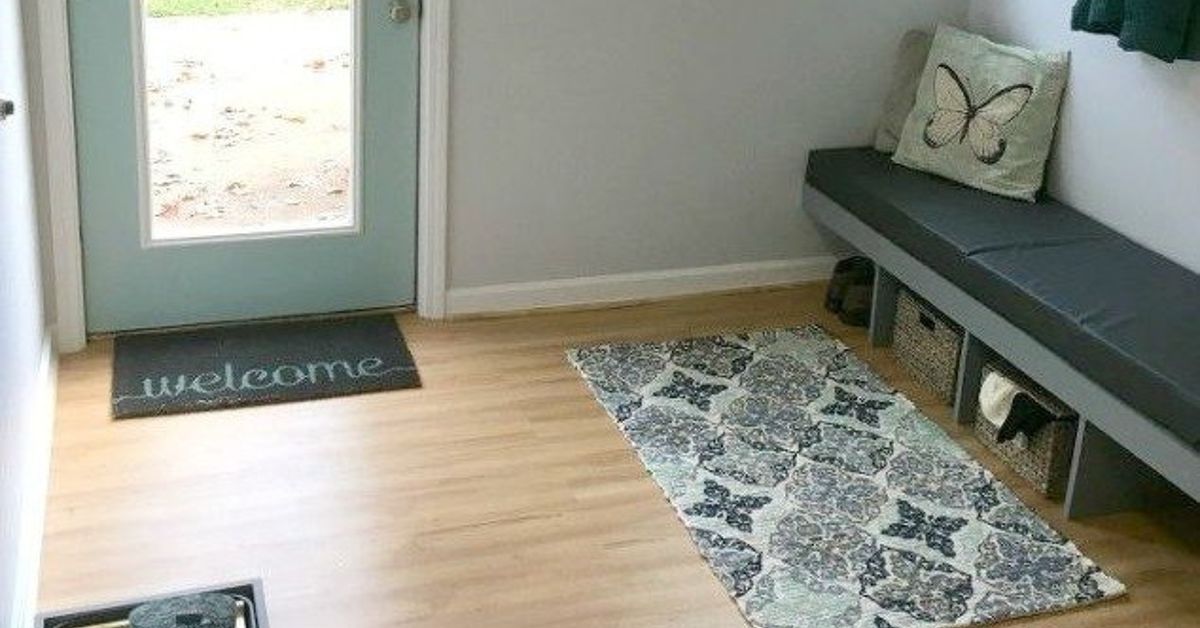
A functional basement mudroom gives shoes, coats, bags, umbrellas, pet supplies, and seasonal gear permanent homes. Open hooks allow damp outerwear to air out, cubbies keep footwear off the main floor, and a bench provides a comfortable place to remove boots. These basic elements are consistently recommended in successful mudroom layouts because they address what actually happens when people enter a housenot what happens in perfectly staged photographs where nobody appears to own sneakers.
Using the basement may also free up space near the kitchen or front door. For households entering through a walkout basement, garage stairway, or side entrance, locating storage near the real daily entry point is far more effective than installing beautiful cubbies nobody walks past.
Plan the Basement Mudroom Before Building It
Observe Your Family’s Actual Entry Routine
Before drawing plans, watch the area for several days. Notice where people naturally drop their belongings. Count the pairs of shoes that accumulate. Identify oversized items such as hockey bags, bicycle helmets, folding strollers, dog leashes, or gardening equipment.
Then list the storage each household member needs. A simple setup might include:
- Two or three hooks per person
- One shoe cubby or boot tray per person
- A basket for hats, gloves, and small accessories
- A bench for changing footwear
- Upper storage for seasonal or rarely used items
Assigning individual zones can reduce the daily treasure hunt for backpacks and shoes. Low hooks and bins work well for children because storage only remains organized when the intended user can reach it. Built-in or freestanding combinations of benches, shelves, hooks, cabinets, and labeled baskets are commonly used to make both large and compact mudrooms more functional.
Measure More Than Once
Measure the wall width, ceiling height, door swing, stair clearance, utility access, and available walking space. Mark the proposed bench and cabinets on the floor with painter’s tape. This inexpensive step reveals whether your elegant design will create a calm entryway or force everyone to shuffle sideways like crabs.
A comfortable DIY mudroom bench can be approximately 18 inches high and 16 to 18 inches deep. Adjust those dimensions for your users and available space. Keep the main path open, and make sure cabinets do not interfere with electrical panels, shutoff valves, floor drains, windows, appliances, or mechanical equipment.
Create a Realistic Budget
The cost of a basement mudroom makeover depends on its size, materials, existing moisture conditions, and how much work you complete yourself. A basic project using wall hooks, a freestanding bench, paint, and plastic boot trays may cost only a few hundred dollars. A larger transformation with waterproof flooring, custom cubbies, new lighting, and built-in cabinetry can cost several thousand.
| Budget Level | Typical Improvements | Best Approach |
|---|---|---|
| Basic Refresh | Paint, hooks, boot trays, simple bench, baskets | Reuse furniture and focus on organization |
| Midrange Makeover | New flooring, wall paneling, cubbies, upgraded lighting | Combine stock cabinets with DIY carpentry |
| Full Transformation | Custom storage, insulation, electrical work, finished walls | DIY cosmetic work and hire licensed trades where necessary |
Start With Basement Moisture Control
No amount of shiplap can negotiate with an active water leak. Before installing flooring, drywall, wooden cabinets, or upholstered cushions, inspect the basement for water intrusion and excessive humidity.
Look for foundation cracks, staining, peeling paint, condensation, musty odors, plumbing leaks, damp corners, efflorescence on masonry, and discoloration behind stored items. Check the area after heavy rain rather than relying on how it looks during a dry afternoon.
The U.S. Environmental Protection Agency emphasizes that controlling moisture is the key to controlling indoor mold. Leaks and water problems should be corrected promptly, wet materials should be dried completely, and moldy porous materials may need to be discarded when they cannot be thoroughly cleaned. Indoor humidity should generally remain below 60 percent, with approximately 30 to 50 percent considered an ideal range.
Depending on the problem, moisture improvements may include repairing gutters, extending downspouts, improving exterior grading, sealing penetrations, fixing plumbing, installing a sump system, or using a properly sized dehumidifier. Serious seepage, repeated flooding, structural cracks, or extensive mold deserves professional evaluation.
Seal Drafts and Rim Joists Carefully
A basement entry can feel chilly because of air leaks around doors, windows, utility penetrations, and rim joists. Weather-strip the exterior door, caulk appropriate gaps, and inspect penetrations around pipes and wiring. ENERGY STAR recommends sealing basement air leaks and insulating rim-joist areas as part of improving comfort and energy performance. Materials and methods must remain compatible with local fire, building, and mechanical requirements.
Choose Mudroom Flooring That Can Handle a Mess
The best basement mudroom flooring is durable, easy to clean, slip-resistant, and appropriate for installation below grade. Wet boots and concrete slabs are not especially forgiving, so moisture-sensitive flooring should be chosen cautiously.
Luxury Vinyl Plank or Tile
Waterproof luxury vinyl plank and luxury vinyl tile are popular options because they can provide a wood or stone appearance without requiring the same maintenance as natural materials. Many products use DIY-friendly click-lock installation, but the concrete must be clean, level, structurally sound, and within the manufacturer’s moisture requirements.
Do not assume a waterproof plank makes the entire floor system waterproof. Water can still travel beneath floating flooring, affect walls, or become trapped against the slab. Follow the installation instructions concerning vapor barriers, underlayment, expansion gaps, floor flatness, and moisture testing.
Porcelain or Ceramic Tile
Tile is durable, easy to mop, and well suited to muddy traffic when installed correctly. Choose a textured or slip-resistant surface rather than a highly polished finish. Dark grout or a medium-toned pattern can conceal everyday dirt between cleanings.
Tile may feel cold in a basement, but washable runners can make the walking area more comfortable. Avoid permanently attaching rugs over any area that is routinely damp.
Sealed Concrete
For a practical and budget-friendly transformation, consider cleaning, repairing, and coating the existing concrete floor. Stained or painted concrete produces a clean industrial look and eliminates layers of moisture-sensitive material.
Surface preparation is critical. Concrete should be dry, clean, sound, and free from dust, loose coatings, oils, mildew, and contaminants before a coating is applied. Use a product specifically approved for the slab’s condition and intended application.
Plan for Possible Flood Exposure
Homes with a history of basement flooding require a more conservative design. Concrete, masonry, certain tiles, and other flood-damage-resistant finishes can be easier to clean and restore than carpet, paper-faced wall coverings, or conventional particleboard furniture. FEMA guidance encourages the use of materials capable of withstanding wet conditions in locations exposed to flood risk.
Prepare the Walls for Daily Wear
Mudroom walls are regularly introduced to wet coats, swinging backpacks, dirty hands, and enthusiastic dogs. Choose finishes that are washable and easy to repair.
After correcting moisture problems, patch damaged surfaces and apply a durable interior paint with good washability. Satin or eggshell paint is often easier to clean than a completely flat finish. For masonry walls, use preparation and coating products designed for concrete or block rather than automatically applying ordinary wall paint.
Wainscoting, beadboard, sealed plywood panels, or carefully installed moisture-tolerant trim can protect the lower wall while adding visual structure. Keep wood components off damp concrete and seal exposed edges. Never cover active mold or moisture staining with paint and hope it develops better manners. Painting over the symptom does not repair the cause.
Build a DIY Mudroom Bench With Storage
A bench is the anchor of most basement mudroom designs. It provides seating, defines the storage zone, and creates space underneath for shoes or bins.
Simple Plywood Bench Design
A straightforward bench can be built from cabinet-grade plywood and solid lumber. The basic structure includes two side panels, a horizontal seat, a lower shelf, and center dividers that create shoe compartments. Add a face frame or edge banding for a finished appearance.
- Cut the side panels, seat, shelf, and dividers.
- Drill pocket holes or prepare another suitable joinery system.
- Assemble the base on a flat surface.
- Check for square before tightening all fasteners.
- Fill holes, sand the surfaces, and apply a durable finish.
- Secure the completed unit appropriately so it cannot shift or tip.
A simple bench can be built as a freestanding project, while a storage cabinet with cubbies can combine footwear storage, coat hooks, and upper compartments in one unit. Existing DIY plans show that useful mudroom furniture does not require elaborate cabinetmaking, although safe fastening and accurate cuts still matter.
Use Open and Closed Storage
Open storage is convenient for frequently used items. Closed cabinets are useful for cleaning supplies, pet food, tools, and visual clutter. A balanced layout might include:
- Open hooks for everyday jackets and backpacks
- Shoe cubbies or removable boot trays below the bench
- Upper cabinets for seasonal gear
- Labeled baskets for gloves, hats, and scarves
- A narrow shelf for keys, sunglasses, and dog-walking supplies
Removable trays and baskets are easier to clean than deep, permanently divided shoe compartments. Leave enough space for tall boots and bulky athletic shoes instead of designing every opening around one elegant pair of loafers.
Attach Hooks and Cabinets Securely
Backpacks and winter coats can place considerable force on hooks. Fasten coat hooks to wall studs or to a securely installed mounting board anchored into framing. Do not rely on decorative trim or weak drywall anchors for heavily loaded storage.
Tall cabinets, shelving units, and freestanding storage furniture should also be anchored securely. The U.S. Consumer Product Safety Commission recommends anchoring furniture with drawers, doors, or shelves to reduce tip-over hazards, particularly in homes with children.
Improve Basement Mudroom Lighting
Basement entrances often feel darker than above-grade rooms. Bright, layered lighting makes the area safer and helps family members distinguish a black glove from the mysterious object beside it.
Use a bright ceiling fixture for general illumination. Add under-cabinet lighting, wall sconces, or LED strip lighting where shadows fall across hooks and cubbies. A light paint color can reflect illumination, while a mirror may help a narrow landing feel more open.
If outlets, switches, or wiring need to be added, hire a qualified electrician unless you are legally permitted and properly trained to perform the work. GFCI protection helps reduce shock risk in locations where moisture may be present, but exact electrical requirements vary by jurisdiction and project conditions. Consult current local codes and obtain permits when required.
Add Practical Mudroom Details
Create a Wet-Gear Zone
Place a washable boot tray near the entrance and install sturdy hooks where wet coats can drip without contacting baskets or unfinished wood. A ventilated rack can hold damp gloves and hats. Families dealing with heavy rain or snow may benefit from a small circulating fan or nearby dehumidifier, provided the equipment is installed and used safely.
Make a Pet Station
Dedicate a lower basket to towels, leashes, waste bags, and grooming supplies. Install one hook specifically for the leash so it does not become emotionally attached to a random coat. A washable mat near the door provides a place to wipe paws before the dog conducts a detailed mud inspection of the rest of the house.
Install a Household Command Area
A narrow bulletin board, dry-erase calendar, mail sorter, or charging shelf can turn the basement mudroom into a useful family command center. Keep electronics away from wet footwear and dripping clothes, and avoid allowing paperwork to accumulate in a basement with uncontrolled humidity.
Use Vertical Space
When floor area is limited, extend storage upward. High shelves and cabinets can hold off-season equipment, extra household supplies, and infrequently used gear. Store heavy objects lower and lightweight items higher. Label opaque containers so nobody must open seven bins to find the winter gloves.
Give the Basement Mudroom Some Personality
A hardworking room does not need to resemble a commercial locker area. Paint the built-ins a deep blue, forest green, charcoal, or warm neutral. Add patterned tile, a striped washable runner, attractive hooks, or contrasting wood accents.
Repeating colors or finishes from the adjoining basement makes the mudroom feel intentional rather than added as an afterthought. Designers frequently combine benches, cubbies, upper cabinets, wall paneling, accent colors, and decorative flooring to balance storage with a welcoming appearance.
Keep decorative objects limited. A mudroom shelf filled with fragile accessories becomes a dust collection service with an unusually complicated business model. Choose a few durable pieces, such as framed artwork, a clock, a mirror, or one easy-care plant if light and temperature conditions are suitable.
Common Basement Mudroom Mistakes to Avoid
- Ignoring moisture: Correct leaks and humidity problems before installing finishes.
- Choosing delicate materials: Avoid surfaces that cannot tolerate mud, water, scratches, or frequent cleaning.
- Building storage that is too small: Measure backpacks, boots, helmets, and sports bags before sizing cubbies.
- Installing too few hooks: Provide extra capacity for visitors and seasonal clothing.
- Blocking utility access: Maintain safe clearance around panels, valves, drains, windows, and mechanical systems.
- Using weak fasteners: Anchor hooks, benches, and tall cabinets into appropriate structural material.
- Forgetting ventilation: Wet gear needs air movement and controlled humidity to dry properly.
- Overdesigning the room: A complicated storage system is useless when family members cannot maintain it.
How to Maintain the Finished Mudroom
Shake or vacuum entry mats weekly and wash boot trays as needed. Wipe benches, cabinet fronts, hooks, and lower walls regularly. Empty individual baskets at the change of each season so swim goggles do not spend December living beside wool mittens.
Monitor the basement for changes in humidity, odors, staining, and condensation. Clean dehumidifier filters and empty or verify drain systems according to the manufacturer’s instructions. Reinspect exterior drainage after storms, and address plumbing leaks promptly.
Once or twice a year, tighten loose hooks, inspect furniture anchors, touch up damaged paint, and donate footwear or outerwear that no longer fits. A mudroom stays organized more easily when its storage capacity is not being tested by six years of forgotten sneakers.
Experience-Based Lessons From a Basement Mudroom Project
A representative basement mudroom transformation often begins with an overly optimistic schedule. The plan says, “Paint Saturday, build the bench Sunday, organize everything before dinner.” Reality introduces a damp corner, an uneven concrete floor, three layers of mystery paint, and a previous owner’s creative interpretation of electrical wiring.
The most valuable lesson is to leave room in the schedule for preparation. Cleaning, measuring, moisture testing, patching, and waiting for surfaces to dry may require more time than installing the visible improvements. That can feel frustrating because preparation does not produce glamorous progress photographs. However, it determines whether the finished room remains attractive six months later.
In a typical small basement landing, the initial concept may include a wall-to-wall built-in with individual lockers. After marking it with painter’s tape, the homeowner often discovers that the planned cabinetry narrows the walkway and makes the exterior door awkward to use. Reducing the storage depth by a few inches and replacing full-height lockers with a bench, hooks, and upper cabinets can produce a far more comfortable result.
Another lesson involves shoe storage. Perfectly divided cubbies look wonderful when they are empty. Once the family begins using them, tall boots do not fit, muddy shoes touch the dividers, and every compartment requires individual cleaning. A combination of wider openings and removable trays usually adapts better to different footwear. The trays can be carried to a sink or outdoor hose rather than scrubbed while kneeling on the basement floor and reconsidering every decision that led to that moment.
Hooks also deserve more attention than expected. Installing one hook per person rarely provides enough capacity. Each person may arrive with a coat, backpack, umbrella, and reusable shopping bag. Adding several extra hooks prevents the bench from becoming the unofficial clothing department. A continuous wood mounting board makes it easier to secure the hooks to framing while creating a neat visual line.
Lighting can dramatically change how the completed mudroom feels. A single old basement bulb may technically illuminate the area, but it can make fresh paint and new cabinets look gloomy. Replacing it with a bright ceiling fixture and adding focused light near the storage wall can make the same space feel cleaner, larger, and safer. Choosing warmer or neutral light rather than an extremely cool industrial tone helps the mudroom connect visually with nearby living areas.
The finishing stage brings a final practical lesson: do not organize everything immediately. Live with the storage layout for a week. Observe which hooks people actually use, where shoes naturally land, and which baskets are inconvenient. Labels should reflect real behavior rather than an imaginary household in which everyone alphabetizes scarves.
After the trial period, adjust the system. Move children’s hooks lower, add a basket for items that need to go upstairs, and create a dedicated container for wet accessories. Small adjustments often improve the room more than another expensive cabinet would.
The best basement mudroom is not the one with the most elaborate built-ins. It is the one that reduces friction during ordinary routines. Shoes come off without blocking the stairs. Backpacks have obvious destinations. Wet coats can dry. The floor can be cleaned quickly. Everyone can find what they need without organizing a search party.
Conclusion
A successful DIY basement mudroom transformation starts below the decorative surface. Control moisture, examine traffic patterns, choose basement-friendly flooring, and build storage around the items your family genuinely uses. Once those fundamentals are addressed, paint, lighting, wall treatments, hardware, and accessories can turn an overlooked entrance into one of the hardest-working areas in the house.
The project does not need custom cabinetry or a massive budget. A durable floor, sturdy bench, well-anchored hooks, removable shoe trays, and a few labeled baskets may be enough to transform daily arrivals. Build for wet boots, heavy bags, growing children, energetic pets, and real human habits. The finished room will be easier to maintainand considerably less likely to resemble the lost-and-found department at a ski resort.