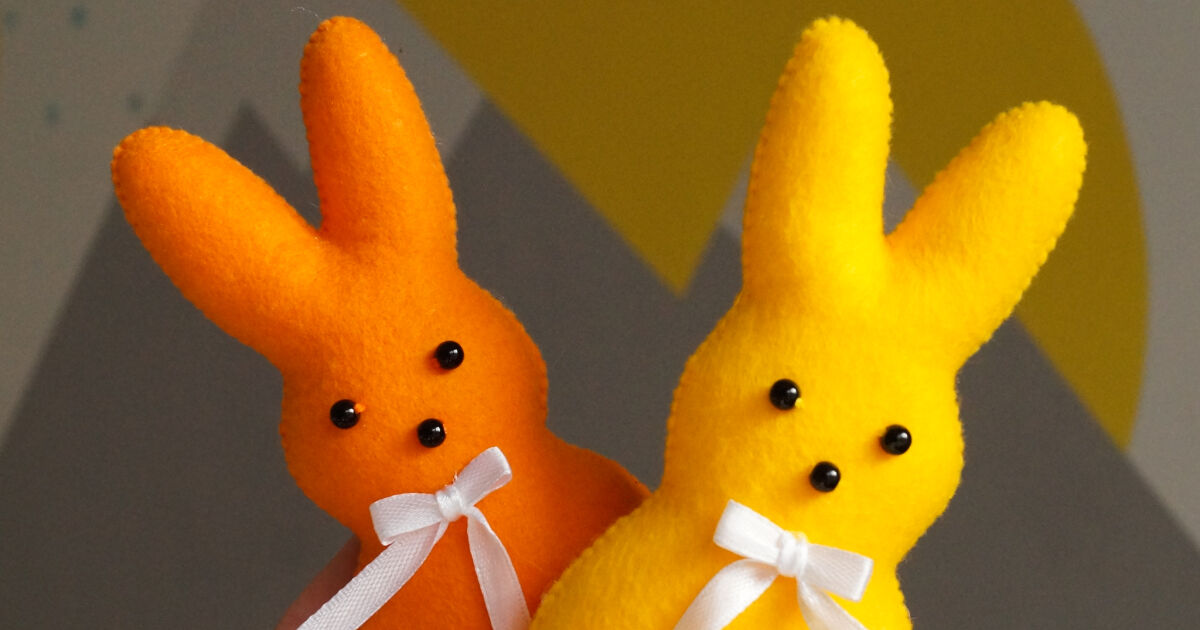
Easter has a sneaky little habit of hopping onto the calendar before the craft table is emotionally prepared. One minute you are calmly drinking coffee in March, and the next minute every store aisle is full of pastel eggs, chocolate rabbits, ribbon, fake grass, and one suspiciously cheerful bunny holding a carrot like it knows your secrets. So this year, instead of panic-buying decorations at the last minute, I decided to make something sweet, soft, and delightfully handmade: cute felt bunnies.
These little Easter felt bunnies are the kind of DIY project that makes your home feel instantly warmer without demanding a professional sewing studio, a giant budget, or the patience of a monastery librarian. They are simple enough for beginners, customizable enough for serious crafters, and charming enough to make guests say, “Wait, you made these?” which is basically the craft-world version of winning an Oscar.
Felt is one of the friendliest materials for Easter crafts because it does not fray like many woven fabrics, holds its shape nicely, comes in every spring color imaginable, and forgives minor mistakes. Slightly uneven ear? That bunny has personality. Tail a little off-center? Clearly, it is mid-hop. The goal is not factory perfection. The goal is cozy handmade charm with a sprinkle of seasonal joy.
Why Felt Bunnies Are Perfect for Easter Decorating
DIY felt bunnies work beautifully because they fit almost anywhere. You can tuck them into Easter baskets, hang them on branches as ornaments, turn them into a garland for the mantel, use them as place cards for Easter brunch, or let them sit proudly on a shelf beside painted eggs and spring flowers. They are small, soft, lightweight, and easy to store for next year, assuming they do not mysteriously migrate into a child’s toy box first.
Another reason felt bunny crafts are so popular is that they balance nostalgia and style. Traditional Easter decor often leans into bunnies, chicks, eggs, baskets, and fresh spring colors. Felt lets you keep those classic symbols while making them look modern, minimal, rustic, vintage, or playful depending on your color choices. White and beige felt creates a soft farmhouse look. Pink, lavender, mint, and yellow feel cheerful and kid-friendly. Brown or caramel felt can mimic the look of a chocolate bunny, except this one will not melt in your hand or disappear before brunch.
Materials You Need for Cute Felt Bunnies
You do not need a complicated supply list to make adorable Easter bunny decorations. The basics are easy to find at craft stores, fabric shops, or in the mysterious craft drawer where old buttons, ribbon scraps, and three lonely googly eyes have been living rent-free since 2019.
Basic Supplies
- Felt sheets in white, cream, gray, brown, pink, or pastel colors
- Embroidery floss or sewing thread
- Needle for hand stitching
- Fabric scissors or sharp craft scissors
- Small amount of stuffing or cotton batting
- Ribbon, twine, or yarn for bows and hanging loops
- Pom-poms or felt circles for tails
- Fabric glue or hot glue for quick details
- Pencil, chalk, or disappearing fabric marker
- Paper or cardstock for making a bunny template
For a cleaner finish, choose wool-blend felt if possible. It tends to look smoother and last longer than very thin craft felt. However, budget-friendly acrylic felt still works well, especially for garlands, party decorations, children’s crafts, and projects where the bunny will live its best short but glorious seasonal life.
Choosing the Right Bunny Shape
The best felt bunny pattern is usually the simplest one. A classic bunny silhouette includes a rounded body, two long ears, and a small tail. You can draw it freehand or trace a printed template. If drawing makes you nervous, start with basic shapes: an oval body, a smaller round head, and two leaf-shaped ears. Suddenly you have a bunny. Art school diploma not required.
For stuffed felt bunnies, cut two identical bunny shapes: one front and one back. For flat ornaments or garlands, one layer of sturdy felt may be enough. For treat holders, pouches, or basket decorations, you can leave an opening at the top or stitch only part of the shape so the bunny can hold candy, name cards, or a tiny paper note. This is where the project becomes both cute and useful, which is more than can be said for some decorative pillows.
Step-by-Step: How to Make Cute Felt Easter Bunnies
Step 1: Create or Print a Bunny Template
Draw your bunny shape on cardstock or thick paper. Keep the edges rounded and avoid tiny complicated details, because felt prefers bold shapes. A bunny with long ears and a plump body is easier to cut, stitch, stuff, and admire dramatically under kitchen lighting.
Step 2: Trace the Pattern onto Felt
Place the template on your felt and trace around it lightly. For each stuffed bunny, trace two pieces. If you are making a garland, trace as many bunnies as you need. Six to ten small felt bunnies usually make a sweet mantel garland, while three larger ones can decorate a basket, wreath, or spring centerpiece.
Step 3: Cut Carefully
Use sharp scissors and cut slowly around the outline. Felt can shift if you rush, so take your time around the ears. Bunny ears are the dramatic hairstyle of the Easter craft world; they deserve respect.
Step 4: Add the Face Before Stuffing
It is easier to add the face before sewing the front and back together. Use embroidery floss for closed sleepy eyes, tiny X-shaped noses, or simple whiskers. You can also glue on small felt circles, beads, or pom-poms, but keep decorations secure if the bunnies will be handled by children. For a polished look, less is often more. A tiny pink nose and two stitched eyes can look sweeter than a face overloaded with sparkle, glitter, and emotional intensity.
Step 5: Stitch the Edges
Place the front and back felt pieces together. Use a blanket stitch, whip stitch, or simple running stitch around the edge. Blanket stitch gives a decorative handmade finish, while whip stitch is quick and beginner-friendly. Leave a small opening for stuffing. This is the moment when your flat bunny starts becoming a real decoration, and you may feel oddly proud. That is normal. The bunny is proud of you too.
Step 6: Add Light Stuffing
Use a small amount of stuffing and push it gently into the ears and body with a pencil end, chopstick, or stuffing tool. Do not overfill. A felt bunny should look softly plump, not like it has been training for a marshmallow bodybuilding competition.
Step 7: Close the Opening
Finish stitching the gap and tie the thread securely. Hide the knot between the felt layers if you can. If not, a small bow or tail can conveniently cover a multitude of tiny craft crimes.
Step 8: Add the Tail and Accessories
A white pom-pom makes the classic fluffy tail. You can also cut a small felt circle, gather it with thread, and stitch it into a soft puff. Add a ribbon bow around the neck, a tiny felt carrot, a flower crown, or a hanging loop. This is where every bunny gets a personality. One may be elegant. One may be rustic. One may look like it runs the Easter egg logistics department.
Design Ideas for Felt Bunny Decorations
Felt Bunny Garland
Cut several flat bunny silhouettes from pastel felt and attach pom-pom tails. Punch small holes near the ears or stitch them onto ribbon, twine, or yarn. Hang the garland across a mantel, window, shelf, or dessert table. Keep the spacing even for a clean look, or vary the colors for a playful handmade style.
Stuffed Felt Bunny Ornaments
Add ribbon loops to small stuffed bunnies and hang them from spring branches in a vase. This creates a charming Easter tree centerpiece that looks festive without taking over the room like a pastel tornado.
Felt Bunny Treat Pouches
Cut a simple bunny pouch shape and stitch the sides, leaving the top open between the ears. Fill it with wrapped candy, stickers, small notes, or tiny toys. These make cute Easter basket additions, classroom treats, or party favors.
Felt Bunny Place Cards
Make small flat bunnies and attach paper name tags to their paws, ears, or ribbon bows. Place one at each Easter brunch setting. It is a lovely detail that says, “I planned this,” even if you were still sweeping jelly beans under the couch ten minutes before guests arrived.
Color Palettes That Make Felt Bunnies Shine
Color choice can completely change the mood of your Easter bunny craft. A soft neutral palette of ivory, oatmeal, gray, and blush pink feels calm and elegant. A candy-colored palette of lavender, mint, yellow, and baby blue feels bright and fun. A woodland palette with tan, moss green, cream, and dusty rose works beautifully for rustic spring decor.
If you want a more modern look, try monochrome bunnies in all white or all beige, then add texture with linen ribbon, jute twine, wooden beads, or small embroidered flowers. If your Easter style is cheerful and maximalist, go ahead and mix patterns, bright felt, and oversized tails. Easter is not exactly known for being shy.
Common Mistakes and How to Avoid Them
The first common mistake is using dull scissors. Dull scissors chew felt instead of cutting it, leaving fuzzy edges that look tired before the bunny has even entered society. Use sharp scissors and reserve them for fabric when possible.
The second mistake is overstuffing. Too much stuffing can stretch the felt and make the seams uneven. Add small amounts at a time and focus on shaping the ears, head, and body gently.
The third mistake is making the pattern too detailed. Tiny feet, thin whisker cutouts, and narrow ears may look cute on paper but become tricky in felt. Simple shapes are easier to sew and often look more stylish.
The fourth mistake is rushing the face. A bunny’s expression changes everything. Before stitching or gluing facial details permanently, place them on the felt and test the look. Move the eyes slightly closer for a sweeter face or farther apart for a more cartoonish style. Yes, you may spend five minutes adjusting a nose by one-eighth of an inch. This is crafting. We do not judge.
How to Display Felt Bunnies Around the House
Felt bunnies can decorate almost every Easter-friendly corner of the home. Place a few in a wooden bowl with painted eggs. Add them to a tiered tray with faux carrots, moss, and mini flowers. Tie them to Easter baskets as reusable name tags. Set one beside each plate for brunch. Attach them to a wreath with ribbon and spring greenery. Hang them from cabinet knobs, drawer pulls, or a decorative branch arrangement.
The trick is to group them intentionally. Three bunnies together look like a sweet little scene. Twelve bunnies scattered randomly may look like they are organizing a takeover. Use odd-numbered groupings, vary heights, and mix felt textures with natural materials such as wood, wicker, linen, and flowers.
Making Felt Bunnies with Kids
This project can be kid-friendly with a few adjustments. Younger children can choose colors, trace templates, glue tails, and decorate faces with adult supervision. Older kids can practice simple hand stitches or make no-sew versions using fabric glue. If using hot glue, sharp scissors, or needles, an adult should handle or closely supervise those steps.
One fun idea is to create a bunny-making station before Easter. Set out pre-cut felt shapes, pom-poms, ribbons, and safe glue options. Let each child design a bunny with its own name and personality. By the end, you will have a tiny felt rabbit family and possibly one bunny wearing six bows and a facial expression that says it has seen things.
Why Handmade Easter Decor Feels Special
Store-bought Easter decorations are convenient, but handmade pieces bring a different kind of joy. They carry small imperfections, personal choices, and memories. A felt bunny made at the kitchen table becomes more than decor. It becomes the thing you remember making while the weather was warming up, the flowers were beginning to bloom, and someone was definitely eating the craft candy before it reached the baskets.
Handmade felt bunnies also support a slower, more meaningful approach to seasonal decorating. Instead of buying a full new set of decorations every year, you can make a few pieces, reuse them, add to the collection, and build a tradition. One year you make bunnies. Next year you add felt carrots. The year after that, maybe embroidered eggs. Eventually, your Easter storage box becomes a soft little museum of springtime creativity.
My Experience Making These Cute Felt Bunnies
When I started making my felt bunnies, I had a very confident plan. I would make a few perfect little rabbits, photograph them beautifully, and casually pretend I am the kind of person whose craft table always looks like a magazine spread. Reality arrived wearing fuzzy slippers. Within ten minutes, I had thread on my sleeve, felt scraps on the floor, and one bunny ear that looked like it had been through a mild weather event.
But that is exactly what made the project fun. Felt is forgiving. If the stitching is not perfectly even, it still looks handmade in a charming way. If the bunny shape is slightly lopsided, it becomes whimsical. If the tail lands a little higher than expected, congratulations, you have created a bunny with attitude.
I found that the best approach was to make one test bunny first. The test bunny taught me several important lessons. First, long skinny ears are adorable but slightly harder to stuff. Second, embroidery floss gives the face a much nicer finish than regular thread. Third, the tail should go on after the body is stuffed, because it is easier to place when the bunny has its final shape. Fourth, a ribbon bow can fix almost anything. This may apply to life in general.
My favorite version was a small cream-colored bunny with blush pink inner ears, sleepy stitched eyes, and a tiny jute bow. It looked soft, simple, and sweet without trying too hard. I placed it in a small basket with faux moss and wooden eggs, and suddenly the whole corner looked ready for Easter brunch. Did I immediately make three more? Absolutely. Crafting confidence is a dangerous thing.
I also experimented with a garland. For that, I skipped stuffing and used flat bunny silhouettes. The flat design was faster, especially for making multiples. I cut each bunny from pastel felt, glued on a white pom-pom tail, and threaded them along a piece of twine. The finished garland looked adorable across a shelf, and it took less time than expected. The biggest challenge was spacing the bunnies evenly, because apparently my eyes believe “even spacing” means “vaguely in the same neighborhood.”
Another thing I loved was how easy it was to personalize the bunnies. One got a floral ribbon. One got a tiny felt carrot. One got embroidered eyelashes and instantly became the dramatic one of the group. I tried adding small felt flowers near the ears, and that gave the bunnies a spring garden feel. For a more natural look, I liked neutral felt with simple stitching. For a cheerful kids’ table, brighter colors worked better.
The project also reminded me that Easter decorating does not need to be expensive or complicated. A few sheets of felt, some thread, and a quiet afternoon can create decorations that feel personal and festive. There is something satisfying about seeing a finished bunny and knowing it came from flat fabric, a paper template, and a bit of patience. It is a tiny transformation, but a happy one.
Would I make these felt bunnies again? Without question. They are budget-friendly, beginner-friendly, and wonderfully reusable. They make great gifts, sweet basket decorations, and charming home accents. They also offer that rare crafting reward: they look impressive, but they do not require advanced skills. That is the dream combination, right behind “the glue gun did not burn my finger” and “I found the scissors on the first try.”
By the time I finished, my Easter decorations felt more personal than anything I could have bought ready-made. The bunnies were not identical, and that made them better. Each one had its own tiny expression, shape, and style. Together, they looked like a cheerful little handmade parade announcing that spring had arrived, Easter was coming, and the craft table had survived another seasonal adventure.
Conclusion
Making cute felt bunnies is one of the sweetest ways to get ready for Easter. The project is simple, affordable, customizable, and full of handmade charm. Whether you sew stuffed bunny ornaments, create a pastel garland, design treat pouches, or make tiny place-card rabbits for brunch, felt gives you endless room to play. With a basic template, soft colors, careful cutting, light stuffing, and a few thoughtful details, you can create Easter decorations that feel warm, personal, and joyfully spring-ready.
The best part is that these DIY Easter felt bunnies do not need to be perfect. In fact, their little quirks are part of the magic. A handmade bunny with slightly uneven ears still brings more personality than a plastic decoration pulled from a shelf. So gather your felt, thread, ribbons, and pom-poms, and let the Easter crafting begin. The bunnies are waiting, and frankly, they look adorable.