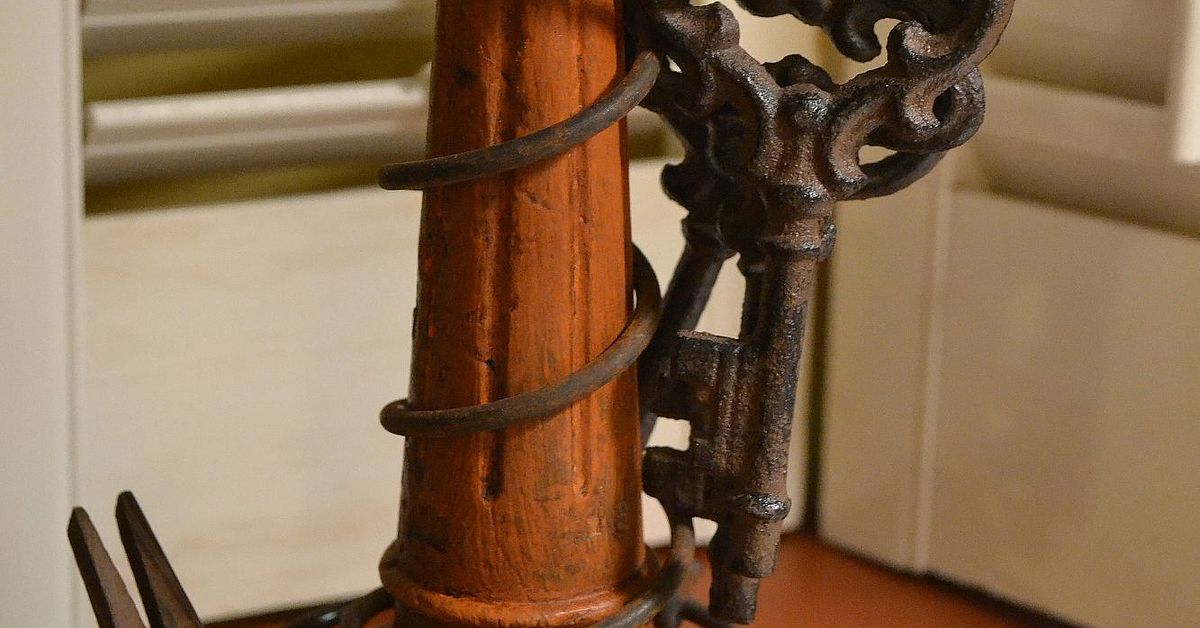
A rusty spring photo display is what happens when an abandoned piece of mattress hardware gets a second career in interior design. Instead of disappearing into a scrap pile, an old coil spriner for family photographs, postcards, recipe cards, wedding snapshots, or tiny works of art.
The original project concept paired a salvaged spring with a decorative stand, vintage keys, and distressed clothespins. The result was simple, inexpensive, and wonderfully imperfectthe decorative equivalent of wearing faded jeans and somehow looking more stylish than everyone else. his guide expands that charming idea into a complete DIY project. You will learn how to choose a usable spring, clean it without erasing its aged appearance, protect the rusty finish, secure the structure, arrange photographs, and customize the display for farmhouse, industrial, vintage, or seasonal decor.
Why Make a Rusty Spring Photo Display?
Traditional picture frames are attractive, but they are not always flexible. Once a photograph is placed behind glass, changing it can feel like a small administrative procedure involving tabs, backing boards, fingerprints, and at least one mysterious piece of cardboard that refuses to return to its original position.
A spring photo holder is different. Photographs attach with small clothespins or clips, so they can be changed in seconds. Similar clip-based displays are often recommended for rotating photographs, postcards, prints, and children’s artwork because they make updates quick and inexpensive. he project also offers several practical advantages:
- It saves useful material. A discarded bed spring becomes decorative rather than becoming scrap metal.
- It fits small spaces. One spring takes up very little tabletop or shelf space.
- It is easy to personalize. The clips, base, finish, photographs, and embellishments can all be changed.
- It displays more than photos. Use it for notes, place cards, seed packets, ticket stubs, or holiday greetings.
- It has genuine texture. Naturally aged metal provides depth that factory-made “distressed” finishes sometimes try very hard to imitate.
Materials and Tools
You do not need an advanced workshop for this rustic photo display. Most versions can be assembled with hand tools and a few inexpensive craft supplies.
Essential Materials
- One vintage mattress or upholstery coil spring
- A stable candleholder, wreath stand, wood block, metal base, or small pedestal
- Three to six miniature wooden clothespins or metal clips
- A wire brush or stiff nylon brush
- Fine- or medium-grit sandpaper
- Dish soap or a mild degreasing cleaner
- Clean rags
- Clear metal sealer in matte, satin, or gloss
- Strong craft adhesive, epoxy, wire, or a mechanical fastener
- Protective gloves and safety glasses
Optional Decorations
- Old keys, washers, gears, tags, buttons, or charms
- Jute twine, ribbon, lace, or thin leather cord
- Distressing stain for new wooden clothespins
- Felt pads for the bottom of the base
- Artificial greenery or dried botanical accents
- Small labels for dates, names, or quotations
How to Make a Rusty Spring Photo Display
1. Select a Spring With Good Structure
Look for a spring that stands reasonably straight and has an attractive hourglass or tapered shape. Surface rust is useful because it provides the aged color associated with rustic decor. Deep corrosion, however, is another matter.
Reject a spring if sections of the wire are nearly rusted through, if the base collapses under light pressure, or if sharp flakes break away when touched. Decorative patina should look old, not behave like a crunchy snack.
Vintage mattress springs can be found at flea markets, architectural salvage stores, estate sales, junk shops, online marketplaces, or inside furniture that is already being responsibly dismantled. Always ask permission before removing hardware from discarded furniture. “But I needed it for a cute craft” is not a recognized exemption from property law.
2. Remove Dirt and Loose Rust
Work outdoors or in a well-ventilated area. Put on gloves and safety glasses, then brush the spring from several angles. The goal is to remove dirt, cobwebs, loose scale, and unstable rust while keeping the solid brown-orange patina attached to the metal.
Manufacturers of metal coatings commonly recommend removing loose rust with a wire brush or sandpaper before cleaning and coating the surface. They also advise allowing the metal to dry completely before applying primer, paint, or sealer. ash the spring with mild soapy water if it is greasy or heavily soiled. Rinse it carefully and dry it immediately. Leave it in a warm, dry location until no moisture remains inside the coils or around the base.
3. Decide How Much Rust to Preserve
There are three main finish options:
- Natural patina: Keep the stable rust color and seal it with a clear coating.
- Partially restored: Remove most of the loose corrosion but leave darker marks and aged texture.
- Painted finish: Use rust-inhibiting primer followed by black, white, bronze, copper, or another decorative color.
For a true rusty spring photo display, the first option usually has the most personality. A matte clear coat preserves the industrial appearance, while satin slightly deepens the color. Gloss creates a more polished finish but can make the spring look wet or lacquered.
Any clear coating may darken rust and increase its sheen because the coating fills the rough surface. Test the product on the least visible section before covering the entire spring. Clear metal coatings work by limiting continued exposure to oxygen and moisture, but they perform best when loose corrosion and contamination have already been removed. 4. Seal the Spring
Place the spring on cardboard or suspend it from a piece of wire. Apply several light coats rather than one heroic coat that immediately runs downhill.
Rotate the spring between applications so the coating reaches the inside and outside of every coil. Follow the manufacturer’s instructions for ventilation, temperature, drying time, and recoating. Allow the finish to cure fully before attaching photographs. A surface can feel dry while still being soft enough to transfer marks onto paper.
Do not use an unsealed spring directly against a white wall, pale tabletop, or fabric-covered shelf. Rust dust has a special talent for finding the one surface you hoped to keep spotless.
5. Choose and Prepare the Base
The base keeps the display upright. A vintage wreath stand or decorative candleholder works well because it already has height and visual interest. A small wood block is easier to find and provides a wider, more stable footprint.
Before attaching anything, place the spring over or on top of the base. Check the proportions from several directions. The base should be wide enough to prevent tipping but not so large that the spring looks like it is standing on a dinner plate.
If you are using wood, sand the edges and apply stain, paint, or clear wax. Dark walnut stain complements orange-brown rust, while distressed white paint creates a brighter farmhouse look. Add felt pads underneath to protect furniture.
6. Attach the Spring Securely
The best attachment method depends on the base.
- For a metal stand: Wrap thin wire around the lowest coil and the stand, tightening it neatly at the back.
- For a wood block: Use sturdy staples, screws with washers, or a small metal bracket.
- For a hollow candleholder: Insert the spring around the central stem and secure it with wire or epoxy.
- For a temporary seasonal display: Use removable wire rather than permanent adhesive.
Hot glue may hold lightweight decorations, but it should not be trusted as the main structural connection. Temperature changes and smooth metal can weaken the bond. Use epoxy or a mechanical fastener when stability matters.
7. Add Clothespins and Decorative Details
Clip miniature clothespins directly onto the coils. Space them around the spring so photographs can face different directions without completely hiding one another.
New wooden clothespins can look suspiciously cheerful next to century-old metal. Age them with diluted brown craft paint, wood stain, or strong tea. Let them dry completely before touching photographs.
Decorate the top of the spring with one or two lightweight objects. Vintage keys are especially effective because their dark metal finish repeats the industrial character of the coil. You could also use a stamped number tag, a tiny brass charm, a wooden heart, or a luggage label.
Resist the urge to attach everything in the junk drawer. A rusty spring is visually interesting on its own. Two old keys look curated; twelve keys, a spoon, three buttons, and a bicycle reflector look like the spring lost a fight with a flea market.
8. Select and Arrange the Photographs
Small prints work best. Try wallet-size photos, square social-media prints, miniature black-and-white portraits, or cropped copies of old family photographs.
Use duplicates rather than irreplaceable originals. Light, heat, damp conditions, and repeated handling can damage photographic materials. The National Archives recommends keeping family photographs in cool, dry conditions and avoiding damp basements, garages, and excessively hot storage areas. or a balanced arrangement, combine:
- One main portrait near the front
- Two smaller images at the sides
- One handwritten note or date card
- One decorative element near the top
Black-and-white or sepia images emphasize the vintage mood. Color photographs create a livelier contrast and keep the project from looking like it was recovered from a haunted attic.
Rusty Spring Photo Display Design Ideas
Farmhouse Family Display
Mount the spring on a distressed white wood block. Add natural jute, stained clothespins, and black-and-white family photos. A small metal number tag can represent a house number, anniversary year, or family size.
Industrial Office Organizer
Use a dark steel base and leave the spring minimally decorated. Clip business cards, appointment reminders, photographs, and short notes around the coils. This version works especially well on a desk beside reclaimed wood or black metal accessories.
Wedding Table Display
Create several matching springs and use them as table-number holders. Add engagement photos, guest names, or short stories about the couple. Make certain the bases are stable enough for crowded tables where elbows, handbags, and enthusiastic dancing relatives may become involved.
Seasonal Photo Holder
Keep the basic spring neutral and change the decorations throughout the year. Add miniature flowers in spring, a tiny flag for summer, dried leaves in fall, or a small ornament during the holidays.
Memory Display
Clip together photographs, handwritten recipes, concert tickets, postcards, and other copied keepsakes from one person, trip, or period of life. Because the clips are removable, the collection can grow without rebuilding the display.
Where to Place the Finished Display
A rusty spring photo display works best where viewers can appreciate its shape from more than one angle. Good locations include:
- A fireplace mantel
- An entryway console
- A bookshelf with vintage books
- A home office desk
- A guest-room nightstand
- A wedding welcome table
- A kitchen shelf holding copied recipe cards
Avoid placing valuable photographs in direct sunlight. Strong light can fade prints over time, and fluctuating temperature or humidity can accelerate deterioration. Common Mistakes to Avoid
Using a Weak Spring
A severely corroded spring may break, shed sharp fragments, or fail to support the clips. Choose structural strength over dramatic decay.
Skipping the Sealer
Unsealed rust can transfer to hands, paper, walls, and furniture. It may also continue flaking. A clear finish makes the display easier to handle and clean.
Attaching Too Many Photos
A small coil spring is not a family reunion database. Three to five images generally create a stronger composition than ten overlapping prints.
Using Original Historical Photographs
Clothespins can leave pressure marks, and exposed prints collect dust and light. Display high-quality copies while storing originals in appropriate archival enclosures.
Ignoring Sharp Edges
Inspect the spring carefully after brushing. File or cover sharp ends, and keep the project out of reach of small children. Tetanus is associated with contaminated wounds, particularly puncture wounds and injuries involving dirt or damaged tissuenot with the color of rust alone. Anyone who receives a deep or dirty puncture should clean the wound and seek appropriate medical guidance regarding tetanus protection. Cleaning and Long-Term Care
Dust the display with a soft brush or dry microfiber cloth. Do not soak it in water or spray household cleaner directly onto the photographs.
Inspect the coating every few months. If fresh orange powder appears or the finish begins to peel, remove the photographs, brush away loose material, clean the affected area, and apply another compatible coat of sealer.
Keep the display indoors unless every componentincluding the base, clips, adhesive, and finishis rated for outdoor exposure. Even then, weather will age the materials faster. Rustic decor enjoys looking weathered; it does not necessarily enjoy actual weather.
Conclusion
A rusty spring photo display proves that meaningful home decor does not need to begin with expensive supplies. A forgotten coil, a stable base, a few clothespins, and several favorite photographs can become a personal accent that feels collected rather than manufactured.
The most successful version balances three qualities: authentic patina, reliable construction, and restrained decoration. Preserve the character of the metal, secure the spring carefully, protect the photographs, and leave enough open space for the coiled shape to remain visible.
Once completed, the display can change whenever your photographs, seasons, or decorating mood changes. It may hold a grandparent’s portrait today, a holiday card next month, and a handwritten reminder tomorrow. Not bad for something that once spent its working life hidden inside a mattress.
Hands-On Experience: What I Learned From Making a Rusty Spring Photo Display
The first lesson I learned was that not every rusty spring is a good rusty spring. My earliest candidate looked fantastic from across the room. It had rich orange coloring, dark patches, and the kind of texture that makes DIY enthusiasts whisper, “Do not clean that too much.” Unfortunately, once I started brushing it, several thin flakes broke away and one section felt noticeably weaker than the rest.
I replaced it with a less dramatic spring that had firm wire and evenly distributed surface rust. That decision made the entire project easier. The second spring stood straighter, accepted the clear coat more evenly, and did not threaten to disintegrate whenever I attached a clothespin.
Cleaning required more patience than force. At first, I brushed aggressively because I assumed every loose-looking spot needed to disappear. I soon realized that overbrushing could remove much of the warm patina that made the spring appealing. A light pass from several angles worked better. I removed powdery corrosion and debris, then stopped when the remaining finish felt stable.
The clear coat changed the color more than expected. Before sealing, the spring looked dusty and pale. After the first satin coat, the rust became deeper, richer, and slightly darker. It was attractive, but it confirmed why testing the finish matters. Someone seeking a completely dry, chalky appearance would probably prefer an extra-flat or matte product.
Attaching the spring to the base was the most important construction step. I initially tried a generous amount of hot glue. It looked secure for approximately the amount of time required to feel proud of myself. Then the spring leaned sideways.
Thin wire produced a much stronger connection. I wrapped it around the bottom coil, passed it through small holes in the wood base, and twisted it tightly underneath. Felt pads concealed the wire ends and prevented scratches. The completed holder could be moved without wobbling, which was reassuring because falling rusty metal is not a decorating style I wanted to introduce.
I also experimented with the number of photographs. Six small prints technically fit, but the result looked crowded and hid the shape of the spring. Four itemsthree photographs and one handwritten date cardcreated a better balance. The display still communicated a story without becoming a tiny paper traffic jam.
Black-and-white copies were the most visually successful. Their neutral tones worked with the rust, stained wood, and aged clothespins. One color photograph also looked good when placed at the front as the focal point. Mixing one color image with two monochrome prints gave the arrangement energy without making it feel disconnected.
The final surprise was how useful the display became after the novelty of the project wore off. I originally treated it as permanent decor, but the clothespins encouraged frequent changes. It held family photos, a birthday card, a small calendar page, and even a grocery note that looked far more distinguished than its contents deserved.
My strongest recommendation is to build the display for flexibility. Use removable clips, avoid permanently gluing photographs, and choose a neutral base that works throughout the year. The rusty spring already has plenty of personality. Everything added to it should support that character rather than compete for attention.
Note: Wear gloves and eye protection when cleaning salvaged metal. Use copied photographs rather than irreplaceable originals, and follow all safety and ventilation instructions supplied with coatings, adhesives, and cleaning products.